
Boho Crochet Granny Wristlet

PIN it here!
Spring markets are just around the corner and it’s time to start prepping!
This post may contain affiliate links that help me continue to post free content. To skip the ads and have a printable pdf of this pattern, you can find it for relatively little cost in both my Etsy and Ravlery shops.
they’re a bestseller
Spring is just around the corner and it’s a great time to start working on inventory for your upcoming craft fairs. As I’ve mentioned in the past, I make almost as much money at my Spring and Summer markets as I do in the colder months, and a large part of the reason is because of these little wristlets. They are by far one of my best-selling items at all craft fairs, but especially in the warmer months.
They’re quick and easy
These bags are the perfect size for running errands. It’s just the right size to fit all the necessities and can be carried as a clutch or on the wrist. My customers absolutely love them and I sell out every year. Add to the fact that they are super quick and easy to whip up and I think you will love adding them to your inventory.
They’re versatile
This bag can technically be made using any size yarn and any size hook. My personal favorite materials for this bag are Bernat Home Maker Dec yarn for the body of the bag and 100% cotton for the tassel. The Home Maker yarn is 100% tubular cotton with a polyfill center, making the bag very sturdy and giving it a beautiful stitch definition. You could also realistically use a similiar yarn I have found on Amazon, or even regular acrylic yarn for the bag body. I do recommend sticking with a 100% cotton for the tassel, however.
think outside the box!
Another favorite way I like to make this is to double up cotton or cotton blends. This bag really shines when it is made out of sturdy crochet fabric. I like to double up Lion Brand’s Comfy Cotton Blend (which has apparently been discontinued) with Peaches N’ Creme 100% cotton. The Comfy Cotton is technically a size 3 DK weight yarn and the Peaches N’ Creme is a size 4 worsted weight yarn, but they are actually just the right thickness when put together, in my opinion.

Pictured above is the doubled Comfy Cotton in the color Chai Latte with Peaches N Creme in the color Ecru. I made the wristlet into a crochet I-cord with doubled strands of the Ecru.
Since the bag is so versatile, I will be giving you the math necessary to create the bag using any yarn, but I will be giving you my stitch counts to help you visualize the math. My stitch counts reflect the bag being made with the Home Maker yarn and a size 6.0 mm hook, but be sure to stop and measure when I instruct you throughout the pattern to make sure your bag fits appropriately. You definitely don’t want it to be too big or the canvas bag will look odd inside of it.
Just a heads up!
You may notice that I instruct you to do some very unique joins and shorter beginning chains than what you might be used to in this pattern. The techniques I use in this design are to help make your bag as seamless as possible. Even the most experienced crocheter will have trouble finding the seam in this project! If you are struggling with the advanced techniques, simply do a regular slip stitch. Just know your seam will be visible when you do.
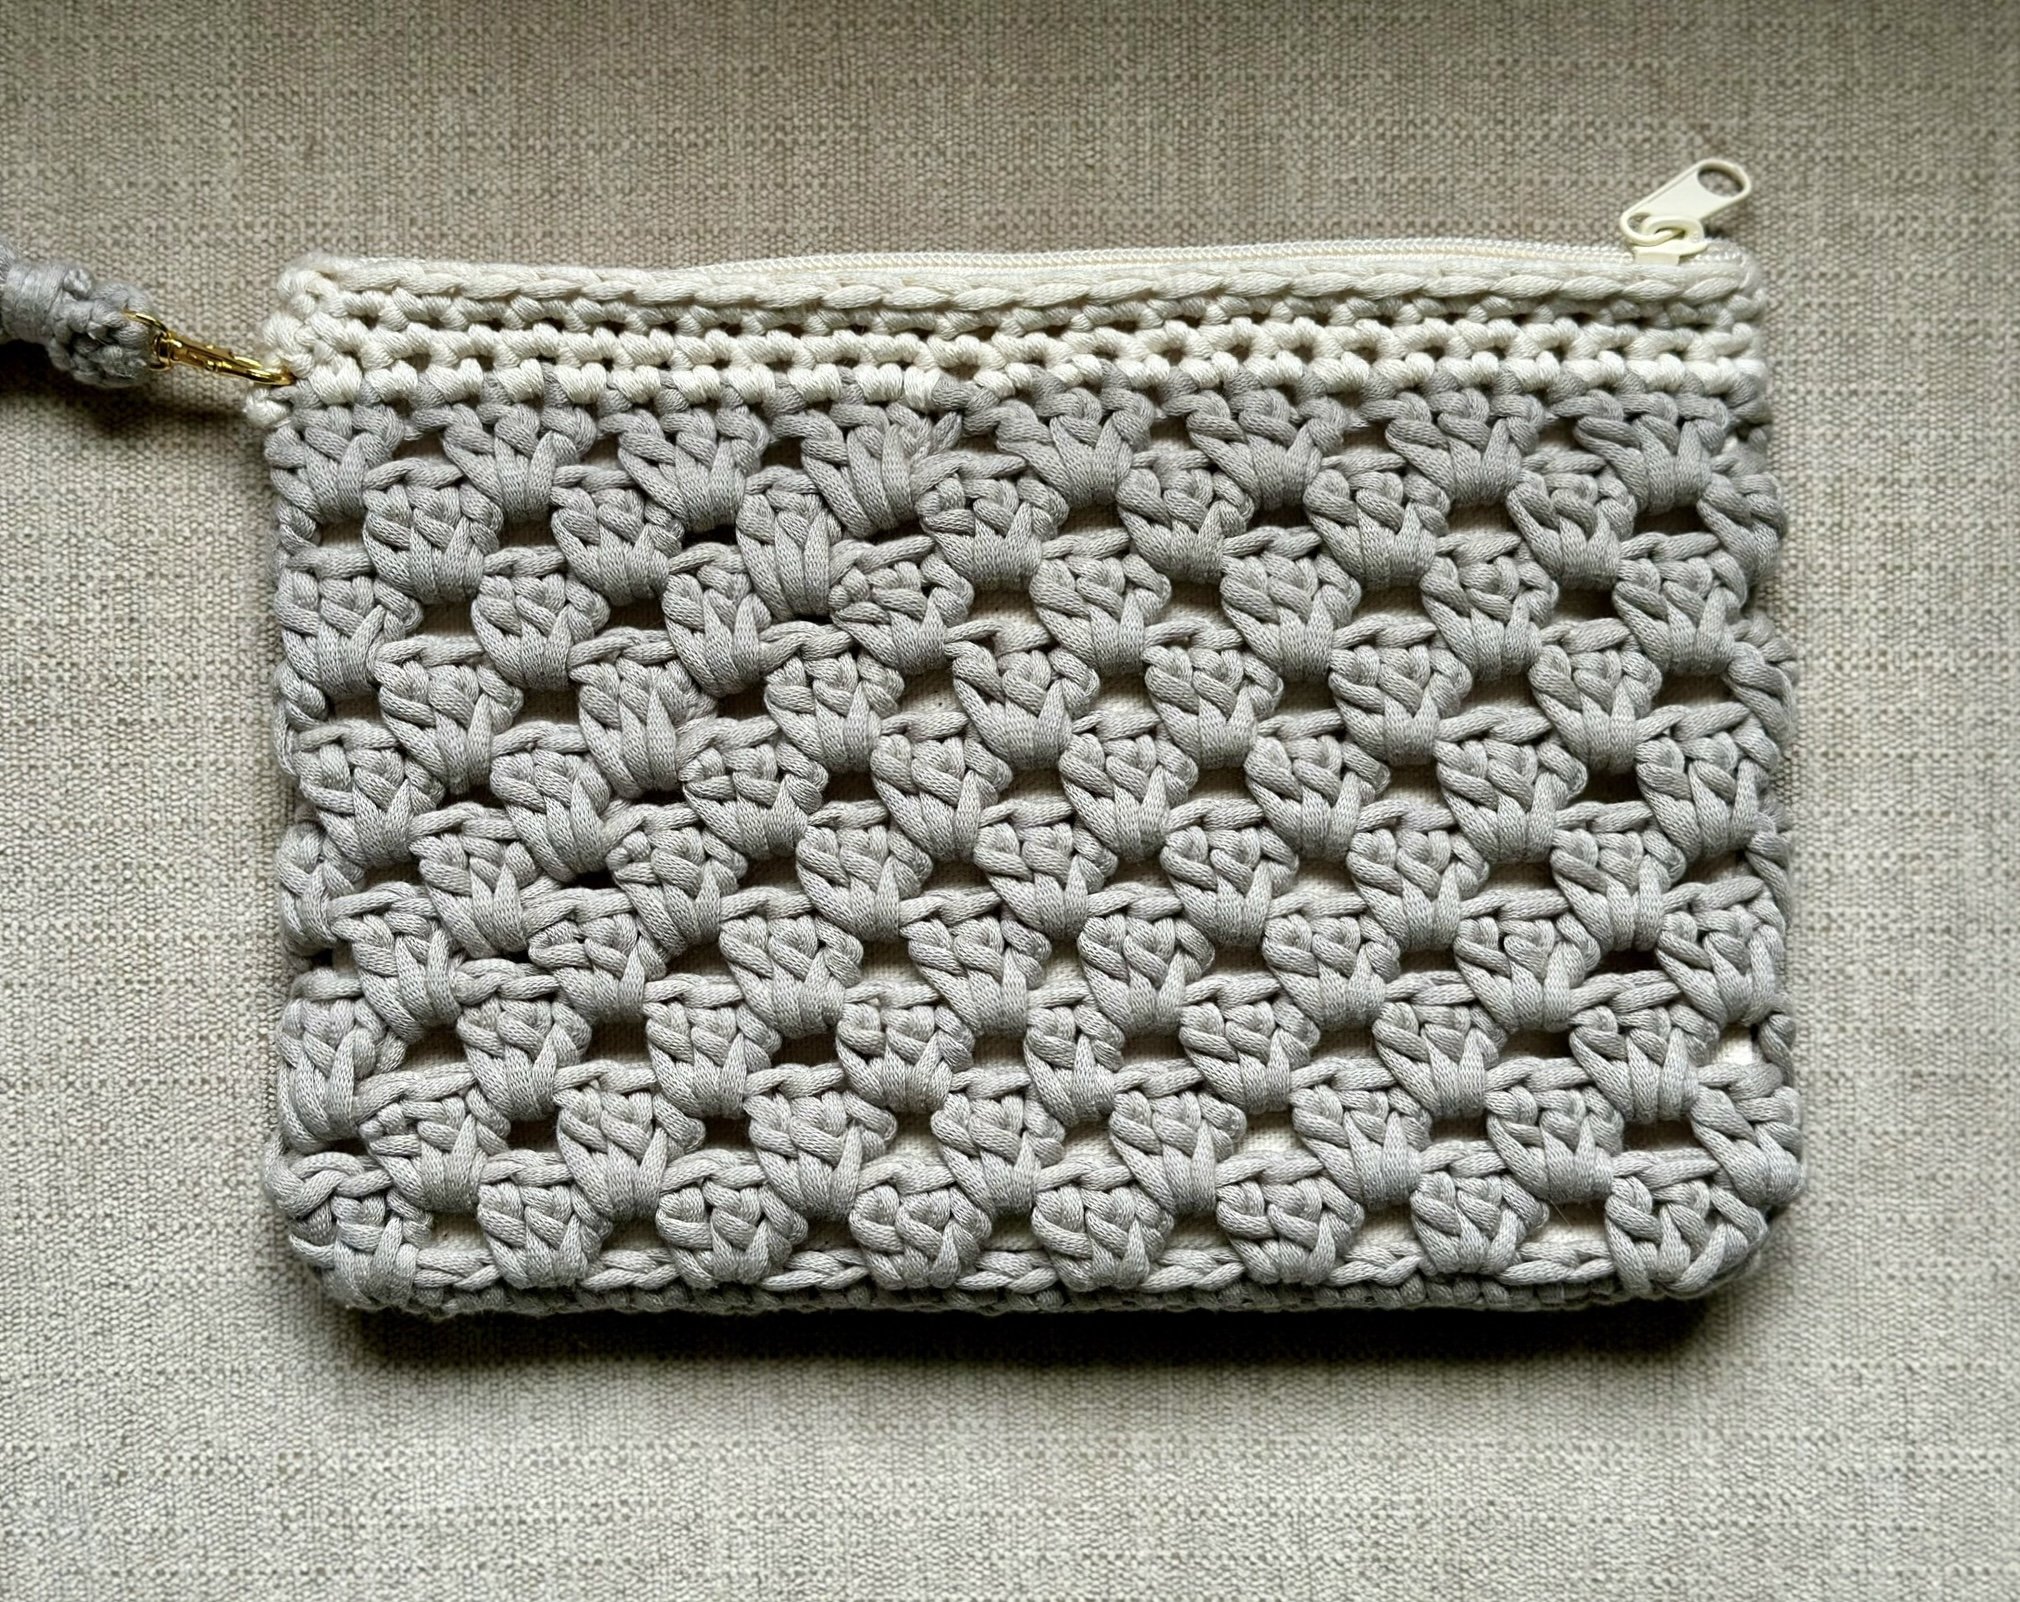
Can you spot the seam from the rounds of Granny Clusters?

The seam follows the arrow shown in the photo above. Crazy, right? The combination of the beginning chain-1 and the Invisible Slip Stitch creates a virtually seamless join. (P.S. I know I missed a stitch at the bottom. I just didn’t care LOL!)

You won’t use the MISS joining method until you get to the band at the top of the bag. Pictured above is the seam created by using the MISS and the Invisible Join (in the very last round). As you can see, it’s almost completely invisible!
important notes
The canvas bag in this pattern is necessary for this bag to be functional. You could realistically line the bag with fabric, but it will be a better finished product if you use the canvas bag.
You want your crocheted bag to fit very snugly over the canvas bag. You do not want it to be loose or it will look sloppy.
Because I am using some advanced and unique techniques, I have included a YouTube video tutorial to help with the most difficult portions of the pattern. You can watch it below, and I have linked it in specific portions throughout the pattern.
supplies needed
100-110 yards of yarn of your choice for the bag body (I'm using Bernat Home Maker Dec yarn in the color Clay for this tutorial)
25-30 yards of yarn of your choice for the bag band at the top (I'm using Bernat Home Maker Dec yarn in the color Cream for this tutorial)
15-20 yards in the cotton yarn of your choice for the tassel (I do recommend using 100% cotton for the tassel! I'm using Peaches N' Cream in the color Ecru)
Size 6.0 mm hook (or the size of choice if you choose to make it by the stitch multiples)
5-inch piece of cardboard for the tassel (I just wrap my fingers)
40 mm wooden ring (optional)
14 mm wooden bead (optional)
small lobster clasp for wristlet strap (optional)
Hot glue gun and glue sticks
9 x 7 inch zippered canvas bag in a cream color (NOT optional for this bag!)
Scissors, yarn needle, tape measure
terms used and abbreviations
Back Loop Only - BLO
Chain - ch
Double Crochet - dc
Granny Cluster - GC
Repeat - Rep
Single Crochet - sc
Skip - sk
Slip Stitch - sl st
Space(s) - sp(s)
Stitch(es) - st(s)
Yarn Over - YO
* - Repeat directions given from *
[ ] - Indicates the number of stitches you should have
( ) - Indicates a note
{ } - Work stitches within { } in the same stitch or space
Special Terms and Abbreviations
Granny Cluster (GC) - 3 dc in the same st or sp.
Invisible Sl St - Take working yarn tail to back of work. Remove hook from working loop. Insert hook from back to front in first st of round and place working loop onto your hook. Draw working loop to back of work and continue as usual. To visualize this process, see my video.
Modified Invisible Sl St (MISS) - Take working yarn tail to back of work. Remove hook from working loop. Skip over the beginning ch-1 and insert hook from back to front in next st of round and place working loop onto your hook. Draw working loop to back of work. Insert your hook under the working loop in the front of your piece, just above the ch-1. Add working loop to hook in the back of your piece, YO, draw through both loops on your hook. To visualize this process, see my video.
Invisible Join - Complete your last st of the round as usual. Leaving a longer tail, cut your working yarn. Pull that tail all the way through your last st (without doing the usual ch 1). Thread tail onto a yarn needle. Going under both loops of the first st of the round, take the yarn needle from front to back. Insert your needle from top to bottom of the BLO of your last st of the round. Weave in this tail extremely well since you are not making a knot of any kind to secure. To visualize this process, see my video.
Gauge
Gauge is not imperative for this project due to the use of stitch multiples and measurements. I have included my stitch counts to help you visualize the math.
Finished Measurements
Finished wristlet measures slightly larger than the canvas bag, about 9.5 x 7.5 inches. The wristlet can be made to any size, but I recommend a length of approx. 13-14 inches.
Instructions
Bag is made in the round from the bottom up, adding the canvas bag as a liner and the embellishments last.
Ch in multiples of 3+1 until your chain is approx. 2 inches (5 cm) shorter than the length of your canvas bag. My foundation ch was 22. Click here to visualize this portion.
Round 1: Sc in the 2nd ch from your hook and in each st across. Turn your work so that you are working down the opposite side of the foundation ch and sc in each st to end. Join with a sl st in the first sc. NOTE: Each foundation ch should be sharing 2 sc, except the turning ch. [42 sc]
Round 2: Ch 1 (does not count as a st), GC in same st as joining, sk next 2 sts, * GC, sk next 2 sts; rep from * to next corner of bag, {GC, ch 1, GC} in corner st, sk next 2 sts, ** GC, sk next 2 sts; rep from ** to end, {GC, ch 1} in same st as beginning GC. Join with an Invisible Sl St. [16 GC, 2 ch-1 sps]
From here on out you will be working in the sp between the GC below. You will always place your first GC in the sp between the first and last GC of the round below.
Round 3: Ch 1 (does not count as a st), GC in each sp around. Join with an Invisible Sl St. [16 GC]
Rep Round 3 until you have 1.5 inches (4 cm) left at the top of your bag. For me, that was a total of 10 rounds of GC. You will join with a regular sl st on your last round of GC and fasten off, weaving in your end tail.
Check the fit of the bag prior to moving on! You want it to be snug. See my video here.
Now we will add a few rounds of sc at the top of the bag to add a bit of visual interest and create smaller holes so the hot glue doesn’t leak through.
Change colors to the color of your choice and join in either corner of the bag.
Round 1: Ch 1 (this will count as half of our first sc), sc in the NEXT st and in each st to end. Sk over the beginning ch 1 and join with a MISS in the next sc. [48 sc]
Rounds 2-3: Rep round 1. Be sure to place the canvas bag inside to double check the fit prior to fastening off. On your last round, you will join with an Invisible Join instead of a MISS.
glue your bags together
Line up the last round of your band with the zipper lip of the canvas bag. Making sure your bags are centered and evenly placed together, hot glue your crochet portion to your canvas bag under the last round. Be sure you don’t use too much hot glue! To visualize this process, see my video.
Add your embellishments
I like to add a beaded tassel to the front of the bag. You will want to watch the video to see my exact steps outlined below.
Cut 2 lengths of your cotton yarn, approx. 10 inches each. Grab your wooden ring. Using the Larks Knot, attach both pieces to the wooden ring opposite of each other (think north and south).
Using a yarn needle and either strand on the wooden ring, sew the wooden ring to the bag at the level of the first round of the band. Weave the tails to the underside of the wooden ring and tie in a knot several times to secure, cutting off the excess.
Thread both ends of the remaining strand through a yarn needle and add your wooden bead. Slide the bead upwards until it is flush against the wooden ring. Set aside for now.
Using your fingers or a 5-inch piece of cardboard, wrap your yarn 20 times. Cut bottoms to create tassel tails.
Grab your bag once more. Open the tails below the wooden bead and place your tassel tails in the center, using the tails below the wooden bead to tie around the tails several times to secure.
Cut another length of yarn approx. 10 inches in length. Using the Gathering Knot, wrap around the top of the tassel to secure the tails in place. DO NOT cut the excess like you normally would.
Use the same tails from the Gathering Knot to tie the tassel TO the bag on the underside of the tassel so it doesn’t flop around when in use. Knot several times and hide within the tassel if necessary. Carefully cut the bottom of your tassel so that all ends are even.
Add a wristlet strap
I have several different straps I like to do depending on which material I am using. I do recommend using doubled cotton in a darker color (when possible) so it will be sturdier and not as noticeably soiled when in use.
For a Romanian Cord strap, click here. NOTE: I don’t really use this for a wristlet, but usually for purse straps. I still think it would make a nice wristlet, however. I do not have a photo since I don’t use it for this purpose.
For a Half Double Herringbone strap tutorial, click here.

Pictured above is the Half Double Herringbone wristlet I use the most with these bags.
For a crocheted I-cord tutorial, click here.

Pictured above is the crocheted I-cord made with double strands of Peaches N Creme cotton.
Once you make your wristlet strap, simply hook it onto the post of one of the corner sc in the band at the top of the bag. I don’t bother using a keyring, but you could if you wanted to.

That’s it! You are done!
Pricing for your markets
Pricing these little bags will vary based on your target customer base and what they are willing to pay. As a general rule, I have no trouble selling these for $20-$25 each. I like to display them on the shelves of my display racks with some simple wire photo stands. I get them off of Amazon and they are perfect for displaying bags at markets. I highly recommend them!
Did you enjoy this project? Let me know in the comments!
Happy hooking!
~Dana
Please note that you do not have my permission to sell, illegally share, copy, or duplicate this pattern or use my photos in any way. Please do not use this pattern for a video, blog, or class tutorial. Thank you so much for following these simple rules!
