
Snowdrift Beanie

PIN it here!
I’ve been super quiet lately and I thought it would be a good time to post a new free pattern. I have been working VERY hard on some behind-the-scenes stuff that has eaten up all my time, but I wanted to get a fun and quick vendor market prep hat out there for those of you who are market prepping.
This post may contain affiliate links that help me be able to continue to post free content. To skip the ads and have an ad-free printable pdf of this pattern, you can find it in both my Etsy and Ravlery shops.
I’m also trying to market prep on the side and I whipped this design up one day while trying to come up with some new merchandise to offer at my huge event in October. I discovered that this hat only takes me 35 minutes from start to finish, making it the fastest hat to date that I’ve designed for market prep—WOOT!
It works up so quickly thanks to my 2 favorite things: super bulky weight yarn and a big ol’ hook! I recently purchased a new super bulky weight yarn from Hobby Lobby called Yarn Bee Dream Supreme, and let me tell you, it definitely lives up to its name! It is a dreamy, soft yarn that appears to be anti-pilling, and the best part is the yardage. There is just enough in one ball to make 2 of these hats! CHA-CHING! That means if you buy it on sale for 30% off (every other week at HL), you can make this hat for as little as $3.50! You do have to be very mindful to meet my gauge, however, as there is just enough.
I recommend selling these hats for $30, meaning you can potentially make $53 out of 1 ball of this yarn! I am super excited about this if you can’t tell LOL!
I designed this hat to have sort of ‘faux’ post work. I instruct you to work in the back loops so that you can jump down and work into the remaining front loops on the next round. This makes it look like post stitches without the bulk of post stitches. It adds some visual interest without uncomfortable bulkiness, as this is a super bulky weight yarn.
You can also realistically use Lion Brand’s Woolease Thick and Quick for this project, but if you do, I recommend only doing 1 round of single crochet at the band (near the end of the pattern) because 2 would probably make it too big. Again, gauge is your friend here!
Aaaaand last but not least, I have also made you a YouTube video tutorial to go with this for those of you who are visual learners. It is a bit tricky in places, so I thought it might come in handy for clarification.
Before we jump into the pattern, I also wanted to let you know that I have recently released an e-book on market prepping that is packed with some cool stuff! It not only has the patterns for my top 20 best sellers (which alone are worth $80), it is loaded with my tips and advice for making your booth really shine and making the most money at markets. You can sign up for it on my homepage here on my website, or you can purchase on Etsy if you are more comfortable going that route.

If you are wondering what the 2 little blue ones are in the bottom left, they are digital pricing calculators to help you decide on what to price your items for. It also comes with Inventory Tracker Sheets, a Market Day checklist, 10 color inspiration charts, and 5 chapters of advice and tips from yours truly!
Enough of my rambling! Let’s make this thing!
Supplies Needed
-75-85 yds. of super bulky weight (size 6) yarn (my favorite is Yarn Bee Dream Supreme and Lion Brand Woolease Thick & Quick)
-Size 9.0 mm hook or size needed to obtain gauge
-Scissors, yarn needle, tape measure
Terms Used and Abbreviations
Back Loop Only - BLO
Chain - ch
Double Crochet - dc
Double Crochet 2 Together - dc2tog
Front Loop Only - FLO
Half Double Crochet - hdc
Half Double Crochet 2 Together - hdc2tog
Repeat - rep
Single Crochet - sc
Skip (sk)
Slip Stitch - sl st
Stitch(es) - st(s)
Special Stitches
Hdc 3rd loop: The st itself is worked the same, but the place where you insert your hook is slightly different. Please see my YouTube video demonstrating this method here.
Invisible sl st: Remove hook from working loop. Take working yarn tail to back of work. Insert hook from back to front in first st of round and hook working loop onto your hook. Draw working loop to back of work and continue as usual. To visualize this process, see my video.
Gauge
8 hdc and 5 rows = 4"
Finished Measurements
Designed to fit an adult head, sized 21-23" (53-58 cm) circumference and 8-8.5" (20-22 cm) in length.
Pattern Notes
-The first st of every round is always the same st as joining.
-Beginning chs will not count as a st throughout.
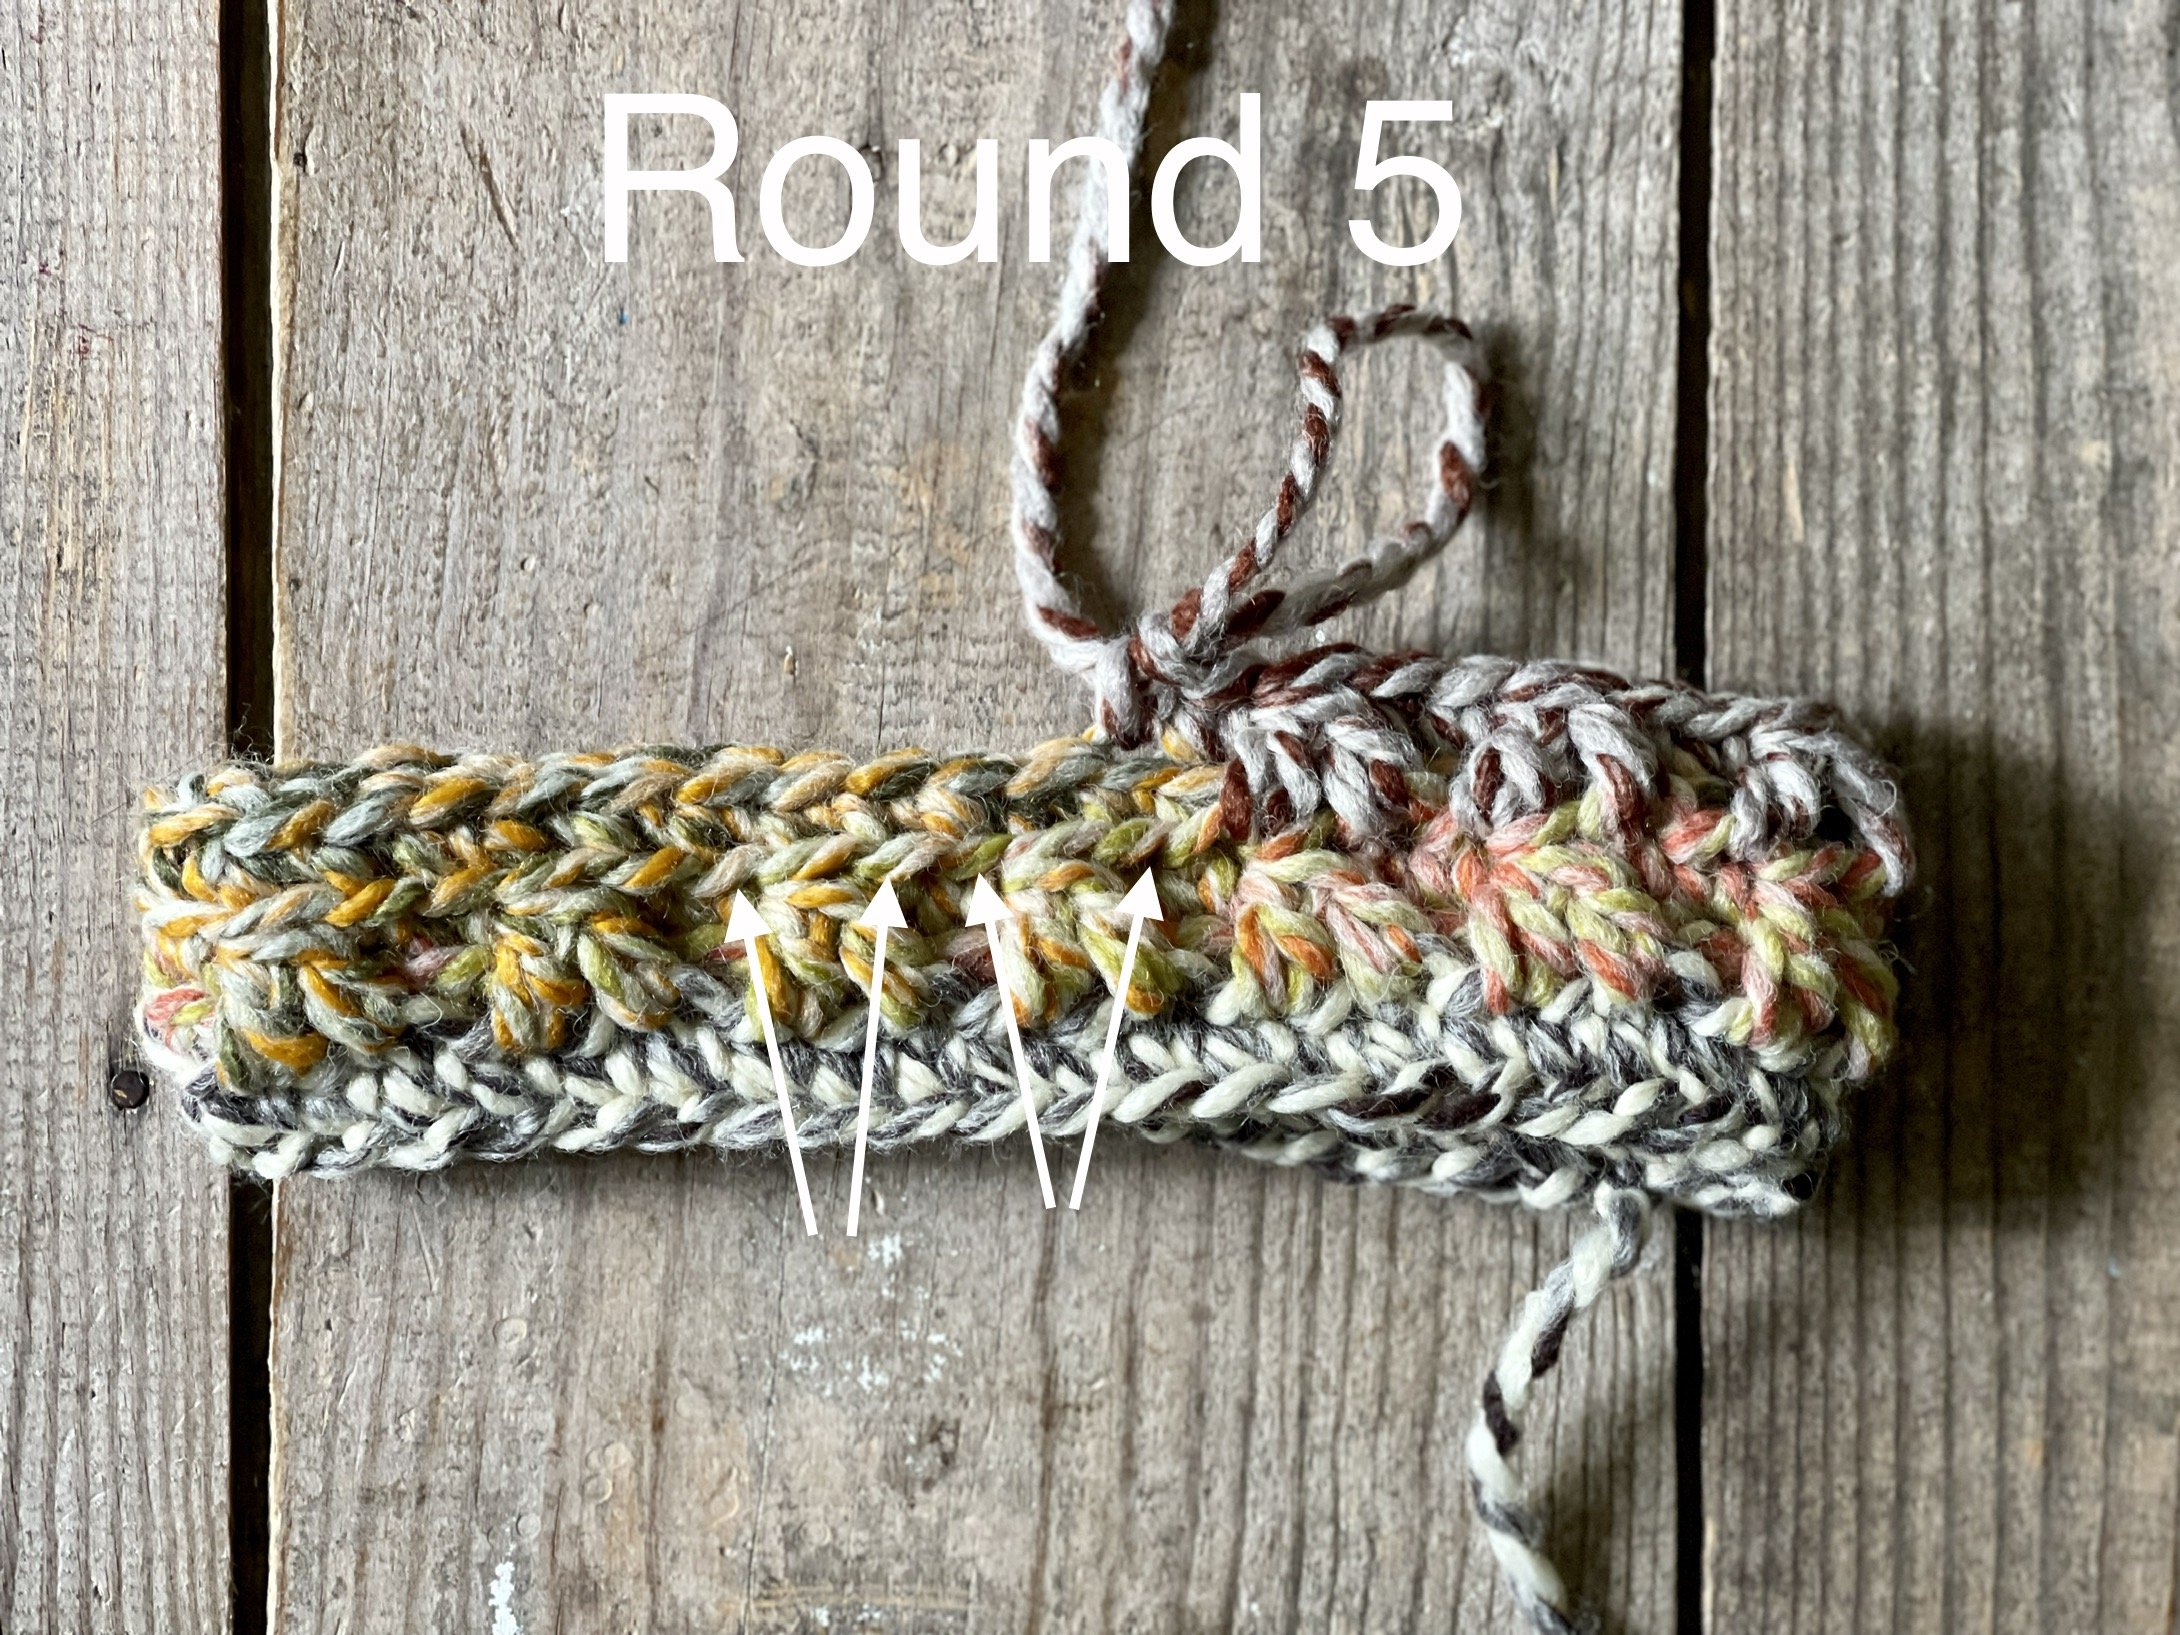
-When completing Rounds 3 and 5, you will be working your sts into the remaining front loops 2 rounds below the round you are on. This creates the look of post sts without all the bulk of post sts. You will be essentially moving backwards and forwards, making a dc2tog over 2 remaining loops and skipping a remaining loop in between to make it have a pointed appearance at the top of the st. In Round 3, I instruct you to dc2tog over the “first and the third” remaining loop in round 3 in order to help you understand where to place your sts. You will essentially be looking at the sts in groups of 3 to help you know where to place your sts. When you get to Round 5, you will be placing your dc2tog st before and after the point of the dc2tog below to “line up” your points. Since this concept was a bit difficult to verbalize, I have made a YouTube video tutorial to help.
Instructions
Hat is worked from the bottom up in the round, adding finishing round(s) to the bottom once the hat is completed to clean up the foundation round.
Round 1: Ch 42, being very careful not to twist your ch join with a sl st in the BLO of the first st to form a ring. Working in the BLO, ch 1, sc in each st around. Join with an invisible sl st. [42 sc BLO]
Round 2: Ch 1, working through BLO sc in each st around. Join with an invisible sl st. [42 sc BLO]
Round 3: Ch 1, sc BLO in first 2 sts, working in the remaining loops 2 rounds below dc2tog over the first and third remaining loops (see pattern notes), sk st behind st you just made, * sc BLO in next 2 sts, working in the remaining loops 2 rounds below dc2tog over the first and third remaining loop, sk st behind st you just made; rep from * to end. Join with an invisible sl st in first sc. [28 sc BLO, 14 dc] To visualize this round, see my video.

Round 4: Rep round 2. When finishing this round, make a regular sl st into the first 2 sts of the round. This will slightly shift our work so that our stitches line up correctly in the next round. The first st of the next round will still be the last st you joined in.
Round 5: Ch 1, sc BLO in first 2 sts, working in the remaining loops 2 rounds below dc2tog over the the remaining loops before and after the dc2tog st below (see pattern notes), sk st behind st you just made, * sc BLO in next 2 sts, working in the remaining loops 2 rounds below dc2tog over the the remaining loops before and after the dc2tog st below, sk st behind st you just made; rep from * to end. Join with an invisible sl st in first sc. [28 sc BLO, 14 dc] To visualize this round, see my video.
Round 6: Ch 2, working in the BLO hdc in each st around. Join with an invisible sl st in first hdc. [42 hdc BLO]
Round 7: Ch 2, working in the 3rd loops hdc2tog over first 2 sts, hdc in next 19 sts, hdc2tog over next 2 sts, hdc to end. Join with an invisible sl st in first hdc. [40 hdc 3rd loop]
Round 8: Ch 2, working through the 3rd loops hdc in each st to end. Join with a normal sl st in first hdc. [40 hdc 3rd loop]
Round 9: Ch 2, working through both loops hdc in first 3 sts, hdc2tog, * hdc next 3 sts, hdc2tog; rep from * to end. Join with a sl st in first hdc. [32 hdc]
Round 10: Ch 2, hdc in first 2 sts, hdc2tog, * hdc next 2 sts, hdc2tog; rep from * to end. Join with a sl st in first hdc. [24 hdc]
Round 11: Ch 2, hdc in first st, hdc2tog, * hdc next st, hdc2tog; rep from * to end. Join with a sl st in first hdc. [16 hdc] NOTE: If you wish to have a messy bun hat, stop here and sk to Round 13.
Round 12: Ch 2, hdc2tog around. Join with a sl st in first hdc. [8 hdc]
FO, leaving a longer tail for sewing purposes. Thread tail onto yarn needle and whip st through the FLO of round 13 and cinch hat closed. Take tail inside and knot off, adding pom button with remaining excess if desired.
Round 13: Join in any st of Round 1, ch 1 and sc in each st around. If desired, make your sts into the ‘back hump’ of the foundation ch so the remaining FLO makes a ribbed edge. [42 sc]
Measure the length of your hat before moving on. If it measures 8", stop here.
Round 14: Ch1, sc BLO in each st around. Join with an invisible sl st. [42 sc BLO]
FO and weave in all tails.
Your Snowdrift Beanie is complete! I would love to see your finished work! If you want to tag me on IG, I’m @dayscrochetnc. You could also use the hashtag #snowdriftbeanie to follow what others are making. I can’t wait to see your projects! If you would like to see other versions that I will be making after this publication, be sure to check me out on IG!
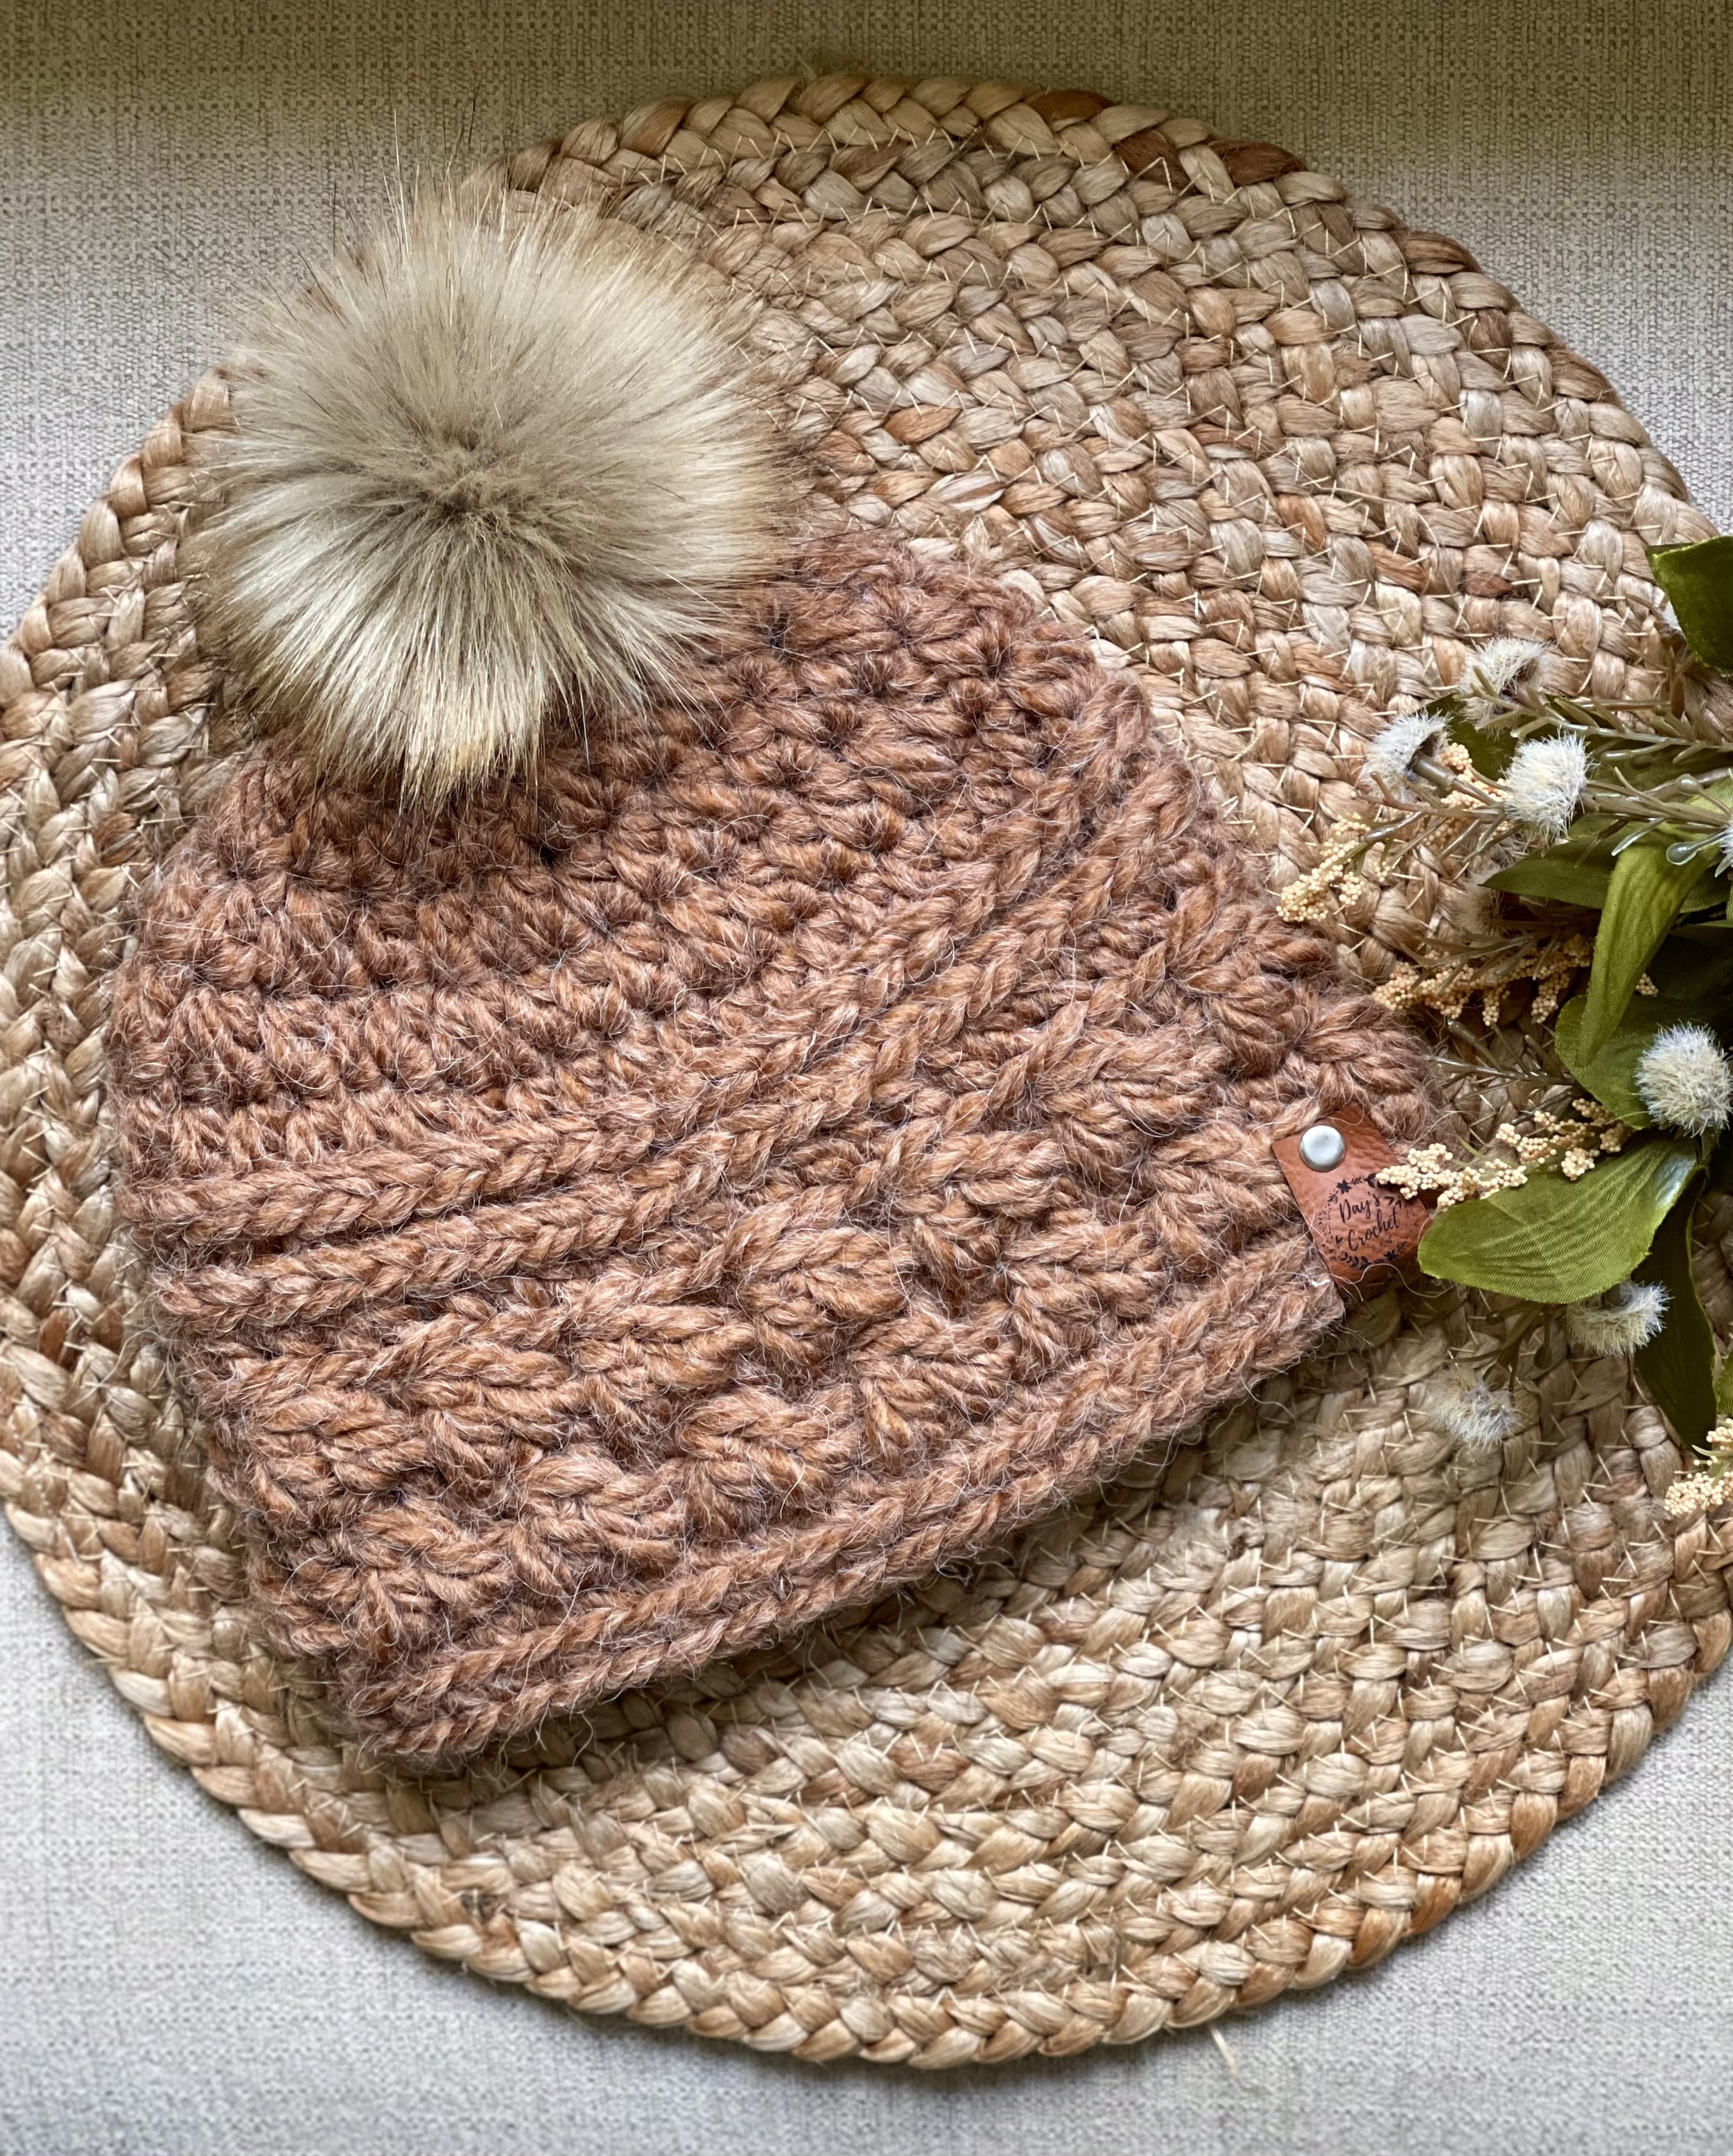
This gorgeous yarn is also from Hobby Lobby and is a Yarn Bee brand, but I forgot to write down the name of the yarn. I do know it has some Alpalca in it, making it soft and fuzzy and absolutely gorgeous! It is slightly more per hat to make (still less than $5 a hat), but honestly, totally worth it! Be prepared to get a little fuzzy when using it, though.
Please note that you do not have my permission to sell, share, copy, or duplicate this pattern or my photos in any way. Please do not use this pattern for a video, blog, or class tutorial. Thank you so much for following these simple rules! Please message me on Facebook or send me an email at dayscrochetnc@gmail.com with any questions.

I made this one with Lion Brand’s Woolease Thick and Quick in the color Fossil. It has consistently been my best-selling colorway in hats every year for the past 4 years! It’s not surprising, as it is GORGEOUS!
Come join my Facebook group, Crochet for Days! We have a lot of fun and I often offer discounts and coupon codes to my members that I don’t offer anywhere else! Request to join and answer the questions by following this link.
What did you think of this project? Did you enjoy making it?
Let me know in the comments!
Happy hooking!
~Dana