
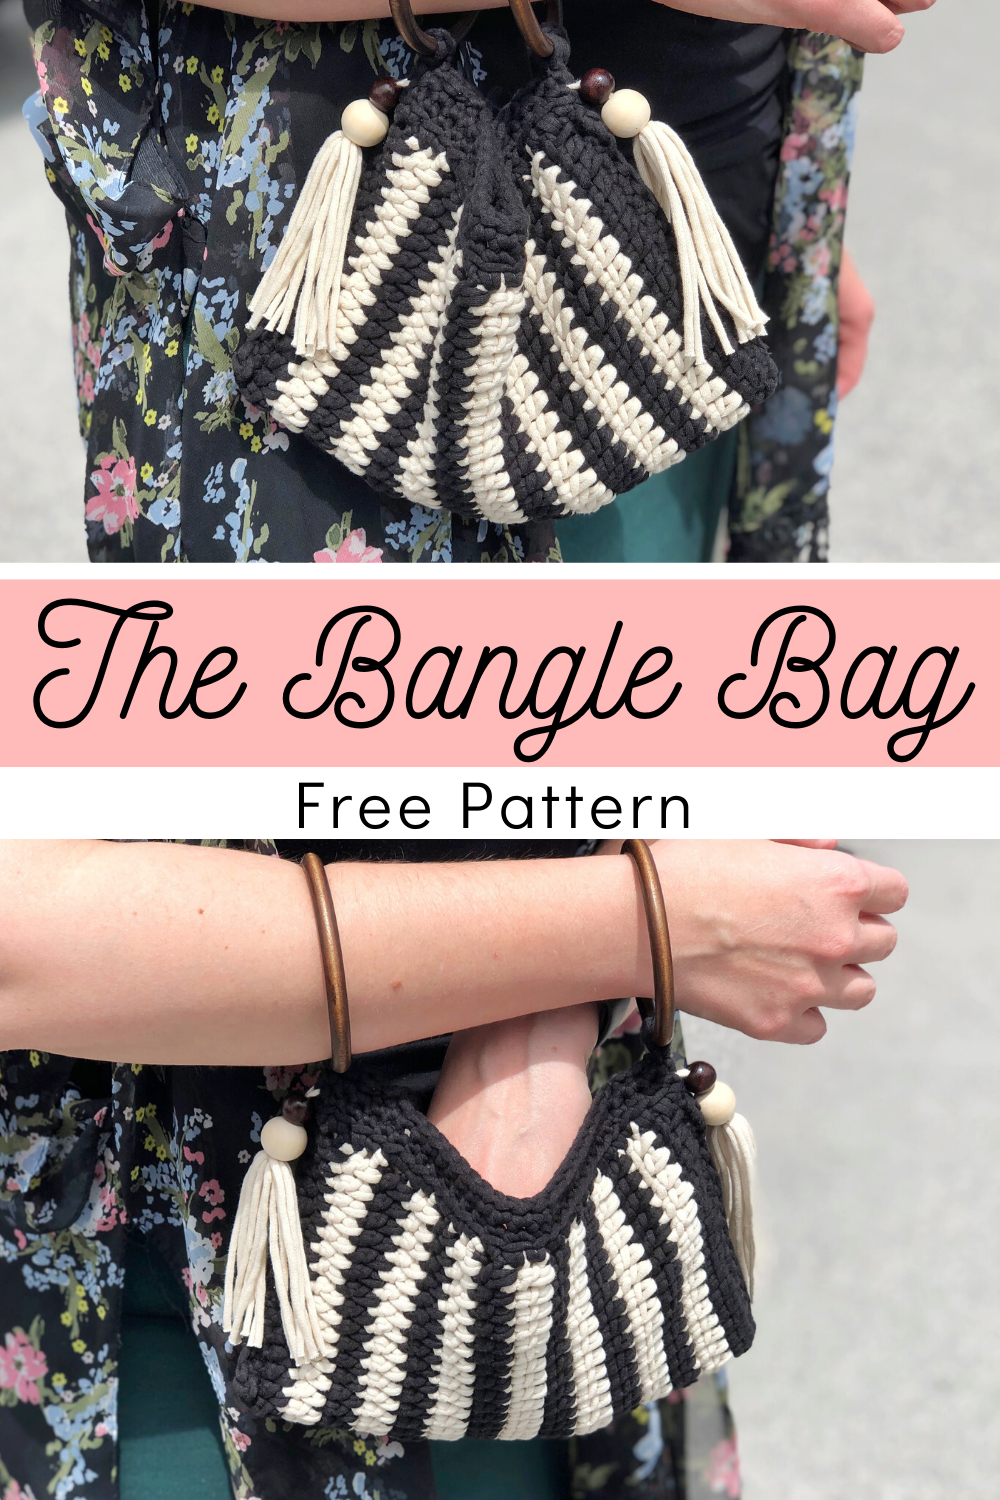
The Bangle Bag Free Crochet Pattern
This versatile bag has so much potential to be anything you want it to be! Once you get the basic concept, the sky is literally the limit. It’s a great project for scrap yarn, as it uses very little. I recommend reading through the entire pattern before beginning.
For an Ad-free printable pdf, see My Ravelry store.
Ravelry: https://www.ravelry.com/patterns/library/bangle-bag-3
For all my weekly content follow me below.
On Pinterest Click Here
On YouTube Click Here
On Instagram Click Here
On Facebook Click Here
Etsy shop Click Here
Ravelry shop Click Here
Come join my Facebook group Crochet for Days! We have a lot of fun in there and I often offer coupons and discounts to my members that I don't offer anywhere else! Just follow this link to answer the questions and request to join: Facebook Group
Supplies Needed
J (6.0 mm) hook
Measuring tape
2 bangle bracelets or rings the size of bracelets (I’m using some wooden ones I found for very cheap in a beauty supply store. You can find them just about anywhere (think thrift stores!). I have found some on both Amazon and Etsy, so check there if you can’t find any in store. You could also realistically make your own out of beads and wire/bracelet cord!
any yarn of your choice. For this pattern, I’m using Bernat Home Dec in both black and cream
a piece of cardboard, 4” wide (optional)
4 wooden beads of your choice for your tassels (I’m using two 15 mm and two 10 mm wooden beads)
a piece of copy paper, 8.5x11” (optional but helpful)
yarn needle
fabric, you’ll need under a 1/4 yard for lining your bag (I’m using a thick jersey knit fabric that is reversible and doesn’t fray)
sewing needle and thread (I used invisible thread to sew the lining into the bag)
any embellishments you see fit!
For this tutorial, I will be teaching you the concept I use, plus giving you the instructions for the exact bag I made.
Terminology used and their abbreviations:
Written in US terminology
back loop only-BLO
chain-ch
double crochet-dc
single crochet-sc
slip stitch-sl st
Gauge: Not essential for this project. You ultimately will be deciding on the final size of your bag, should you desire it larger or smaller.
Instructions
Grab the piece of copy paper. We will be using it as a sort of template. Because I wanted vertical stripes, I chose to crochet my stripes lengthwise.
Beginning with the color black and your J (6.0 mm) hook, crochet a chain that is 11” (28 cm) long unstretched, and then add 3 chains. Lay it on your piece of copy paper to see if it is about the length of the paper (or just measure it using a measuring tape). Turn and dc in 3rd ch from your hook and in each st to end. Fasten off, leaving a tail for weaving in. (Mine ended up being 33 dc)
When changing colors, I merely join with a sl st in the top of the beginning ch 3 of the row below. This means I do not turn my work. This will give the panel you are making a cleaner look, in my opinion. It also makes tails evenly situated on both sides of the panel to weave in. However, if you feel more comfortable turning your work every row, it’s perfectly fine to do so.
Rows 2-15: Beginning at the ch 3 of the row below, join with a sl st. Ch 3 (counts as a st from here on out). Dc in each st across. Fasten off and change to alternating color. [33 dc]

You may have more than 15 rows, which is ok. Just be sure to end in black. Lay your work on top of your copy paper as you go to determine when to finish (Or just measure with a measuring tape). I made my panel slightly bigger than the piece of paper. When size is reached, fasten off and weave in tails. Note: I used fabric glue to help hold ends down. I also left a bit of a tail loose on the inside since I lined my bag and it won’t be showing. This yarn is rather thick, so weaving in your tails excessively can distort your stripes a bit. The glue helps hold it down without having to do a ton of weaving. Leaving a slight tail will help lessen the odds of it popping loose and showing on the front of the bag, since the yarn is very stretchy. Just make sure your tails are on the “wrong side” of the panel.
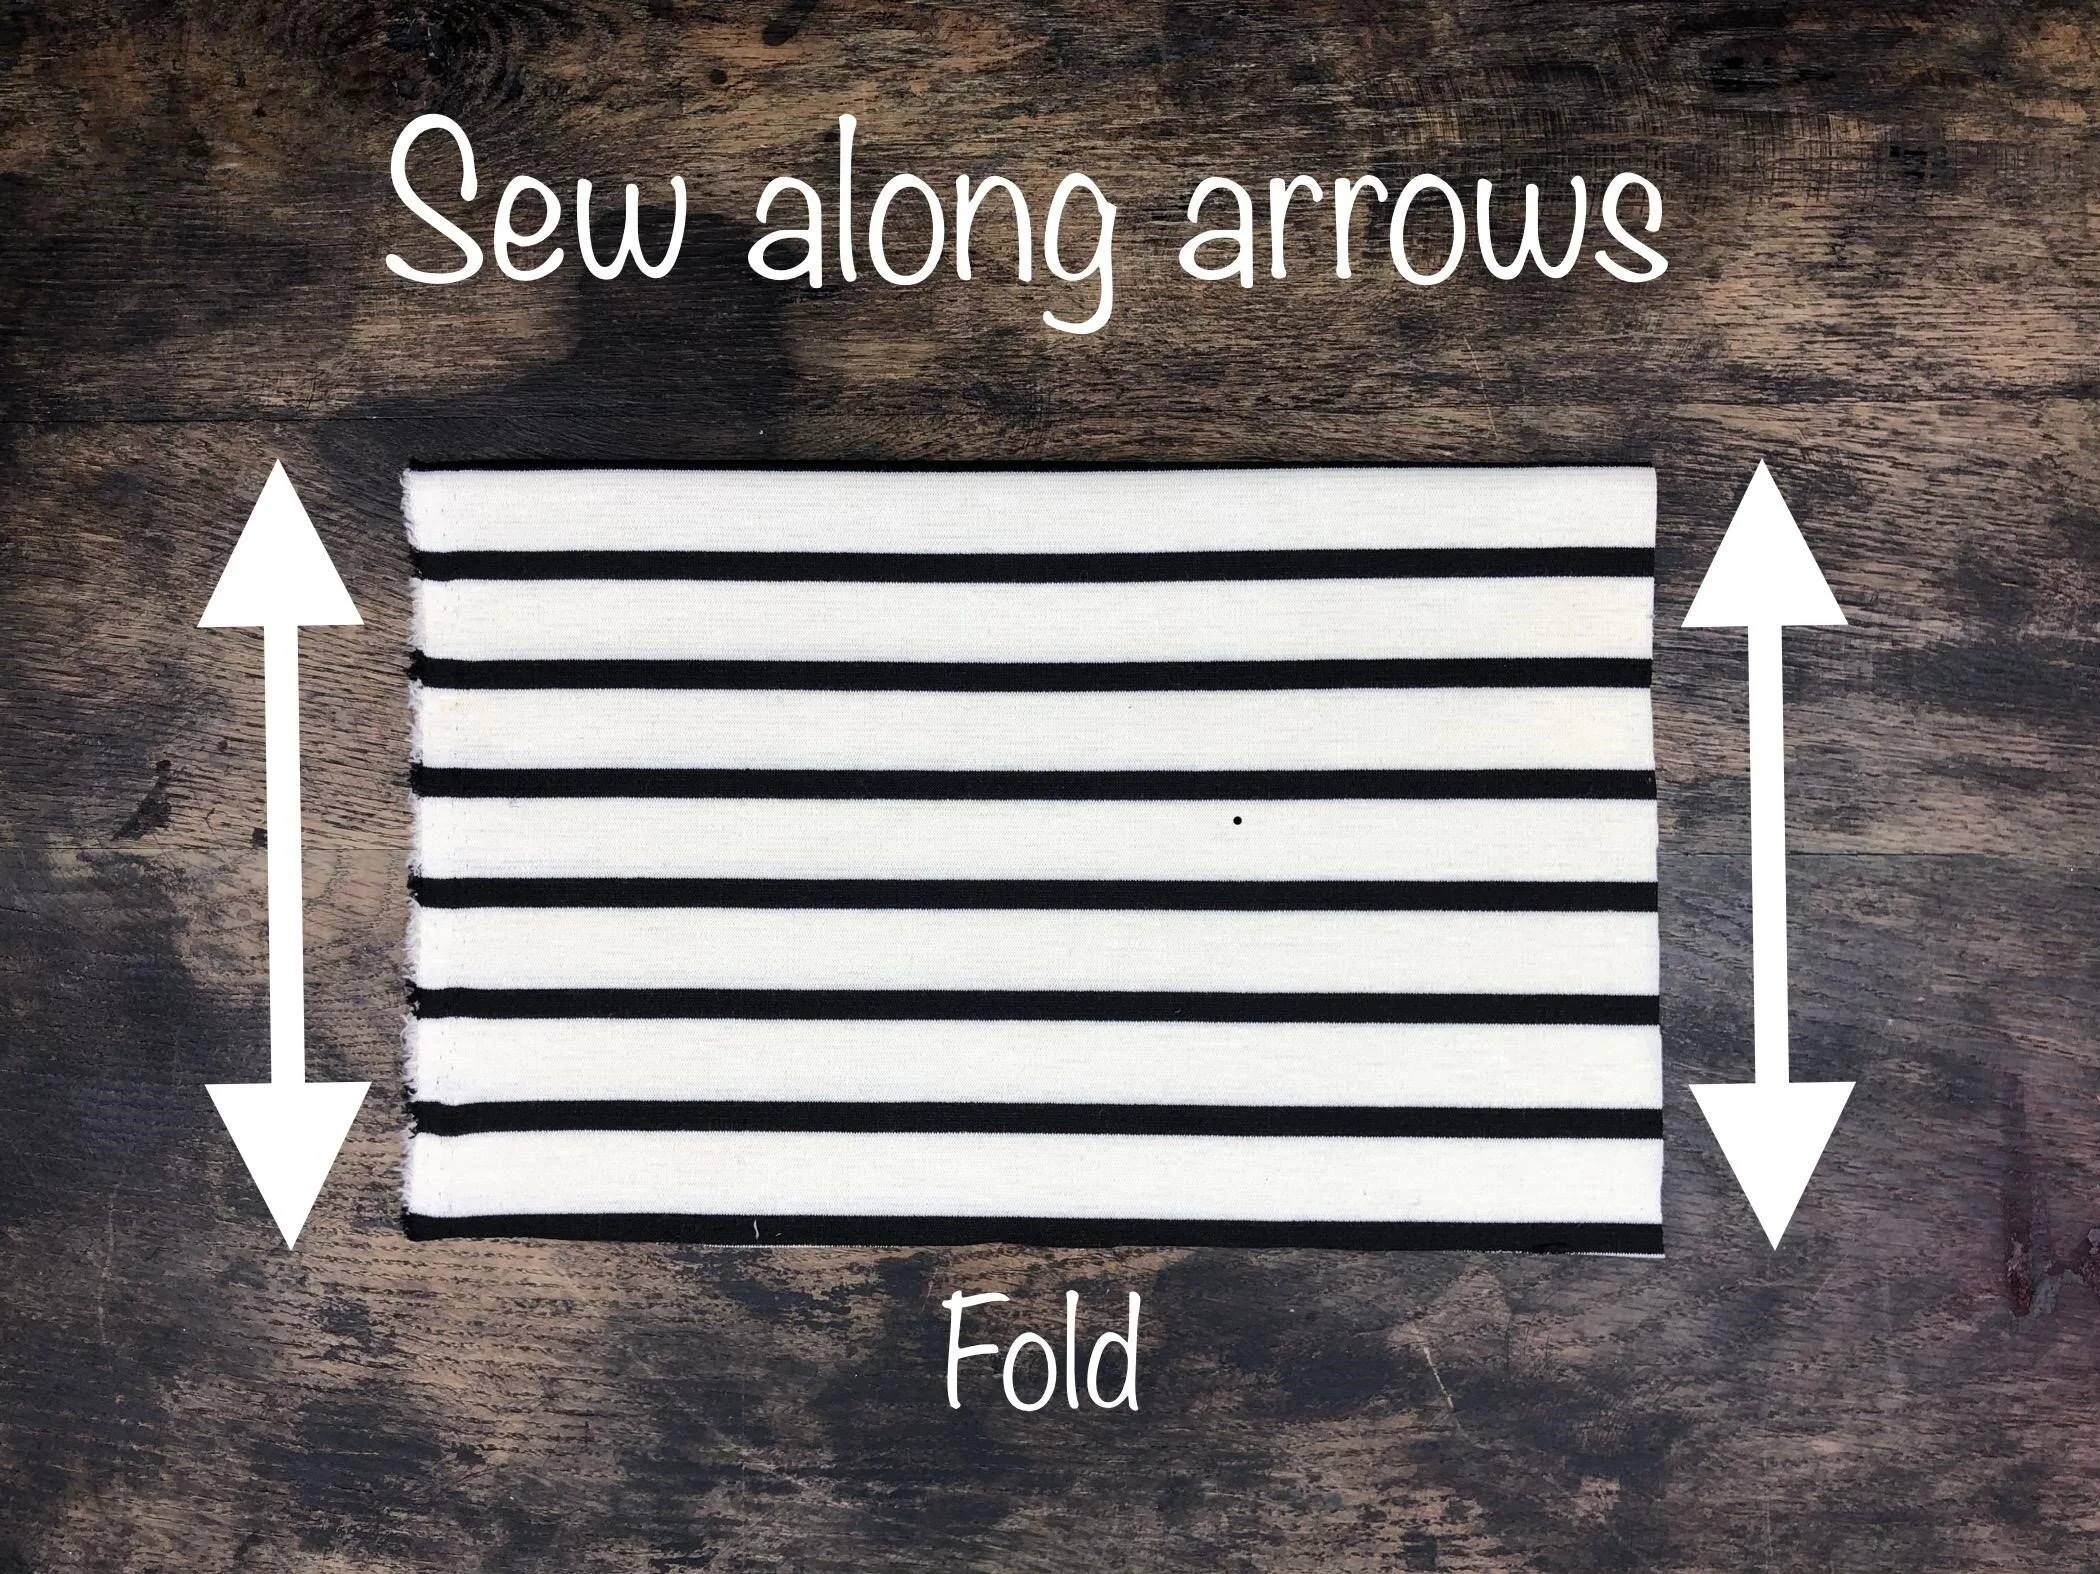
Cutting out your lining:
You will want to cut your fabric for your lining out now, prior to proceeding with the next steps. I simply lay my panel on top of my fabric and cut around the panel, leaving a 1” seam allowance. Sew alongside the side seams. Then fold down the top about 1” and sew it down. Set your fabric aside.


Joining your panel
Lay your panel down, wrong side facing you. Fold in half to where the shorter ends are at the top. Join the sides together using a sc stitch. Start at the top left.
Join with a sl st through both layers and ch 1. Place 1 sc through both layers until you reach the bottom. Fasten off and weave in tails. [16 sc]
Starting at your bottom right, join with a sl st through both layers and ch 1. Place 1 sc through both layers until you reach the top. Do not fasten off. [16 sc]

Brim
Round 1: Ch 1 and turn. We will now be making the brim. Working along the top of the bag, sc evenly around the brim. Take extra care that you have the same exact number of sc on both sides, or it will distort your bag shape. Join with a sl st in the top of 1st brim sc. [I had approximately 32 sc on each side of the brim for a total of 64 sc].
Round 2: Ch 1. Sc in BLO of each st around. Join with a sl st in top of 1st sc. [64 sc].
Round 3: Ch 1. Sc again through both loops in each st around. Join with a sl st in top of 1st sc. Fasten off and weave in tails. [64 sc].

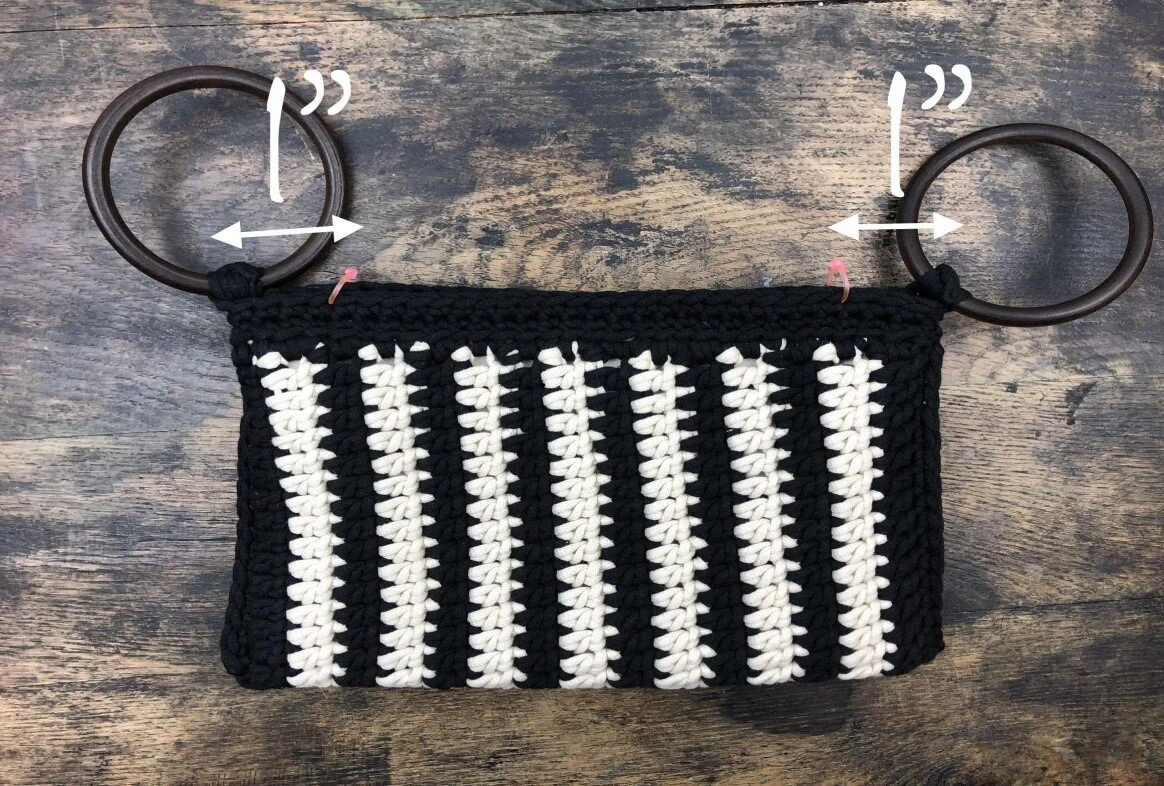
Adding your bangles:
I added my bangles to both sides of the top of the bag by sc over the bangles and into the top corners in 3 stitches. See images for clarification.


Adding your lining:
Now you will want to add your lining before proceeding with the rest of your bag. I used a regular sewing needle and invisible thread for a more professional look. I lined up the top of the lining to the top of round 2 of the brim.

Finishing your bag
Because your bag will not have a closure, you will need to cinch the corners down a little to keep the desired shape and help keep your items from falling out of your bag. Measure your brim inward 1” (2.5 cm) from the corner by the bangle and place a marker on both sides. Now either sew these stitches closed through both layers or sl st across them to close it off. There were about 4 sts for my bag on each side. FO and weave in tails to underside of brim.


Making your beaded tassel
I like the added accent the beaded tassel gives to this simple bag. I simply wrap the yarn around my fingers. (You could use a piece of cardboard 4” (10 cm) wide).
I wrapped the yarn 9 times per tassel, but do as many as you’d like. If you wrap it more, you’ll create a fatter tassel and will probably want to cut it shorter. Add your wooden beads using your yarn needle or a small hook. Attach to bag by tying it in to both sides of the bag, just under the bangle and just above the 2nd round of the brim. Knot off and weave in ends. Trim your tassel to be even at the bottom.
Your Bangle Bag is complete! The possibilities for this bag are endless! You could do granny squares, c2c, stripes, tunisian crochet, mosaic crochet, tapestry crochet, bobbles, puffs….literally ENDLESS! The 8.5” x 11” paper is a great template, but you could make it larger if you wanted to. Just note the bigger the bag, the bigger you’ll want your bangles to be (most likely). Also keep in mind that you may want to sew inward more than 1” with a bigger bag.

I would love to see your finished work! If you want to tag me on IG, I’m @dayscrochetnc, or you can use the hashtag #thebanglebag. If you would like to see other versions that I will be making after this publication, be sure to check me out on IG!
Please note that you do not have my permission to sell, share, copy, or duplicate this pattern or my photos in any way. Please do not use this for a video, blog, or class tutorial. Thank you so much for following these simple rules! Please message me on Facebook or comment below if you have any questions.