
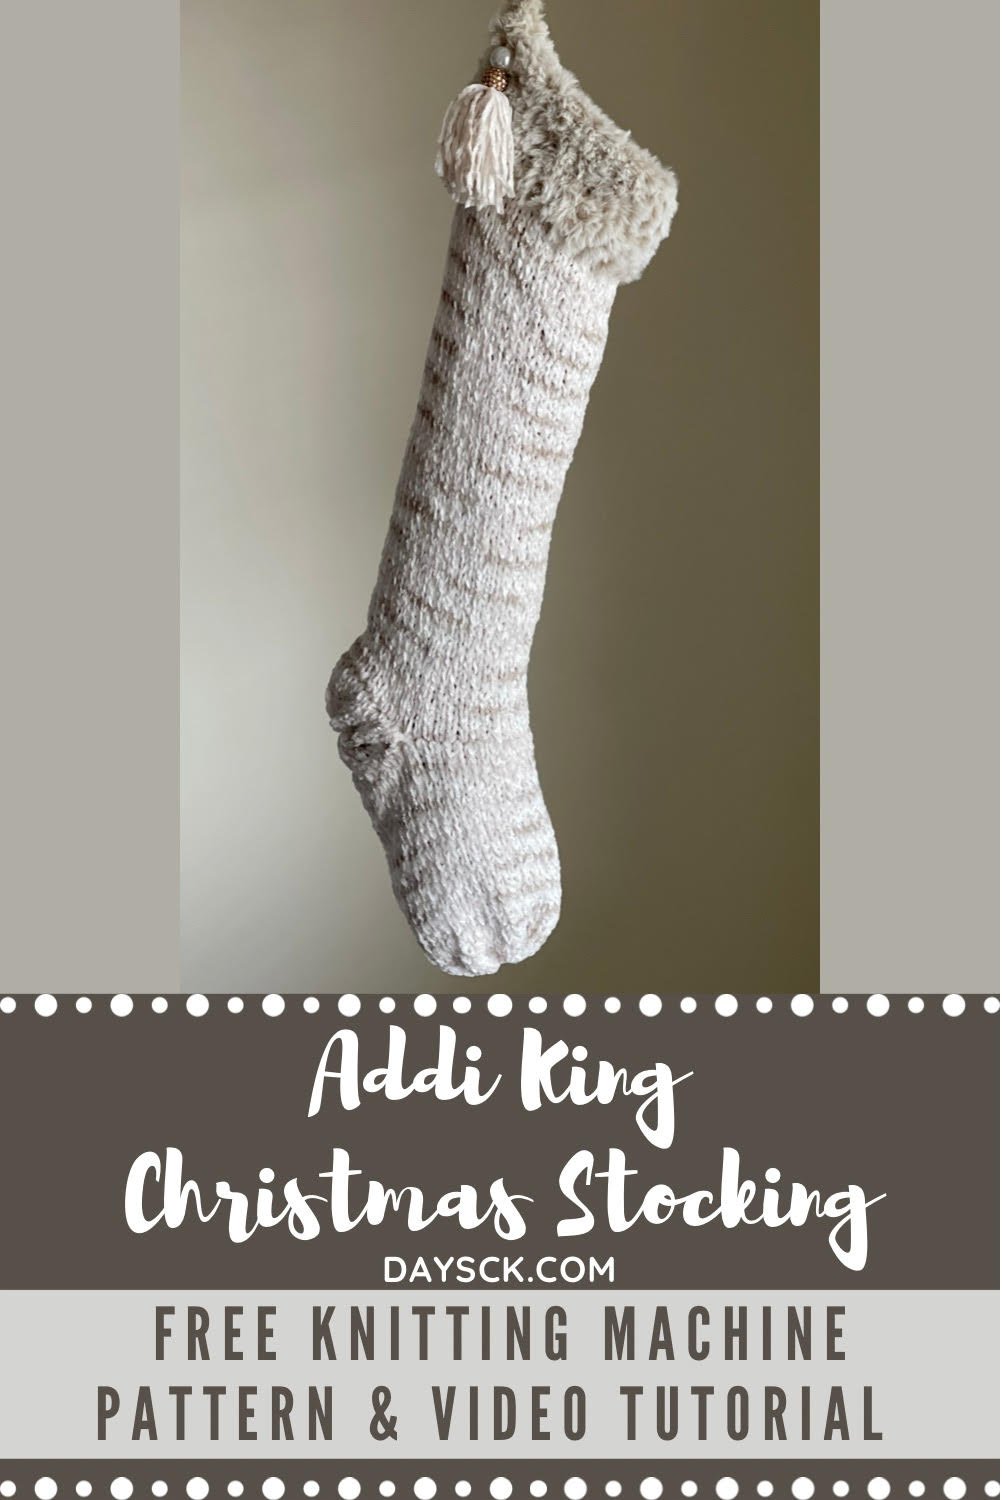
Addi King Christmas Stocking
PIN it here!
There are so many reasons you are going to love this Christmas stocking made on the knitting machine!!
This post may contain affiliate links that help me to continue to post free content. To skip the ads and have a printable pdf of this pattern, you can find it for relatively little cost in my Etsy and Ravelry shops.
If you love the look of a knitted stocking, but you don’t want to go to the trouble of hand knitting for hours and hours, this stocking is for you. One of the greatest attributes is has is the ENTIRE thing can be made on the Addi King! You don’t need to have multiple sizes of knitting machines to crank this thing out.
The next best thing about it is you will be able to easily figure out how to adapt the pattern and make it on any circular knitting machine (I’m talking Sentro, Express, Jammit, you name it!). When I say this pattern is easy, I mean
It. Is. Easy.
I have been on a kick lately to see what all I can crank out of my Addi King while I give my crochet testers a much-needed break. And one of the first things I have noticed is that most knitting machine designs out there seem to be based on doubled tubes. That’s all well and good, but if you are trying to save money, it’s not great. So I have also decided all things I make MUST be easy and cost-effective. This stocking is made with all SINGLE knit tubes, no doubling up here! So it is more budget-friendly as well.
You will find when you are making this stocking that it does require a little bit of crochet knowledge. If you can single crochet and half double crochet (US terms here), then you will have zero trouble. And good news— I have created a full YouTube video tutorial on how to make this thing. My goal is to help you make it without any hiccups. So you should be able to crank out one for everyone in the fam jam by the time you are done with this tutorial. Woot!
Let’s get to it!
Supplies Needed:
-For 2-toned version of stocking, you will need approx. 105-115 yds of the body color and 40-50 yds of the accent color. If you are using the double brim method for the top of your stocking, you will need 60-70 more yds of the accent color. If you are doing the crocheted faux fur brim, you need approx. 60-70 yds of the super bulky weight size 6 faux fur yarn. (My favorite faux fur yarn is Lion Brand’s Go for Faux yarn.)
-30-40 yds of waste yarn
-Addi King 46 needle circular knitting machine (you can follow the same concept and make it with any circular knitting machine or even a loom)
-Size H 5.0 mm hook
-4 gift cards or bobbin cards
-Yarn needle or tapestry needle, scissors, measuring tape
Terms Used and Abbreviations:
Pattern is written in US terminology.
Begin(ning) - beg
Chain(s) - ch(s)
Fasten Off - FO
Half Double Crochet - hdc
Repeat - Rep
Single Crochet - sc
Skip - sk
Slip Stitch - sl st
Space(s) - sp(s)
Stitch(es) - st(s)
Yarn Over - YO
Gauge:
15 sts and 20 rows = 4" (10 cm) using medium tension for knitted portion. Gauge for crocheted portion is not imperative.
Finished Measurements:
Finished stocking should measure approx. 19" (48.5 cm) x 6" (15 cm)
Pattern Notes:
-All cast-on and cast-off methods used in this pattern will be the provisional (basic) cast-on and cast-off methods.
-You will need to be able to read and follow basic beginner crochet pattern instructions.
-You will need to understand basic sewing techniques and the Kitchener stitch.
Instructions:
Stocking will be made from toe to cuff. You will make 3 separate tubes and sew together using the Kitchener stitch. The cuff will have 2 options, so be sure to pay attention when you get to the cast-off portion of the body tube.
Toe
1) Cast on with toe accent color and knit 13 rows.
2) Cut yarn and change to body color. Knit 22 more rows.
3) Leaving a very long tail for a round of sc and for sewing purposes later, cut body color and wrap around gift card/bobbin card. (To visualize this process, see my video.)
4) Add waste yarn and knit 5 rows.
5) Cast off. Set tube aside.
NOTE: Total knit toe rows should be 35.
Heel
1) Cast on with accent color and knit 13 rows.
2) Leaving a long tail for a round of sc only, cut yarn and wrap around gift card/bobbin card. (To visualize this process, see my video.)
3) Add waste yarn and knit 5 rows.
4) Cast off. Set tube aside.
Body
1) Cast on with waste yarn and knit 5 rows. Cut waste yarn and set in middle.
2) Reset counter to zero.
3) Leaving a long tail for a round of sc and for sewing purposes later, wrap body color around gift card/bobbin card and add body color to machine. (To visualize this process, see my video.)
4) Knit 50 rows of body color. (If you want a longer body, knit as many rows as you desire.)
5) Finish by choosing which method (A or B) below for your cuff:
A) Double brim/cuff method
If you desire to have a knitted brim/cuff for the top of your stocking, you will need to cut your body color and add your accent color at this point. (To visualize how to make a double brim/cuff, see my video.)
6) Knit 40 rows of accent color for cuff.
7) Cut yarn and add waste yarn. Knit 5 rows of waste yarn.
8) Cast off. Set tube aside.
B) Faux fur crochet cuff method
6) Leaving a long tail for sc round later, add tail to gift card/bobbin card and change to waste yarn.
7) Knit 5 rows of waste yarn.
8) Cast off. Set tube aside.
Assembly
You will first finish the tubes so that you can remove the waste yarn and sew the tubes together.
Toe
1) Take your cast-on end tail and pull so that the tube end cinches closed. Thread tail onto your yarn needle and go back through the sts to reinforce row 1 and close the hole smaller. Take tail inside and knot off to secure. Cut tail and weave in.
2) Remove long tail from gift card/bobbin card at cast-off end. With the right side of the tube facing you, insert your crochet hook into the st with the long tail coming out of it. YO and pull up a loop.
3) Ch 1, sc in same st and in each st around. Join with a sl st in first sc. Leave your tail long for sewing purposes and FO. Wrap excess tail back onto gift card/bobbin card. [46 sc]
4) Remove waste yarn. Set tube aside. (To visualize this process, see my video.)
Heel
1) Beg with cast-off end. Remove excess tail from gift card/bobbin card. With right side of tube sts facing you, insert crochet hook into first st with the long tail coming out of it. YO and pull up a loop.
2) Ch 1, sc in same st and in each st around. Join with a sl st in first sc. You do not need a long tail for sewing purposes, so FO and weave in your tail. [46 sc]
3) Remove waste yarn from cast-off end.
4) Take your cast-on tail and pull so that the tube end cinches closed. Thread tail onto your yarn needle and go back through the sts to reinforce row 1 and close the hole smaller. Take tail inside and knot off to secure. Cut tail and weave in.
5) Set tube aside. (To visualize this process, see my video. )
Body
(For double brim/cuff method)
1) Beg with cast-off end. Roll bottom inward to inside of stocking and line rows 1 and 40 of the accent color together.
2) Using the sl st closure method, join rows 1 and 40 of the accent cuff color in all 46 sts. (To visualize this process, see my video.)
3) Remove waste yarn from cast-off end. Weave tails inside doubled area.
4) Move to cast-on end. Remove excess tail from gift card/bobbin card. With right side of tube sts facing you, insert crochet hook into first st with the long tail coming out of it. YO and pull up a loop.
5) Ch 1, sc in same st and in each st around. Join with a sl st in first sc. You will need the long tail for sewing purposes, so leave the tail long and FO, wrapping the excess around the gift card/bobbin card. [46 sc]
6) Remove waste yarn. Set tube aside.
(For crocheted faux fur cuff)
1) Beg with cast-off end. Remove excess tail from gift card/bobbin card. With right side of tube sts facing you, insert crochet hook into first st with the long tail coming out of it. YO and pull up a loop.
2) Ch 1, sc in same st and in each st around. Join with a sl st in first sc. You do not need a long tail for sewing purposes, so FO and weave in your tail. [46 sc]
3) Remove waste yarn from cast-off end.
4) Move to cast-on end. Remove excess tail from gift card/bobbin card. With right side of tube sts facing you, insert crochet hook into first st with the long tail coming out of it. YO and pull up a loop.
5) Ch 1, sc in same st and in each st around. Join with a sl st in first sc. You will need the long tail for sewing purposes, so leave the tail long and FO, wrapping the excess around the gift card/bobbin card. [46 sc]
6) Remove waste yarn. Set tube aside. (To visualize this process, see my video.)

You can also create a unique stocking by using a striping yarn. This will result in fewer ends to weave in and add visual interest. This yarn is Yarn Bee Wildstreak in the color River Stone.
Sew pieces together
We will beg sewing our stocking tubes together, beg with the toe and the heel. You will need the excess tail you left on your card from the toe tube. Thread your yarn needle onto this tail and begin to join with the right side of the heel (in any st) using the Kitchener st. (To visualize this process, see my video.


NOTE: ONLY sew half of the tubes together. You should only have 23 sts sewn together at the end of this step. Once you have 23 sts sewn together, reinforce the seam on the wrong side and weave in your tails. Since you joined exactly 23 sts of each tube, you should have 23 sts left on each tube, making a total of 46 sts left. Your body tube will also have 46 sts to join.
Remove the excess tail from the gift card/bobbin card on your body tube. Thread your yarn needle onto this tail and beg to join the body with the right side of the top toe portion using the Kitchener st. You will continue to join all 3 tubes together in this manner until all 46 sts of the body are joined to the 23 sts of the toe and the 23 sts of the heel that are leftover. (To visualize this process, see my video.)
Once you have the 46 sts sewn together, reinforce the 3 seams on the wrong side and weave in your tails.
Add faux fur cuff
With you 5.0 mm crochet hook and the faux fur yarn of your choice, join with the sc st closest to the side seam of the heel in your cast-off end of your body tube. (To visualize this process, see my video.)
Round 1: Ch 1, hdc in same st as joining, sk next st, * hdc, sk next st; rep from * around. Join with a sl st in first hdc. [23 hdc]
Rounds 2-5: Ch 1, hdc in sp between every st around. Join with a sl st in first hdc. [23 hdc]
Round 6: Ch 7, sl st in 7th ch from hook (hanging loop made), hdc between every hdc st below. Push ch-7 loop to back of work and sl st in first hdc to join. [23 hdc, 1 ch-7 loop]
FO and weave in tails. Add embellishments as desired.
NOTE: If you are using a different sized knitting machine, you can simply follow the same concept by joining half of the heel sts to the half of the toes sts, and then sewing the sts of the body to the leftover toe and heel sts. So for example if you made this on the Sentro which has 48 pins, you would join 24 of the toe and heel sts together, and then join the 48 sts of the body to the 48 sts that remain from the toe and heel.

Pictured is the 2-toned version made with RHSS in the color Ranch Red, Hobby Lobby ILTY in the color Ivory Tweed, and Yarn Bee Fur the Moment in the color Wolf.
Your Addi Christmas Stocking is complete! I would love to see your finished work! If you want to tag me on IG, I’m @dayscrochetnc. I can’t wait to see your projects! If you would like to see other versions that I will be making after this publication, be sure to check me out on IG!
Please note that you do not have my permission to sell, illegally share, copy, or duplicate this pattern or my photos in any way. Please do not use this pattern for a video, blog, or class tutorial. Thank you so much for following these simple rules! Please message me on Facebook or send me an email at dayscrochetnc@gmail.com with any questions.
Come join my Facebook group, Crank & Crochet! We have a lot of fun and I often offer discounts and coupon codes to my members that I don’t offer anywhere else! Request to join and answer the questions by following this link.
Did you have fun making this project? Let me know in the comments!
Happy Making!
~Dana