
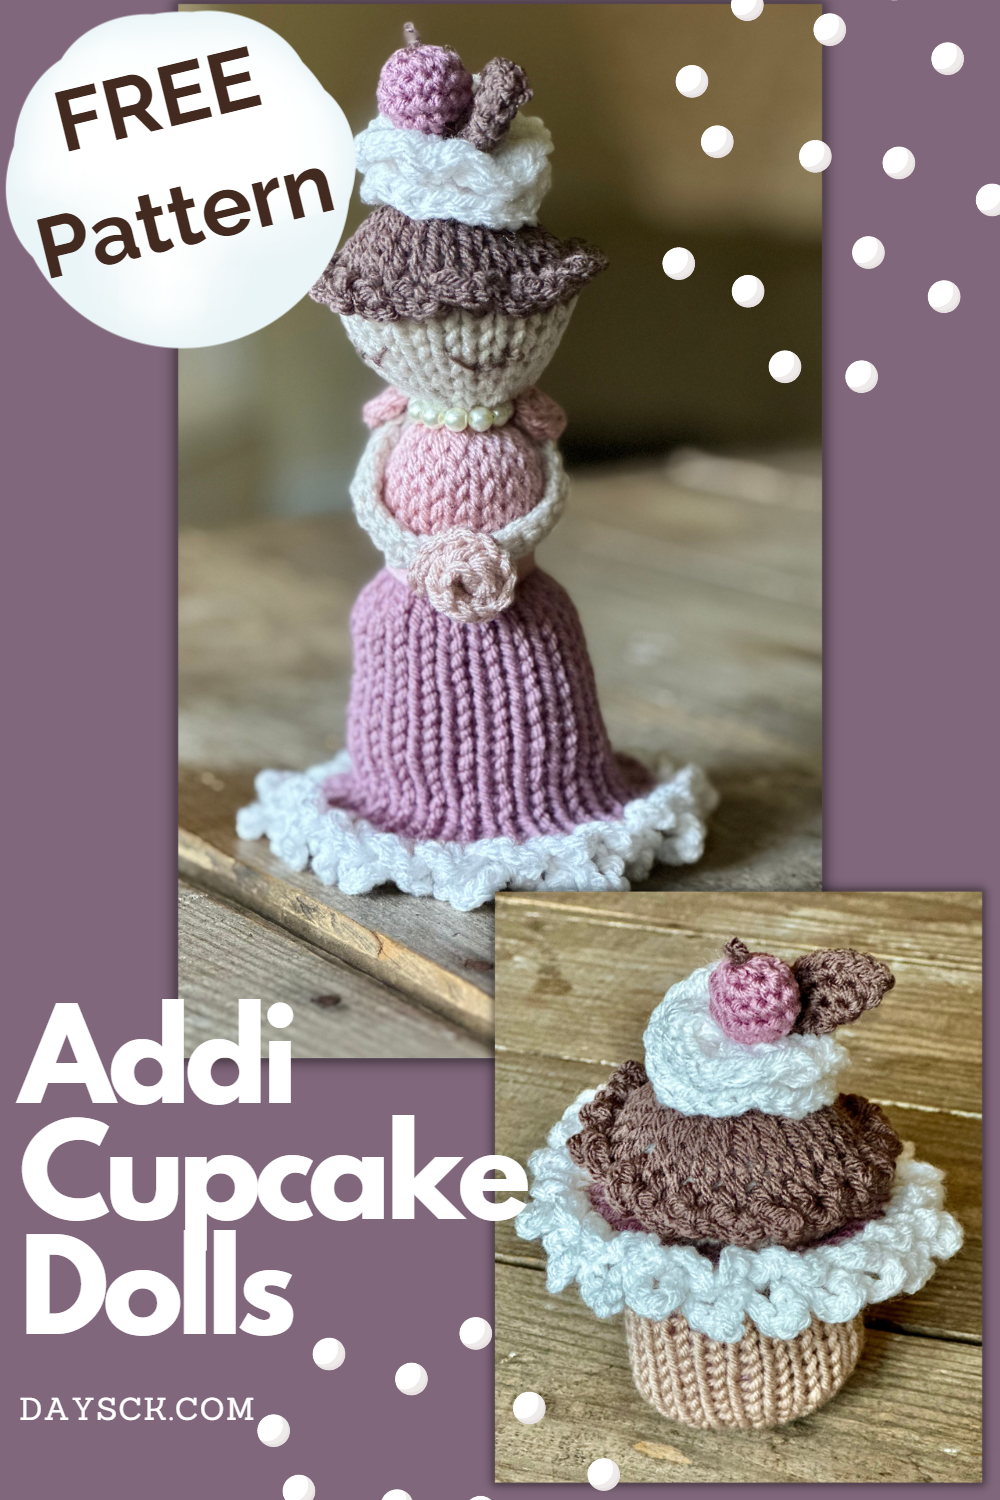
Knitting Machine Cupcake Dolls
PIN it here!
If you haven’t gotten a 22 pin circular knitting machine yet, I’m about to give you a reason to go get one!
I have been obsessed with making these adorable little cupcake dolls lately, and I don’t even like making amigarumi. They are SO much fun to make and the possibilities are endless.
This post may contain affiliate links that help me to continue to post free content. Using these links are no extra cost to you, but allow me to make a small commission if you choose to use my links.
I was actually inspired by another YouTuber over at Made by Miranda, who has a much more beginner-friendly version with a LOT fewer steps and embellishments than my version. If that sounds more like your speed, you can find Miranda’s video here.
This project is actually a TON of fun to do with a young girl. My cupcake doll craze began with me making these with my niece and I have not stopped making them ever since! I think these are going to make great little gifts for the young girls in our family and church for Christmas.
I could even see these being a super cute party favor for a little girl’s birthday party. How cute would it be to package them like a dozen cupcakes?! I plan to buy those clear little baker’s bags and add some crinkle party paper to the bottom and maybe some curly ribbon to package mine. I can’t wait to see their little faces when they open them!
This project has been the most fun when it comes to embellishments. I have not made very many exactly alike because I want to make them all different to see how they look. I hopped on Pinterest to check out gourmet cupcakes and used them as my inspiration. If you want to see all the versions I’ve made so far, be sure to scroll to the very bottom of this post. I am showing you how to make this one in these instructions:

Let’s Make It!
To break it down for you, the doll’s body is made first on the 22 pin circular knitting machine. You cast on with the hair color, then switch to the face color, then bodice, then skirt, then cupcake “wrapper”. Once you have your tube made according to the row counts below, you can add as many embellishments as you like!
I will warn you and tell you that you don’t really want to overstuff your doll’s body or add anything heavy to the top of the head because the doll does actually stand up on its own if it’s not too top heavy. So just keep that in mind when you are planning out your doll. If you make it just like my YouTube video tutorial, your doll should be just right.
I will admit that I have pushed the limits on the weight of what I put on the doll’s head, though. This Christmas Tree icing one is pretty top-heavy, but it does still stand upright.

It is borderline too heavy though. The most danger comes when you add things on top that have stuffing inside because that weighs it down a bit more. That’s why I tend to only put one berry/cherry on top.

I mean, how CUTE is this?!?
Alright, enough of my rambling! Let’s get to it!
Supplies Needed
-22 pin circular knitting machine. I'm using the Addi Pro, but you could use any knitting machine that has a similar pin count and get the same results, like the Sentro or Jammit
-Crochet hooks, sizes 3.75 mm, 4.25 mm, and 5.0 mm for crochet embellishments
-5 yarn colors for the doll: hair, face/skin, bodice, skirt, and "cupcake wrapper". You will use very little yardage. You may also wish to have different colors for the whipped cream, fruit/berry, cookie, and rose. For my sample in the video, I used a total of 7 different colors.
-7 4mm or 6mm beads for necklace (optional)
-Monofilament illusion cord (or non-stretch beading string) for the necklance (optional)
-embroidery thread or safety eyes
-polyfil stuffing
-Hot glue gun and glue sticks
-Yarn needle, scissors, stitch marker
Doll Body
Using a 22 pin (or a similar pin count) circular knitting machine in the circular knitting mode:
1) Cast on with the hair color and knit 7 more rows.
2) Switch to face color and knit 7 more rows.
3) Switch to bodice color and knit 7 more rows. NOTE: Leave your bodice color tail about 8-10 inches long when you switch colors. We are going to use that tail later.
4) Switch to skirt color and knit 25 rows.
5) Switch to “wrapper” color and knit 25 rows.
6) Cast off using a yarn needle to pick up your stitches as you go.
Assembly
To assemble the doll, you will need your yarn needle, some embroidery thread or safety eyes, and some polyfil stuffing.
1) Make sure all your color changes on the inside of the tube are knotted off and cut (except leave that bodice color tail long).
2) Using the cast-off tail, cinch the bottom closed. Thread your yarn needle onto the tail and reinforce the stitches by going through them once more. Then knot several times but do not cut your tail.
3) Bring cinched end inward until it meets the top of the skirt/bodice color change. Bring your wrapper tail inside and line up your tube so it isn’t crooked.
4) Using a whip stitch, begin picking up the first row of skirt stitches using the wrapper tail you brought inside from the bottom. Make sure you pick up all 22 stitches.
5) Cinch the skirt shut until you have the waist the desired size. I do recommend that you don’t cinch it all the way closed because it looks better if you don’t. Once you get it to the desired size, go back through all 22 skirt stitches to reinforce. Knot off and cut yarn.
6) Now you will grab your embroidery thread and make the eyes as I show you in my tutorial, or you could add small safety eyes if desired. Add them to the level of the 3rd row of the face color. Make sure you put the eyes in the “front”, keeping the color changes in the back of the doll.
7) Lightly stuff the bodice, bringing that long tail upwards and out of the way. Make sure you don’t overstuff the bodice! If your stitches are stretching and you can see the stuffing, you have too much.
8) Thread your yarn needle onto your bodice tail you left yourself. Using the whip stitch, pick up all 22 of the first row of bodice stitches. Cinch to close. Go back through all 22 stitches to reinforce. Knot several times and cut yarn.
9) Lightly stuff head. Do not overstuff! Using the cast-on tail, cinch the head closed. Add your yarn needle and go through all stitches once more to reinforce. Knot off and hide tail to inside of head.
Make Hair
Using a 5.0 mm hook and the hair color, add your slip knot to your hook and insert your hook from top to bottom at the level of the hair color/face color. You will be picking up the 2 horizontal bars of the stitches at the color change. To visualize this, see my video.
Round 1: Sc in first st, ch 3, {sc, ch 3} rep brackets in each st around. Join with a sl st in first sc. [22 sc, 22 ch-3 sps]
Fasten off and weave tails to inside of head.
Make Ruffles
Switch to the ruffle color of choice. These ruffles will be at the bottom of the skirt and will look like icing when the cupcake is closed. We will be using the same concept as the ruffles we just made for the hair, but you will be chaining more in between your sc stitches.
There are 2 rounds of ruffle stitches. You can make all your chain spaces 5, or you can layer it and make your first round a chain 7 and the second round a chain 5. If it’s too confusing, just do all chain spaces a chain-5 space. In my video, I layer them.
Using your 5.0 mm hook, make a slip knot on your hook and insert your hook at the bottom of the skirt as shown here in my video.
Round 1: Sc in first st, ch 7, {sc, ch 7}; rep brackets in each st around the skirt until you reach where you began. Do not join. [22 sc, 22 ch-7 sps]
Round 2: Ch 5, sc between first 2 sc of round 1, {ch 5, sc between next 2 sc of round 1}; rep brackets around until you reach where you began. Ch 5, sl st in very first sc of round 1 to join.
Fasten off and weave tails inside tube between skirt and wrapper layers.
Make Arms (make 2)
Switch to your 4.25 mm hook and the face color. Leave a long tail for sewing purposes when you both begin and end.
Row 1: Ch 13, sc in 2nd ch from hook and in next 4 sts, sc2tog, sc last 5 sts. [11 sc]
Fasten off. Sew arms to doll on each side at neck level as shown in my video.
Make Rose
Switch to your 3.75mm hook and the rose color of choice.
Row 1: Ch 6, 3 hdc in 2nd ch from hook, 3 hdc in each st across. Ch 1, sl st in foundation ch. [15 hdc]
Fasten off, leaving a long tail for sewing purposes. Shape into rose shape and lightly stitch together. Making sure your arms aren’t twisted, bring hands together. Using the rose tail, sew rose to hands as shown in my video.
Make Sleeves (make 2)
Using the 3.75 mm hook and the yarn in the same color as the bodice, Ch 3, 5 dc in 3rd ch from hook, ch 2, sl st into foundation st to join. Fasten off. You can sew the sleeves onto the arms or you can hot glue them to the arms. NOTE: If you are adding a necklace, do so before you attach the sleeves. I would not add a necklace for children under 4. If you wish to add a necklace, see my video.
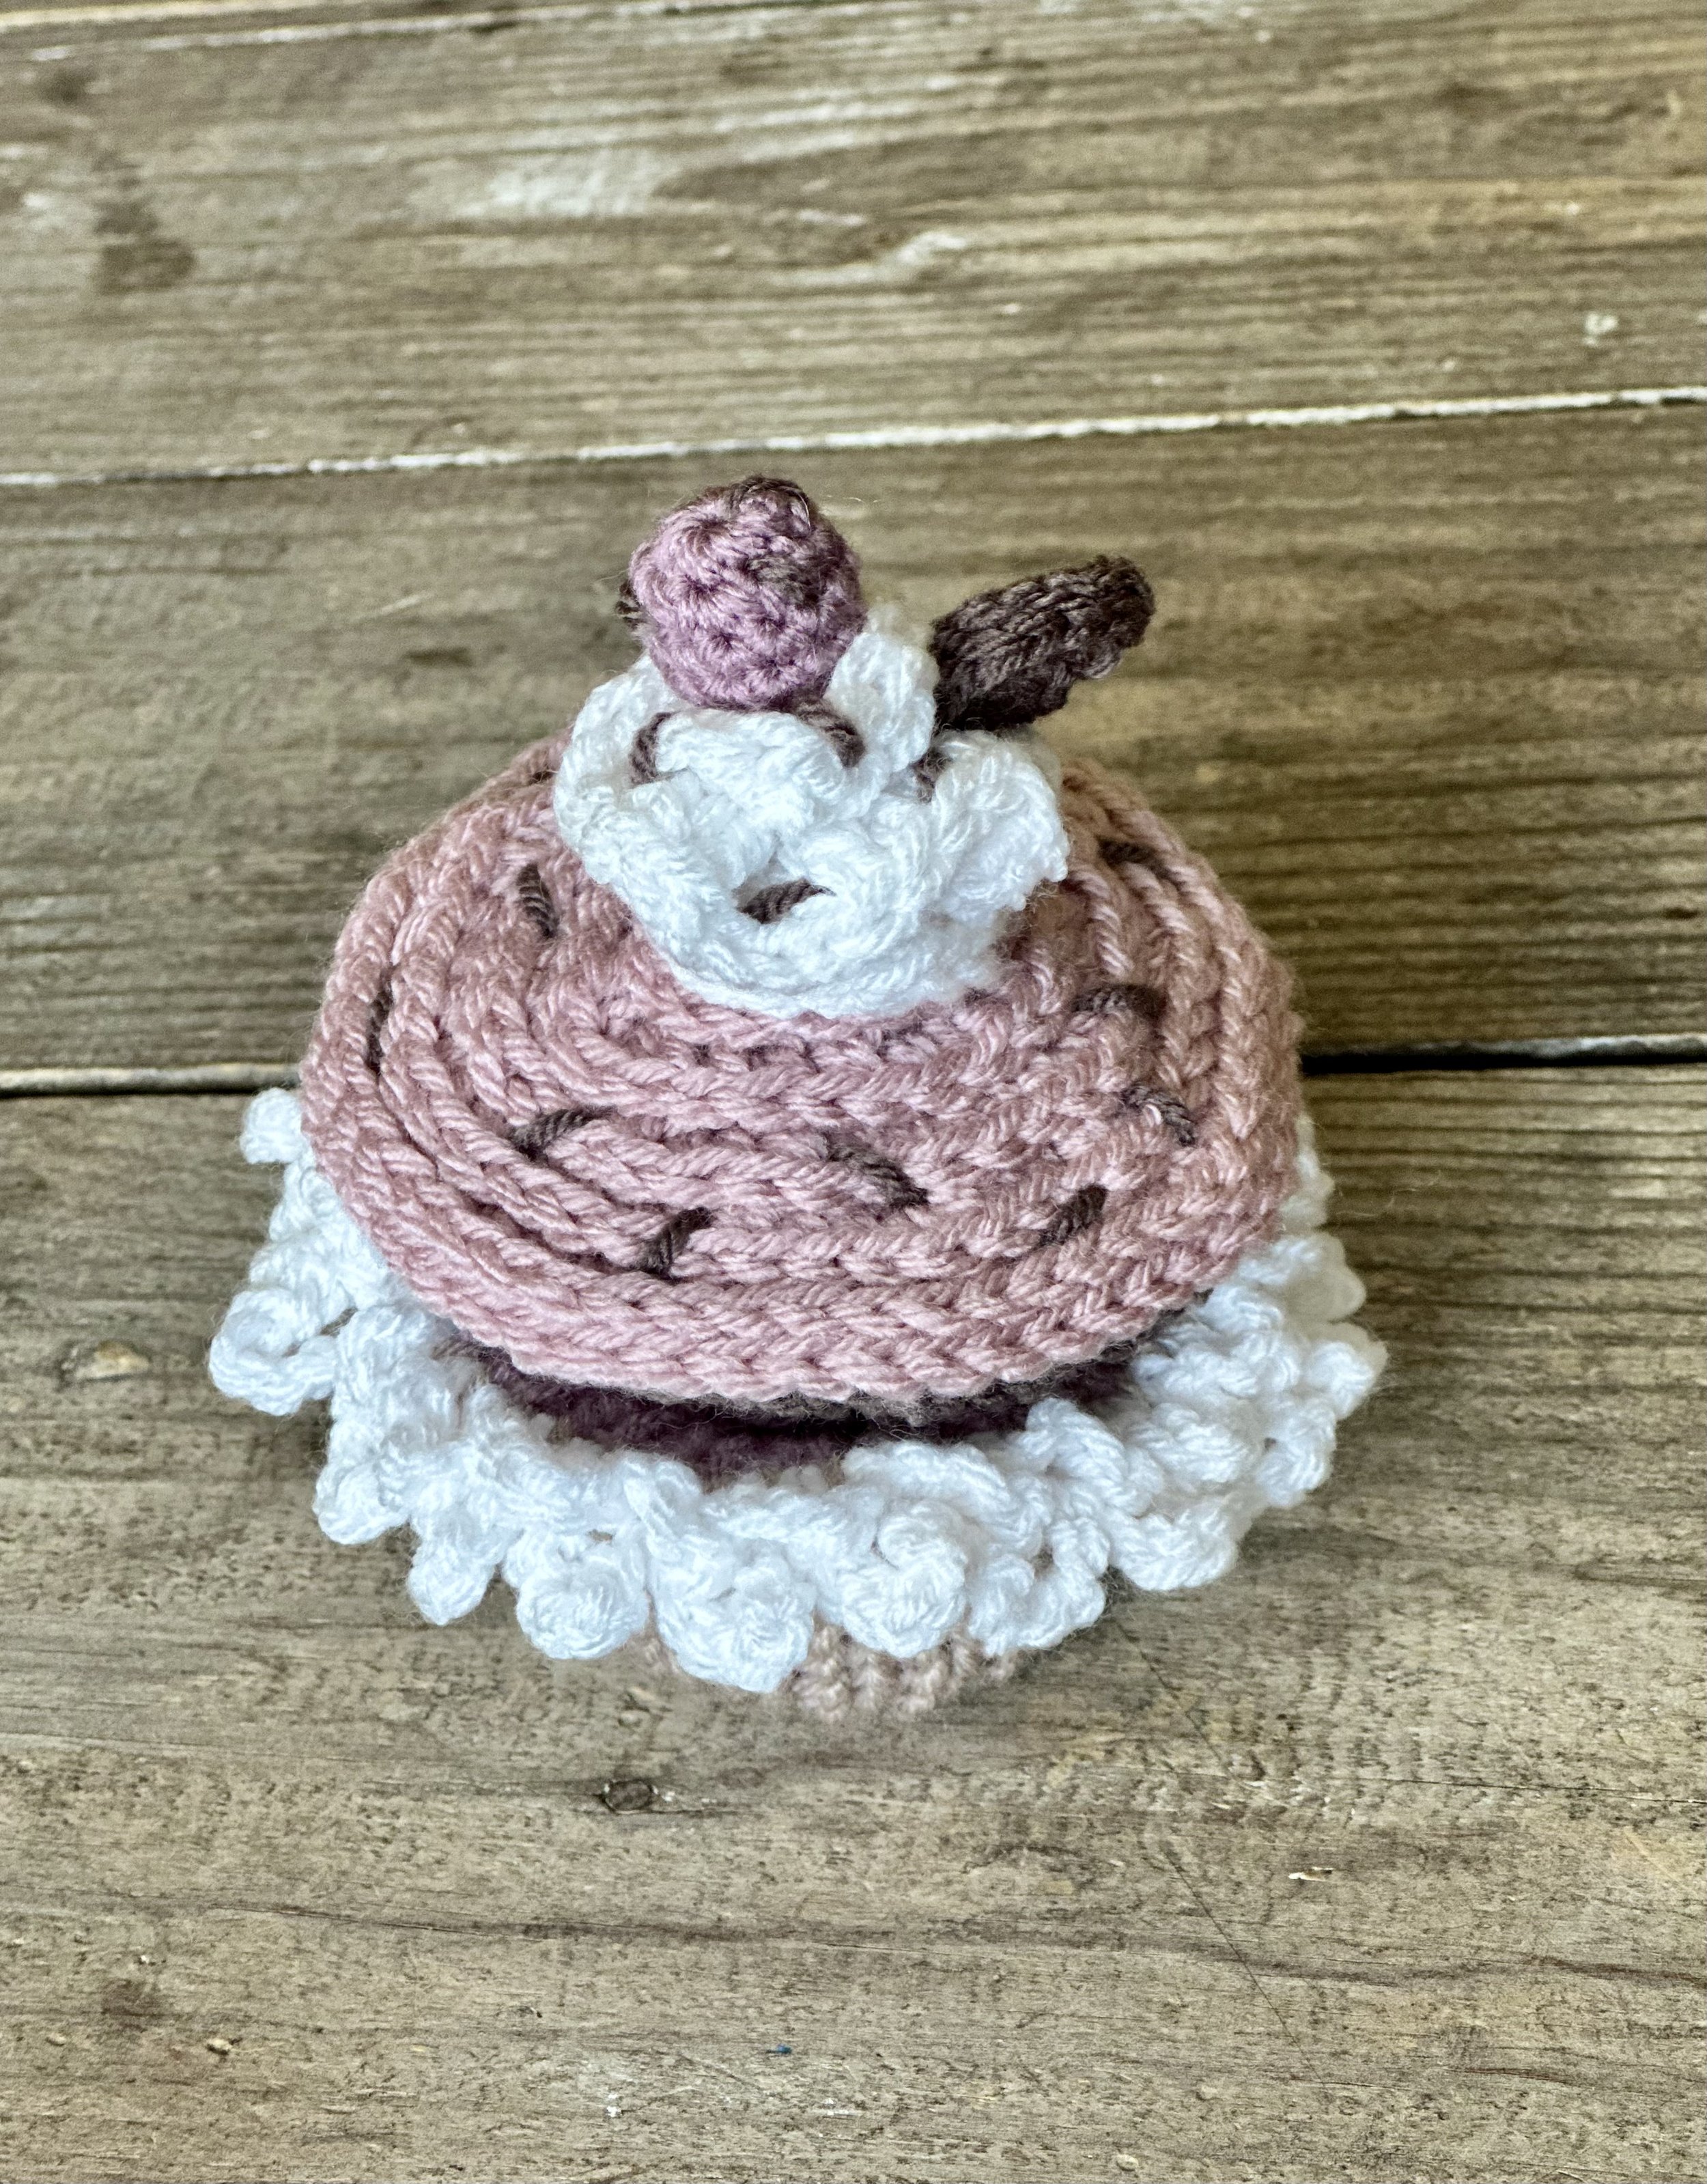
Make Whipped Cream/Icing
Use your 5.0 mm hook and the color of your choice (I used white in my tutorial).
Row 1: Ch 20, 3 dc in 4th ch from hook, 3 dc in each st across. Ch 2, sl st in foundation ch to join. [51 dc, not including beginning or ending chs]
Fasten off, leaving a long tail for sewing purposes. I recommend gently sewing the whipped cream in the basic shape it makes as you crochet. If you manipulate it too much, it will look more like a flower and less like whipped cream. You can sew it to the top of the head or hot glue it. To visualize this process, see my video.
Make Berry/Cherry
Use your 3.75 mm hook and color of choice. You will not be joining the rounds, so you may wish to use a stitch marker.
Round 1: Ch 2, 6 sc in 2nd ch from hook. [6 sc]
Round 2: 2 Sc in each st around. [12 sc]
Rounds 3-4: Sc in each st around. [12 sc]
Round 5: Sc2tog through the FLO 6 times. [6 sc]
Leaving a long tail for sewing purposes, fasten off. Lightly stuff and thread tail onto yarn needle. Whip st through the FLO of the last 6 sc. Cinch closed. Sew or hot glue to whipped cream. To visualize this portion, see my video.
Make Cookie
Use your 3.75 mm hook and color of choice. You will not be joining the rounds, so you may wish to use a stitch marker.
Round 1: Ch 2, 6 sc in 2nd ch from hook. [6 sc]
Round 2: 2 sc in each st around. [12 sc]
Round 3: {2 sc in next st, sc} rep brackets around. Join with a sl st in first sc. [18 sc]
Fasten off, leaving a long tail for sewing purposes. Fold cookie in half at level of where you fastened off and sew through both layers. Sew or hot glue to whipped cream. To visualize this portion, see my video.
You are done! I hope you enjoy making these as much as I do! You could also add a hat if you wanted to, like I did on this one:

To make the hat, use your 5.0 mm hook and ch 2, 8 hdc in 2nd ch from hook. Then you will work through the 3rd loops only from here on out. You will also work in the continuous round, so use a stitch marker. You will increase a total of 6 rounds and then make a hdc in each st around for the last round. I added “ties” at the level between the 3rd and 4th round with just 1 strand of yarn. For the strawberry, I followed this YouTube video tutorial.
As you can see here, working your stitches in the 3rd loops gives it a swirled look that mimicks icing. I even added sprinkles! The options are endless. I hope you have fun!

This one I made a bit more fancy. I glued rhinestones on for the necklace, but it did NOT work out. They fell off very quickly, so I definitely don’t recommend that. Otherwise, I love her! Just look how cute it is folded up:

I cannot get over how cute they are! I will definitely be making more. Be sure to follow me on Instagram if you wish to see the other versions I make.
Please note that you do not have my permission to sell, share, copy, or duplicate this pattern or my photos in any way. Please do not use this pattern for a video, blog, or class tutorial. Thank you so much for following these simple rules! Please message me on Facebook or send me an email at dayscrochetnc@gmail.com with any questions.
Come join my Facebook group, Crochet for Days! We have a lot of fun and I often offer discounts and coupon codes to my members that I don’t offer anywhere else! Request to join and answer the questions by following this link.
Did you enjoy this project? Let me know in the comments!
Happy hooking,
~Dana
