
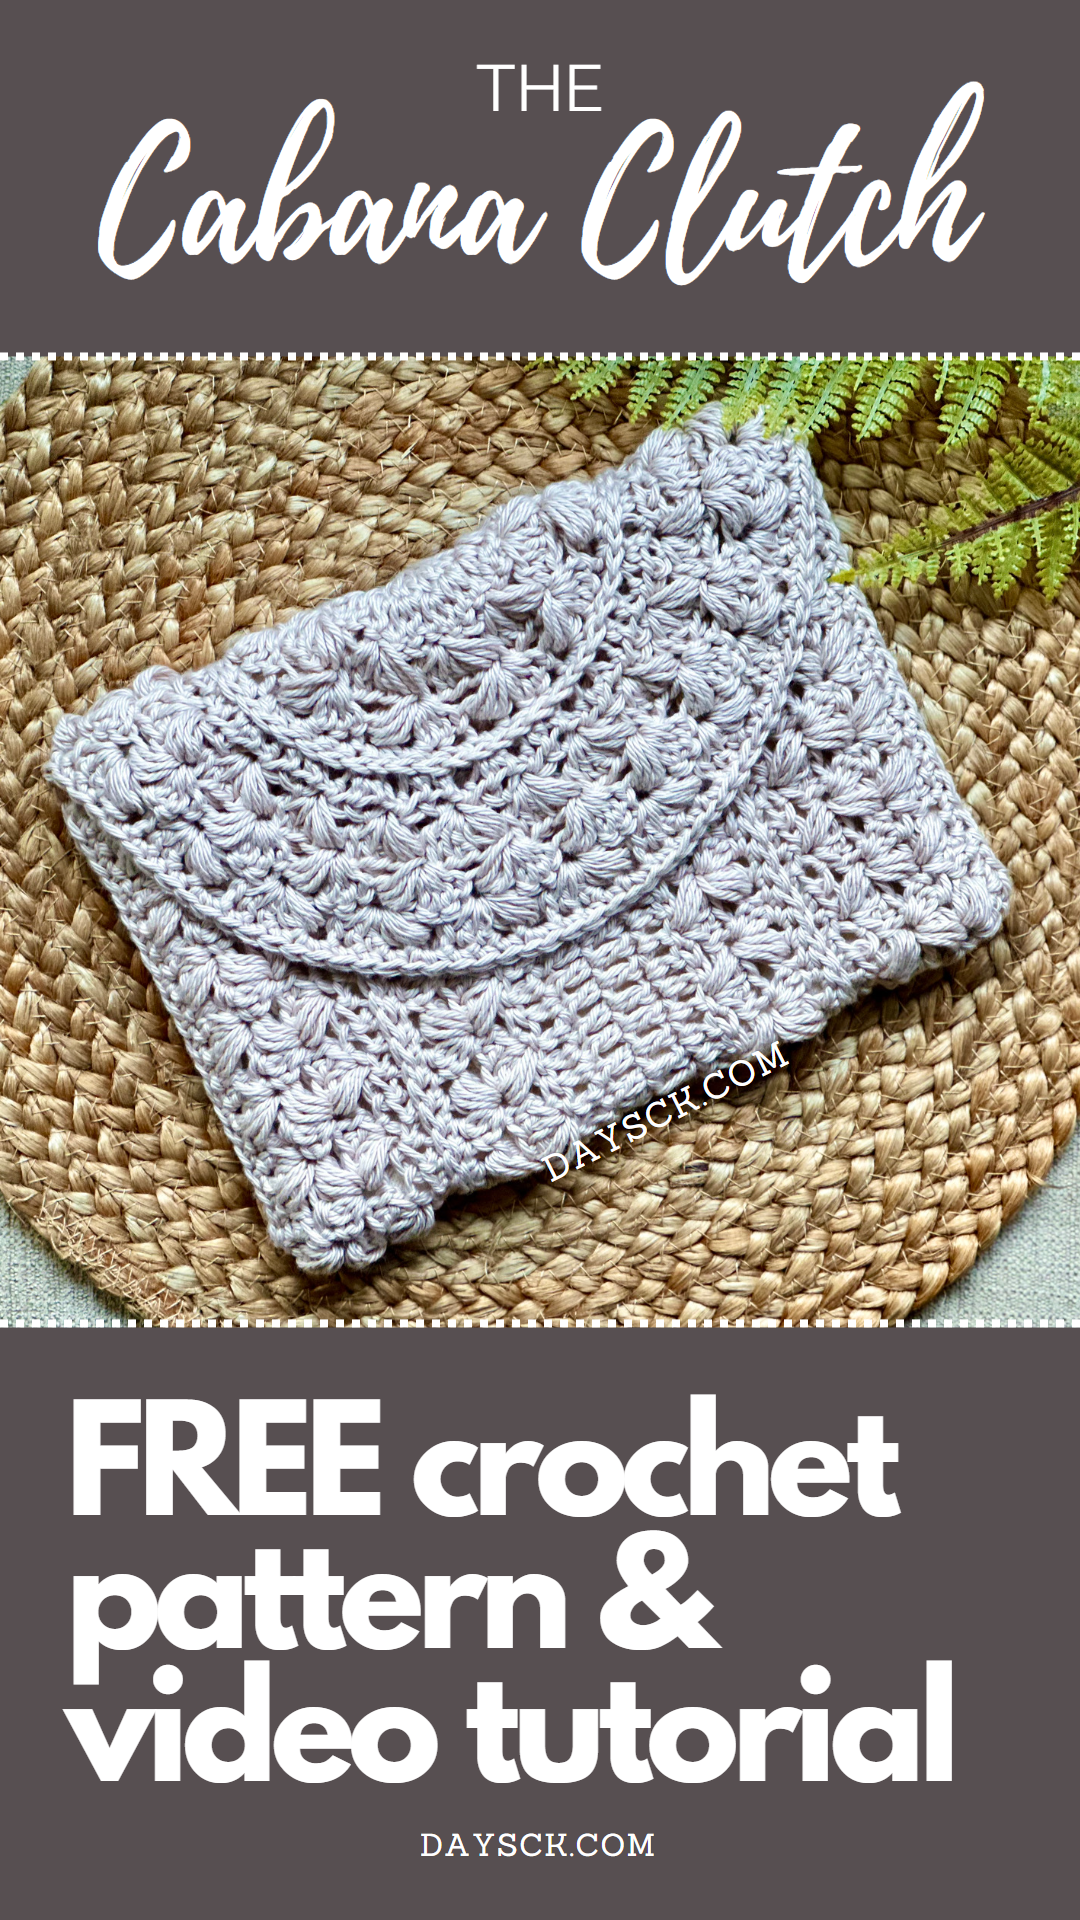
Cabana Clutch
PIN it here!
The days are getting longer, the air is getting warmer, and I could not be happier!
When the weather starts turning warmer, I can’t help but start dreaming up crochet bags. They’ve got to be one of my most favorite things to design and I decided to kick off this season with a brand new crochet clutch pattern!
This post may contain affiliate links that help me to continue to post free content. If you prefer an ad-free printable pdf, you can find this pattern in both my Etsy and Ravelry shops for very little cost.
This adorable clutch would be great for any spring or summer outfit, and would be a lovely accessory for an evening out on the beach. I also think it would be a simple and elegant accessory for a nice dinner on a cruise or as a wedding guest.
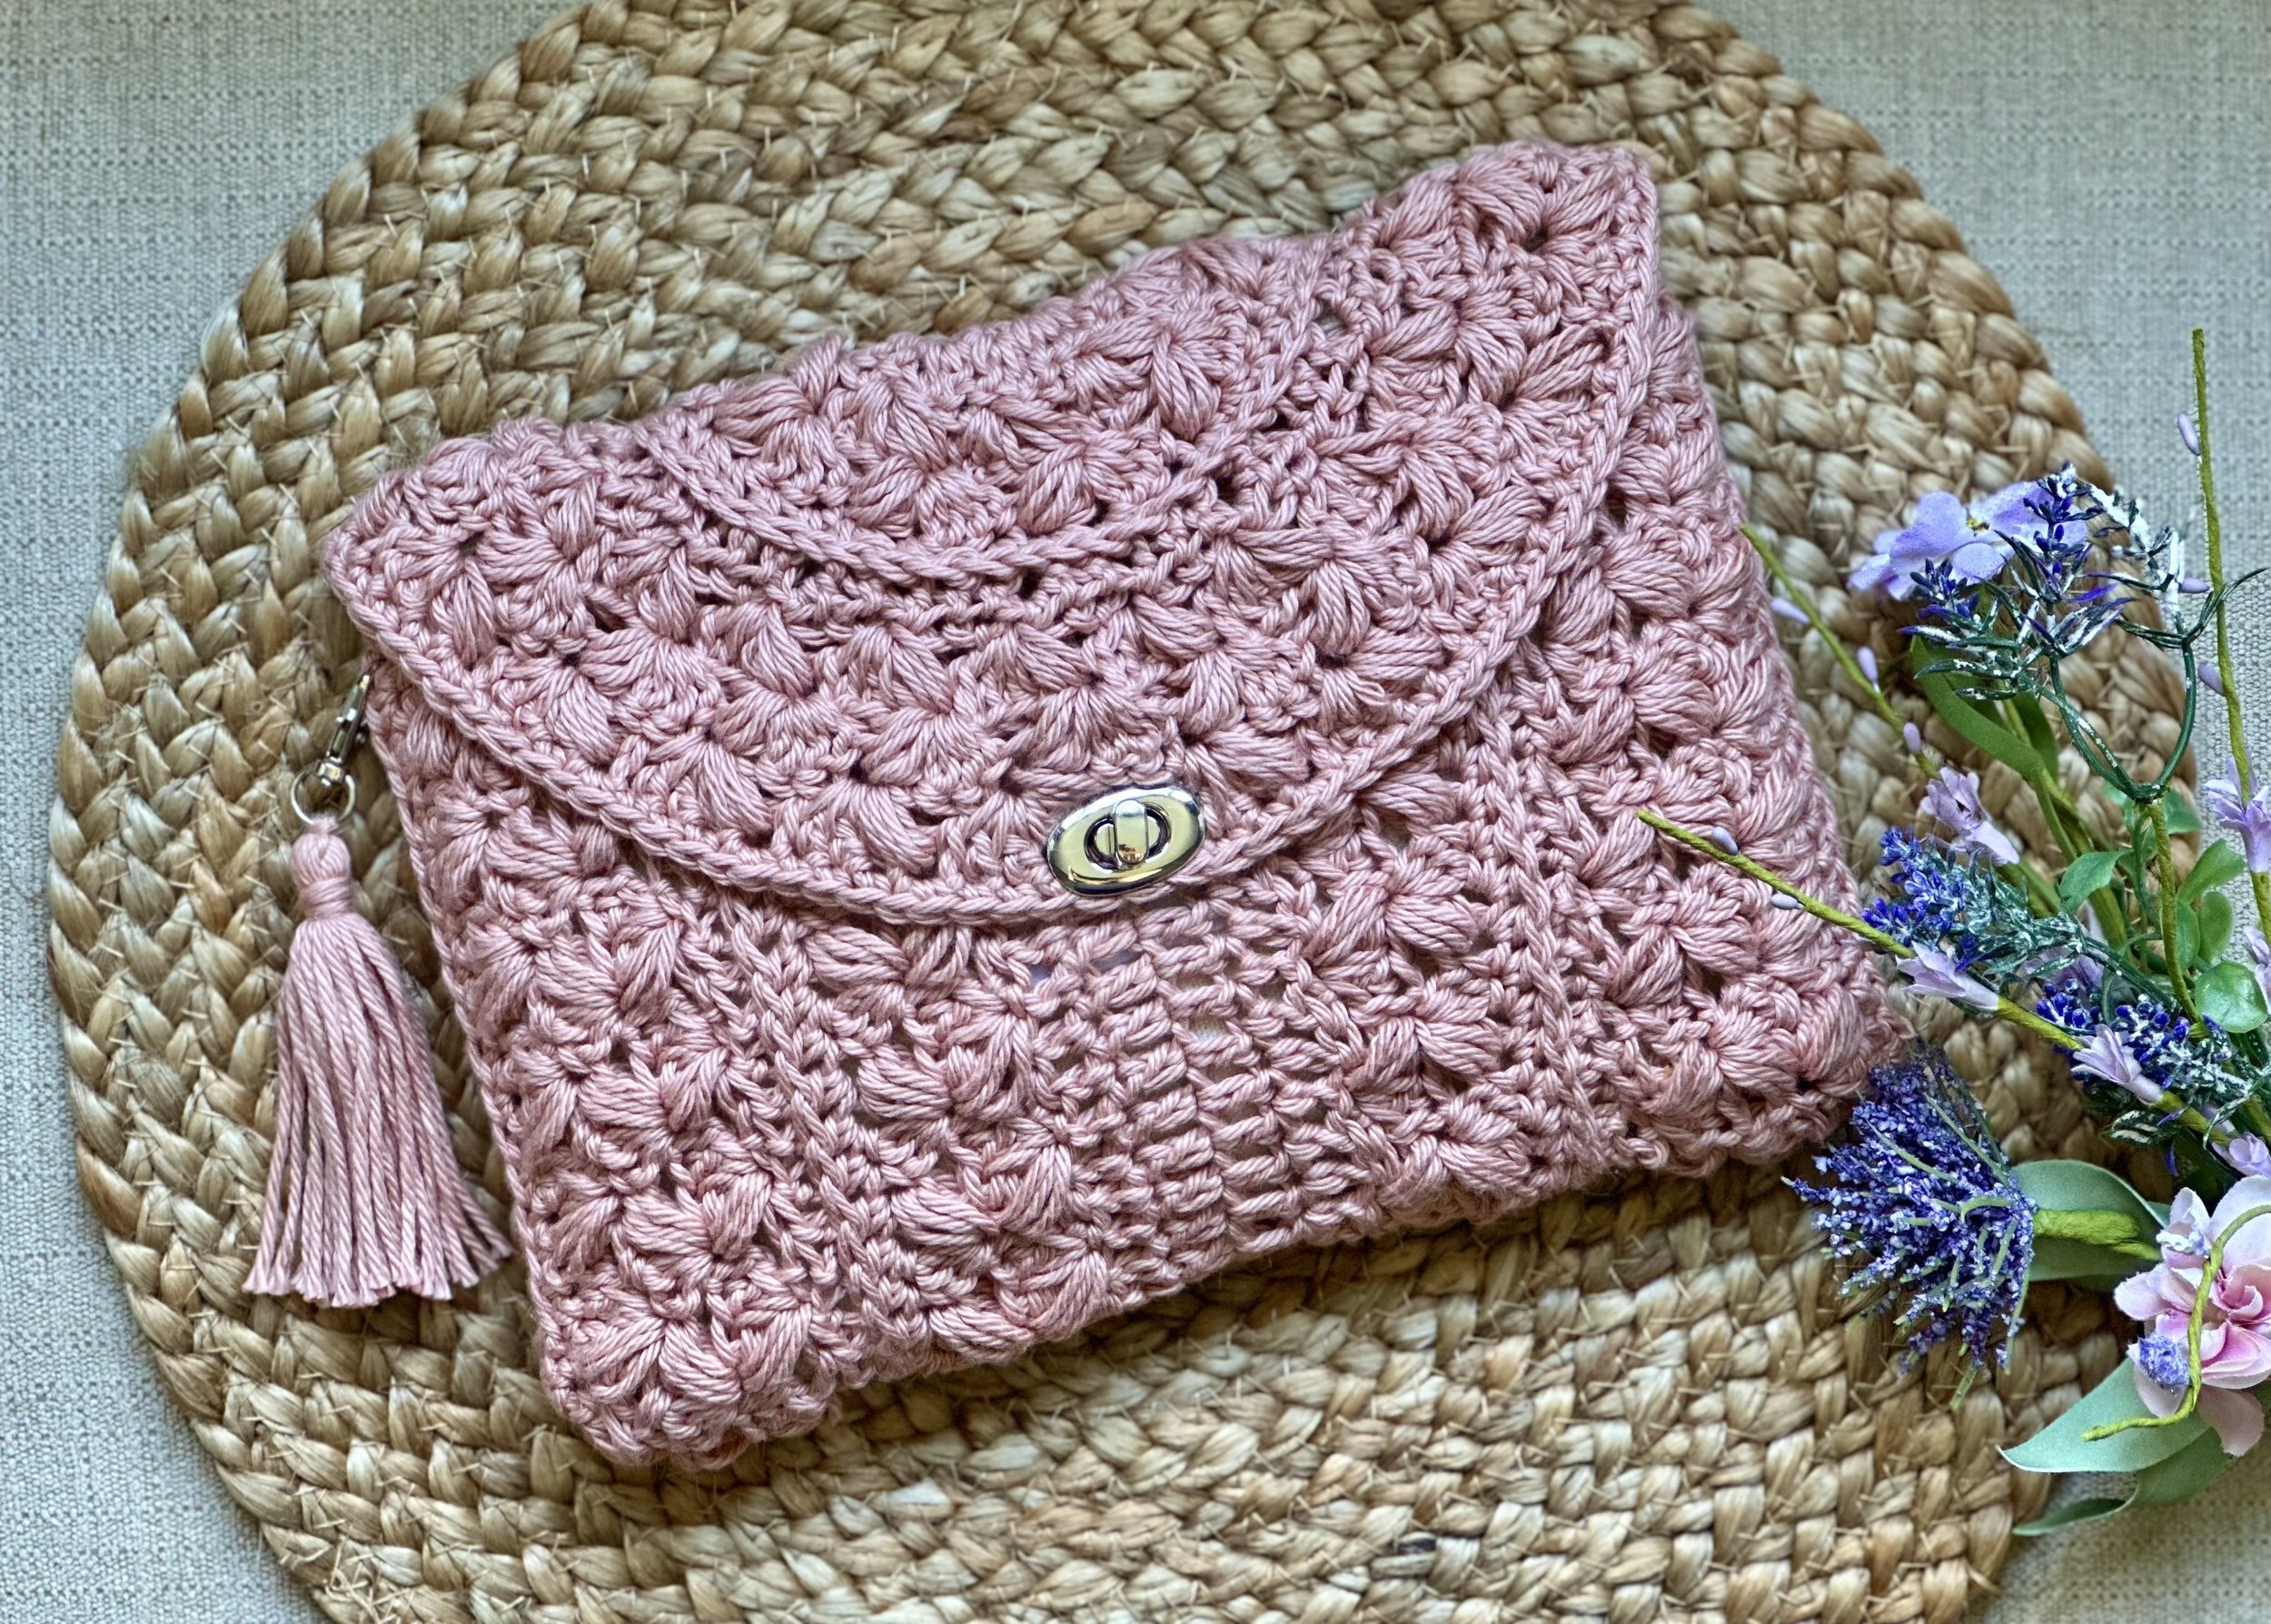
The Cabana Clutch works up really quickly and the stitch pattern is so simple but so beautiful! It only needs a solid yarn to really shine, so I chose Yarn Bee pima cotton. This soft neutral is perfect in my opinion, but Yarn Bee always has a bunch of delectable colors to choose from.
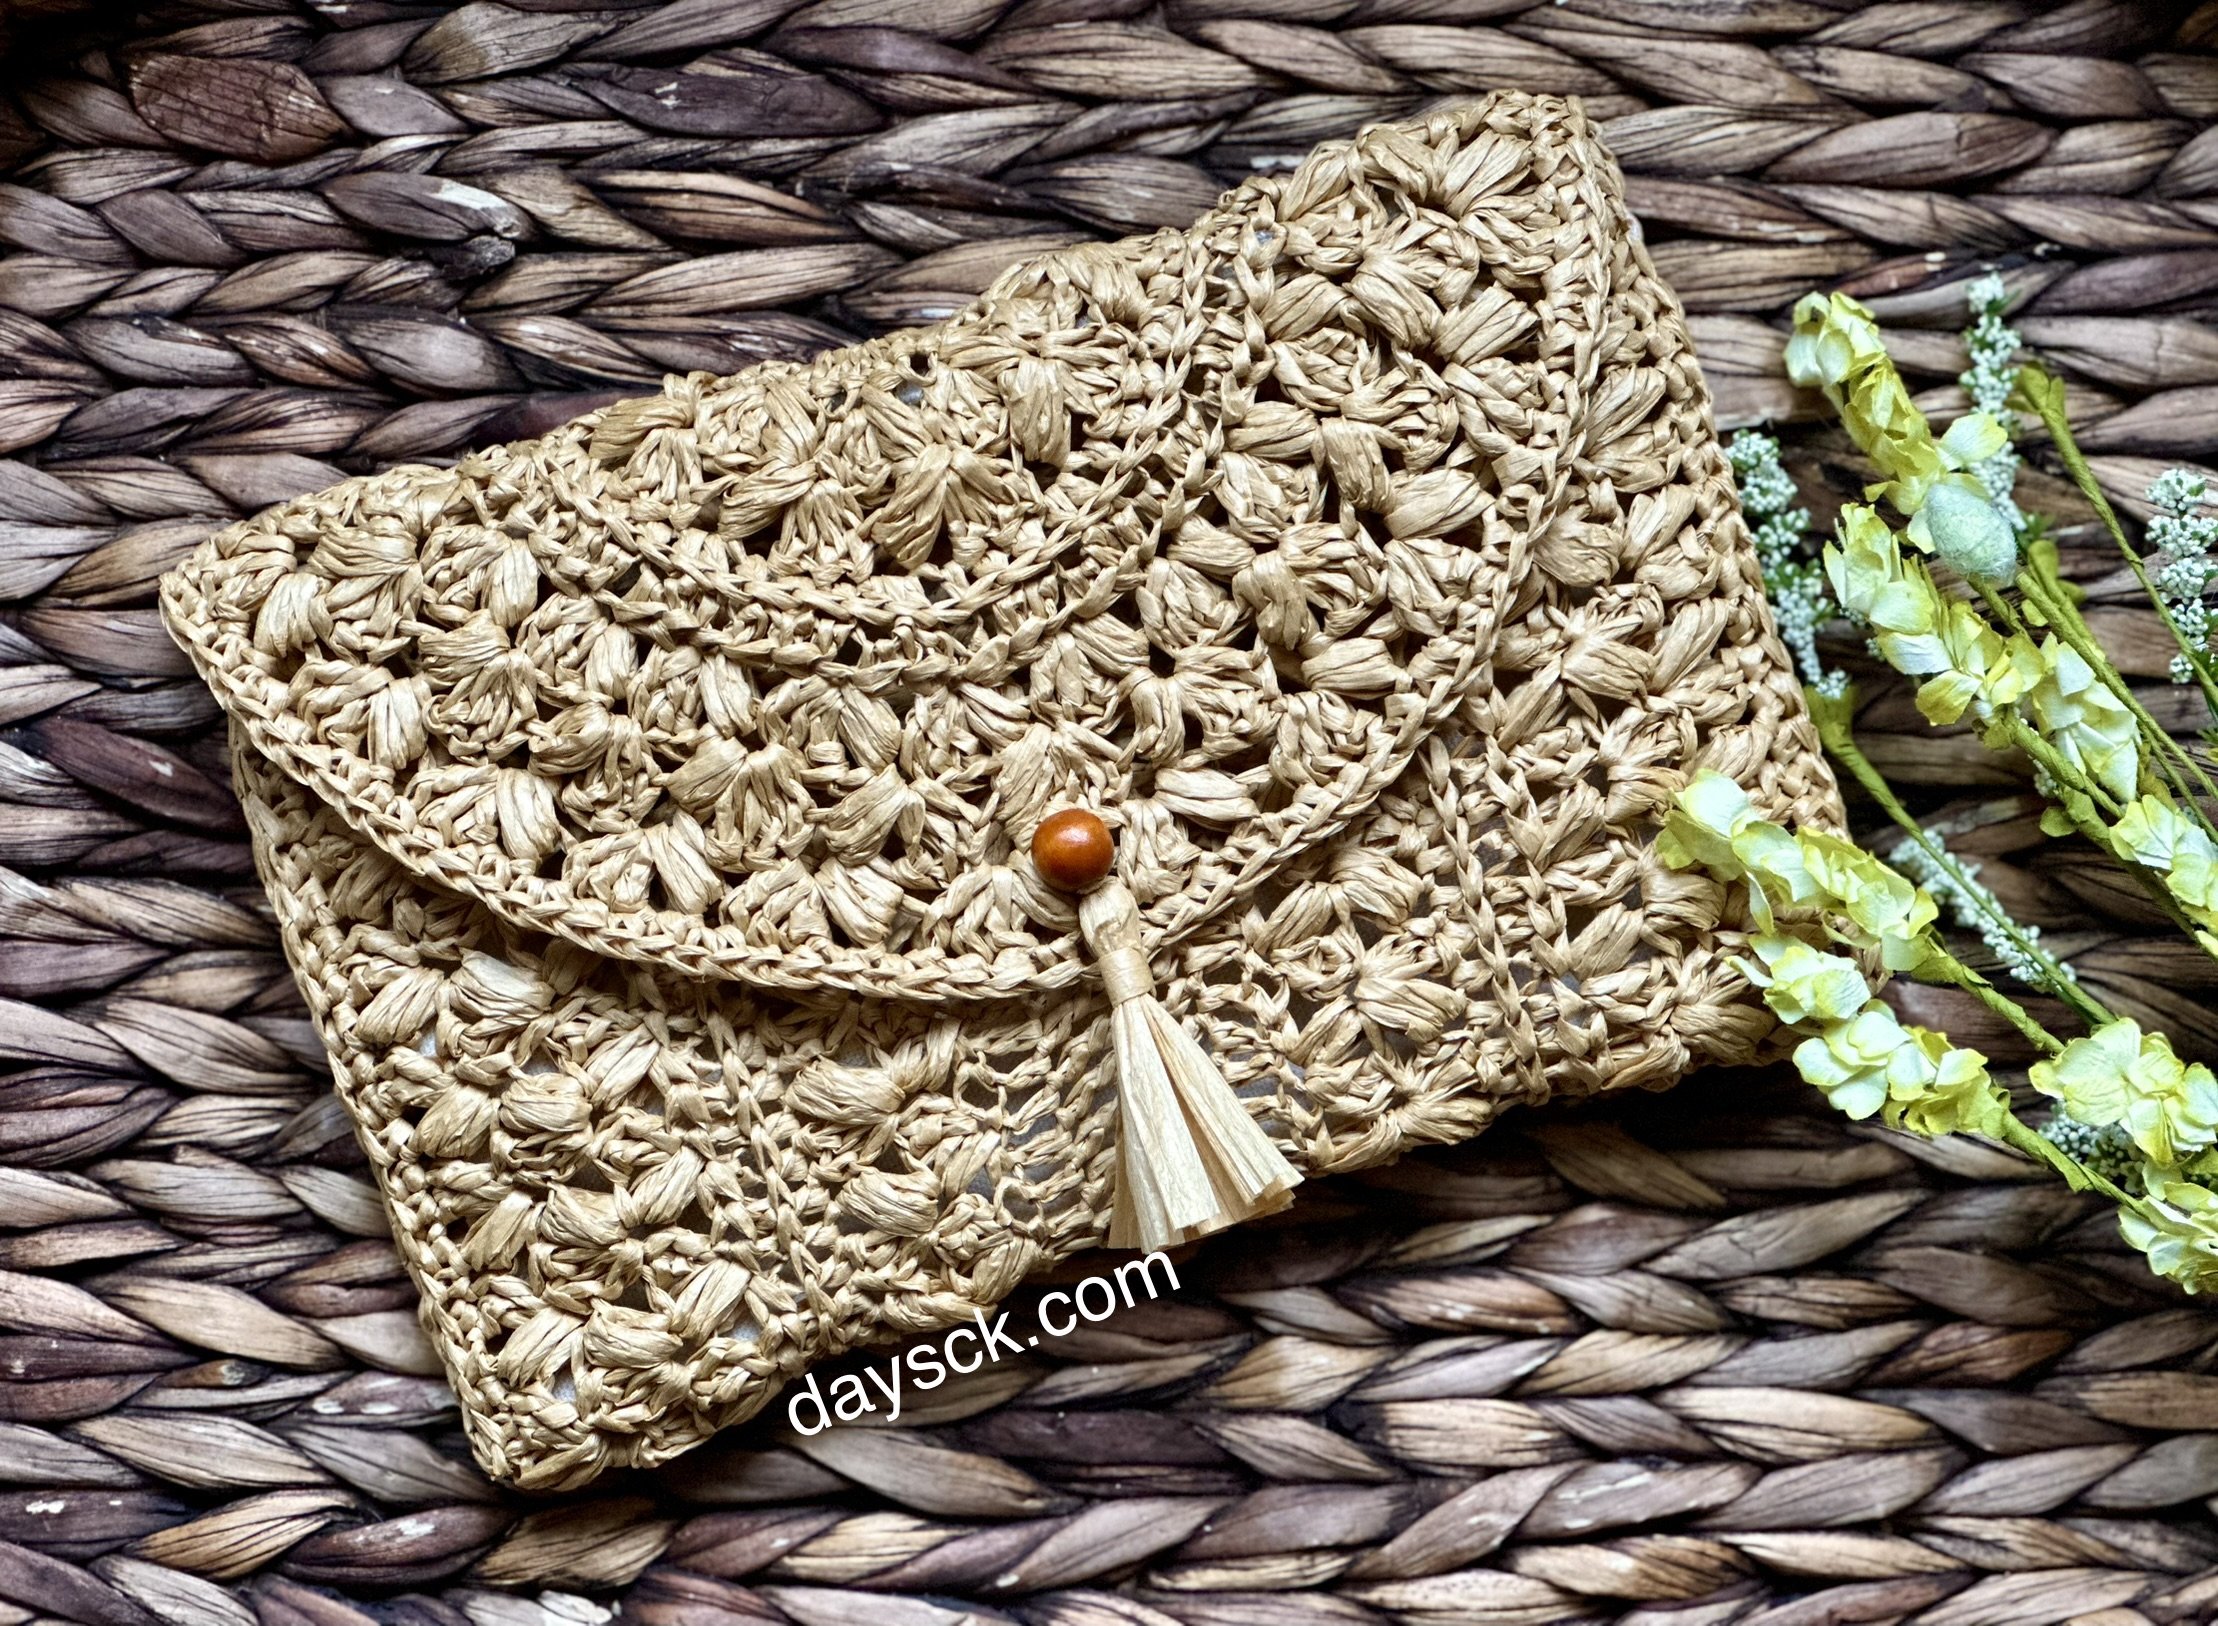
Here I used raffia yarn to really give all the boho summer beachy vibes. I had never tried raffia yarn before, but I fell in love with this project using it. I used a 10-12mm wooden bead as a button closure and added the tassel to the flap itself. I will warn you that I had to go down a few hook sizes to meet gauge.
Regardless of what you use, I have chosen to place a pre-made zipper canvas bag inside to give it better functionality. It is a quick and easy solution for lining your clutch, and it only takes minutes to glue it or sew it to the inside of your bag.
One thing that you really need to note about this design though, is gauge truly matters. If you wish for your bag to fit like a glove over the premade zipper canvas, then you are going to want to make sure your gauge is the same. If you find your gauge is slightly different than mine, err on the side of making it smaller, that way it will fit more snugly to the canvas bag. You really don’t want it to be too big or it will be difficult to get the bags to stay together.
I also want to mention that you can use whatever material you want, but I will say that pima cotton tends to be a bit thinner than regular worsted weight yarns, so if you substitute the materials, you 100% need to do a gauge swatch. You will likely need a smaller hook so your bag doesn’t come out too big.
Enough of my rambling! Let’s make it!
Supplies Needed
-180-200 yds. of size 4 pima cotton, such as Yarn Bee Pima Suprema; see pattern notes
-Size 5.5 mm hook, or size needed to obtain gauge
-9 x 6-inch zipper canvas bag
-Hot glue gun and glue sticks, or needle and thread for attachment of bags
-tapestry needle, scissors, tape measure
Terms Used and Abbreviations
Pattern is written in US terminology.
Begin(ning) - beg
Chain - ch
Double Crochet - dc
Half Double Crochet - hdc
Puff Stitch - PS
Repeat - rep
Right side - RS
Single Crochet - sc
Skip(ped) - sk
Slip Stitch - sl st
Stitch(es) - st(s)
Wrong Side - WS
Yarn Over - YO
* - Repeat directions given from *
[ ] - Indicates the number of stitches you should have in previous row/round
{ } - Work stitches within { } in the same stitch or space
Special Stitches
Puff stitch (PS)- Insert hook into indicated st, YO, pull up a loop, {YO, insert hook into st, YO, pull up a loop} rep brackets a total of 3 times, YO, draw through all 8 loops on your hook. Do not ch 1 unless specified in pattern.
Hdc 3rd Loop - The hdc stitch is made the same as always, but where you place your hook when making the stitch is different. With the RS of your stitch facing you, find your back loop. Push the back loop towards you and look directly behind the stitch. There will be a horizontal bar parallel to the back loop. This is the 3rd loop. To visualize this, see my video: https://youtu.be/wgKK1OSfXzQ?t=829
Gauge
16 dc and 6 rows = 4 inches unblocked, unstretched
Gauge is essential in this project or your crochet bag will be the wrong size for your canvas bag that will serve as the lining of your clutch and give it the structure it needs for functionality.
Finished Measurements
Finished panel is meant to fit snugly over a 9 x 6-inch premade canvas zipper bag.
Pattern Notes
-All beginning chain 3 will count as a stitch; all other beginning chains will not count as a stitch.
-If you choose to use a material other than the suggested Pima cotton, note that the Pima cotton is slightly thinner than a regular worsted weight cotton or yarn. The Pima cotton is closer to a size 3 DK weight yarn. It is imperative that you try to meet gauge so your zippered liner fits correctly. I recommend using a smaller hook to create a smaller bag if you choose a worsted weight yarn so your bag is not too big. Always do the gauge swatch for this project.
-The detailed stitch pattern is much more noticeable when using light, solid-colored yarns. Note that if you choose a variegated yarn, the stitch pattern might get lost in the translation.
Instructions
Bag is made as a flat rectangular-shaped panel that is then folded and sewn together to create the bag and flap portion, with the canvas bag inserted and glued/sewn inside.
Row 1: Ch 48, dc in 4th ch from hook and in each st to last st, 9 dc in last st, turn to work down opposite side of ch and dc in each st to end. [99 dc]
Row 2: Ch 3, turn, dc in next 44 sts, 2 dc in each of the next 9 sts, dc in last 45 sts. [108 dc]
Row 3: Ch 2, turn, sk first 2 sts, {2 dc, PS} in next st, * sk next 2 sts, {2 dc, PS} in next st; rep from * a total of 14 times, ** sk next 2 sts, {3 dc, PS} in next st; rep from ** a total of 6 times, rep from * 14 more times, ch 1, sk next st, dc in last st. [77 dc, 35 PS]
Row 4: Ch 2, turn, sk first st, {2 dc, PS} in next st, * sk next 2 sts, {2 dc, PS} in next st; rep from * a total of 14 times, ** sk next 3 sts, {3 dc, PS} in next st; rep from ** a total of 6 times, rep from * 14 more times, ch 1, sk 2 sts, dc in last st. [77 dc, 35 PS]
Row 5: Ch 1, turn, hdc in first 43 sts, * 2 hdc in next st, hdc in next 3 sts; rep from * a total of 7 times, hdc in last 42 sts. [120 hdc]
Row 6: Ch 1, turn, working through the 3rd loop throughout hdc in the first 46 sts, * 2 hdc in next st, hdc next 4 sts; rep from * a total of 6 times, hdc in last 44 sts. [126 hdc]
Row 7: Ch 2, turn, sk first 2 sts, {2 dc, PS} in next st, * sk next 2 sts, {2 dc, PS} in next st; rep from * a total of 14 times, ** sk next 2 sts, {3 dc, PS} in next st; rep from ** a total of 11 times, rep from * 15 more times, ch 1, sk 2 sts, dc in last st. [94 dc, 41 PS]
Row 8: Ch 2, turn, sk first st, {2 dc, PS} in next st, * sk next 2 sts, {2 dc, PS} in next st; rep from * a total of 15 times, ** sk next 3 sts, {3 dc, PS} in next st; rep from ** a total of 11 times, rep from * 14 more times, ch 1, sk 2 sts, dc in last st. [94 dc, 41 PS]
Row 9: Ch 2, turn, sk first st, {2 dc, PS} in next st, * sk next 2 sts, {2 dc, PS} in next st; rep from * a total of 14 times, ** sk next 3 sts, {3 dc, PS} in next st; rep from ** a total of 11 times, rep from * 15 more times, ch 1, sk 2 sts, dc in last st. [94 dc, 41 PS]
Finishing Round: Ch 1, turn to work across rows, place 2 sc around every dc post and every ch 2 and place 1 sc around every hdc post (you should have 32 sc total), ch 2, turn to continue working around entire piece and sc in next 49 sts, * 2 sc in next st, sc in next 3 sts; rep from * a total of 10 times, sc in last 47 sts, ch 1, sl st in first sc to join. [178 sc]
Fasten off and weave in tails. With the WS facing, fold bottom upward until it meets the group of 9 dc in row 1. Sew side seams together and weave in tails. Place 9 x 6 canvas bag inside and hot glue or sew to the inside of the bag.
Your project is complete! I would love to see your finished work! If you want to tag me on IG, I’m @dayscrochetnc. You could also use the hashtag #cabanaclutch to follow what others are making. I can’t wait to see your projects! If you would like to see other versions that I will be making after this publication, be sure to check me out on IG!
I also wanted to share some of the ones my testers made. I absolutely LOVED the 2-tone versions they were making. This one is by my tester Sara Sclafani:

This lovely 2-toned version was made by my tester Sara Sclafani.
I also tried adding a twist lock closure for the first time ever, and I put the process on my YouTube video so you would know how to add one to yours if you so choose. I also show on camera how I hot glued the bags together. You can watch the whole process for adding the closure to gluing the bags together starting in my YouTube video here.
Please note that you do not have my permission to sell, illegally share, copy, or duplicate this pattern or use my photos in any way. Please do not use this pattern for a video, blog, or class tutorial. Thank you so much for following these simple rules!
Come join my Facebook group, Crochet for Days! We have a lot of fun and I often offer discounts and coupon codes to my members that I don’t offer anywhere else! Request to join and answer the questions by following this link.
What did you think of this project? I hope you enjoyed making it!
Happy hooking!
~Dana