
How to add crochet sleeves to any sweatshirt

PIN it here!
This project is SO much fun to make, I bet you can’t make just one!
This post may contain affiliate links that help me to continue to post free content. To skip the ads and have a printable pdf of this pattern, you can find it for relatively little cost in both my Etsy and Ravelry shops.
Another crochet friend of mine recently shared a post showing that she added crochet sleeves to her favorite sweatshirt, and I just KNEW I had to make one. I began scouring the internet for how to do so, and to be honest, there weren’t very many tutorials that I felt were clear or that had a professional finish.

This green one pictured here was my very first attempt at just winging it, and while I feel it turned out beautifully, I learned some very important do’s and don'ts that I will be sharing with you so you don’t make the same mistakes.

At first glance, my seam looks extremely nice! I crocheted right into the fabric.

But as you can see, with just one wear it’s already starting to stretch along the holes. I will be hand washing this because I feel it probably won’t last through many washes at all.
I realized after making my first prototype that I definitely needed to reinforce the holes that I was crocheting into, or all my hard work would be for nothing after 3 or 4 washes. I began to do some research as to what sort of materials I could use that would help my sleeves hold up for many years, which led me to fusible interfacing.

After watching MANY boring videos on the types of interfacing, I decided to go with a light to mid weight fusible interfacing for this particular project. It worked perfectly; however, I was worried that the interfacing might come apart from the sweatshirt material after washing (as warned on the label), so I decided another step was necessary, and that step is sewing.
hear me out…
I want to stop right here and encourage you to not skip these extra steps I am going to be showing you. If you’re like me, you HATE sewing.
However, I am making these for gifting and selling, so I want them to be the highest quality that I can make. It also takes me around 5 hours to make this project from start to finish, and I certainly didn’t want my time to be wasted by doing a halfway job.
Can you make this project by simply crocheting right into the sleeves? Sure! But it won’t last, and that’s a fact. Doing it right the first time will help you be able to enjoy it for a long time.
Moving right along!
I also want to mention that I am using some supplies that maybe not all crafters have on hand, so I will be sharing a few tips for what you could do if you don’t have the supplies I am using. If you intend to make several of these, however, I do recommend that you invest in the supplies I am using to save yourself time and energy.
Let’s Make it!!
I have included a full YouTube video tutorial to help with the most difficult portions of this project. I recommend watching it at least one time all the way through before attempting the project. You can check it out here:
Supplies Needed
Approx. 600-650 yds of any size 4 worsted weight yarn (you can also use a sport weight size 3)
3.75 mm, 5.0 mm, and 5.5 mm hooks
Rotary cutting blade and rotary skip blade, size 45 mm tool
Light to mid weight fusible interfacing (I’m using Pellon Wonder Under Fusible Interfacing, Style 805)
Iron and ironing board
Sweatshirt in size of choice
Sewing machine and matching thread (you can also hand sew)
Fabric pins or clips
Small piece of cardboard, approx. 6-7 inches wide
Tape measure, yarn needle, scissors
Terms Used & Abbreviations
Pattern is written in US terminology.
Back Loop Only - BLO
Chain(s) - ch(s)
Double Crochet - dc
Half Double Crochet - hdc
Repeat - rep
Right Side - RS
Single Crochet - sc
Skip -sk
Slip stitch - sl st
Space(es) - sp(s)
Stitch(es) - st(s)
Wrong Side - WS
* - Repeat directions given from *
[ ] - Indicates the number of stitches you should have
( ) - Indicates a note
{ } - Work stitches within { } in the same stitch or space
2tog - indicates a decrease
Special Terminology
Invisible Sl St - Remove hook from working loop. Take working yarn tail to back of work. Insert hook from back to front in first st of round and hook working loop onto your hook. Draw working loop to back of work and continue as usual. To visualize this st, see my video linked above.
3rd Loop - You will not change the way you complete the st instructed, only the place where you insert your hook. Instead of inserting your hook under the 2 bars at the top of the hdc, you will insert your hook into what's known as the "3rd loop", which is a horizontal bar that runs parallel to the front loop of the hdc. In this pattern, you will need to push the 2 bars at the top of the st away from you and find the 3rd loop running parallel to the front loop (it should be facing you). To visualize this, be sure to watch my video above.
Pattern Notes
The first st of every round is the same st as joining.
Beginning chs do not count as a st unless otherwise specified.
Each sleeve round is turned in order to keep the seam straight and less noticeable.
Pay attention to which kind of sl st I am telling you to use, as it will affect how nice your seam looks. As a rule of thumb, if the RS of your work is facing you, join with an Invisible sl st; if the WS of your work is facing you, join with a regular sl st.
Be careful you don’t work into your joining sl st when turning your work, or you will accidentally increase. You might wish to mark the last st of each round if you are struggling with this.
Make sure you make your sl sts loosely because you will be working into all sl sts except the ones you join your rounds with. You will need to pull up a tall loop each time to prevent making them too tightly.
If your foundation round appears to be making the fabric bunch up, you are making your sl sts too tightly.
Be sure to read the instructions of the fusible interfacing prior to using. You may also wish to protect your ironing board with something (like a scrap piece of fabric), as the interfacing is likely to get on your ironing board and cause it to be sticky. I have a craft ironing mat for crafts only to prevent this from happening to the one I use for household purposes.
Keep in mind that your sleeves will likely stretch over time and take that into consideration when deciding on the length of your sleeves.
BE SURE you have the same number of foundation sts on both sleeves or they will look quite different!
Gauge
With a 5.5 mm hook and regular ww yarn, 15 hdc and 9 rows = 4 inches. Gauge is not imperative for this pattern.
Instructions
Steps 1-7 will be preparing the sweatshirt for the crochet portion. Once you have completed steps 1-7, you will begin crocheting rounds from the shoulder to the cuff, decreasing every 4 rounds. Your st counts do not need to match mine exactly, as it will vary depending on the size of the arm hole, etc. HOWEVER, it will matter that both of your foundation rounds have the same number of sts starting out or your entire project will be off. It might be prudent to go ahead and write the st counts after completing each round so you can compare your second sleeve for consistency.
Step 1
Place your sweatshirt sleeve on your cutting mat. Using the quilting ruler as a guide, measure 2 inches from the factory seam at the level of the shoulder. Using your rotary cutting blade, cut the sweatshirt sleeve off. Repeat to the other sleeve. (You can also use a tape measure and fabric scissors here.) Flip sweatshirt inside out.

Cut 2 inches down from the factory seam at the shoulder.

This is what it should look like.
Step 2
Plug in your iron and set to the specifications on your fusible interfacing package and set iron aside to warm up. Using the cutting mat, quilting ruler, and rotary cutting blade, cut four 2-inch strips of fusible interfacing. You want them to be longer than the width of the sleeve hole, as we will cut the excess off after ironing. (You can also just measure and cut with scissors here.)

Step 3
Following the instructions on the package, iron the interfacing strips to the wrong side of the sweatshirt fabric along the 2 inches you left at the top of the shoulder seam. Cut off the excess interfacing and peel the paper off. Repeat to 3 remaining sides of the sleeves. (NOTE: You may have to cut darts in the interfacing prior to ironing in order to follow the seam. It does not have to be perfect, as this will not even show in our finished product.)

It doesn’t have to be perfect! It won’t even show in the end.

Cut off the excess interfacing.

Peel off the paper while your project is still warm.
Step 4
Fold the sleeve excess so the wrong sides are together until the bottom edge meets the factory seam. Clip or pin into place.

Fold as shown here.

Pin or clip it into place.
Step 5
Sew along the factory seam leaving about a ¼ inch seam allowance. This is to prevent the interfacing from separating from the sweatshirt material with multiple washings. You can hand sew or use a sewing machine.

Step 6
Switch to a rotary skip blade. Flip the sweatshirt right side out. Grab a piece of cardboard (around 6 inches wide or the width of the arm hole opening) and place it inside the sleeve to separate the 2 layers.

The cardboard keeps you from making holes through all layers.
Step 7
Place rotary skip blade near the factory seam (but not too close!) and begin carefully cutting holes along the seam line. Flip sweatshirt over and repeat to the other layer, making sure you are cutting over the cardboard and not through all layers. Repeat process to the other sleeve. (If you don’t have a rotary skip blade you can measure and place holes so that they are 1 cm apart using a sharp awl or seam ripper.)

This rotary skip blade creates holes in the fabric that are approximately 1 cm apart.

Follow the factory seam, but not too closely. You don’t want to accidentally cut the stitches of the seams.
Step 8
Grab your 3.75 mm hook to create the foundation round with. Begin at the hole closest to the underarm seam, slightly to the left.
Foundation Round: With the RS of your sweatshirt facing you, insert hook into the indicated hole and place your slip knot onto your hook, draw up a loop. LOOSELY sl st into each hole around. If your fabric is bunching or rippling, you are making your sts too tightly. (NOTE: If you find some of your holes are incomplete, use a seam ripper to finish the hole.)
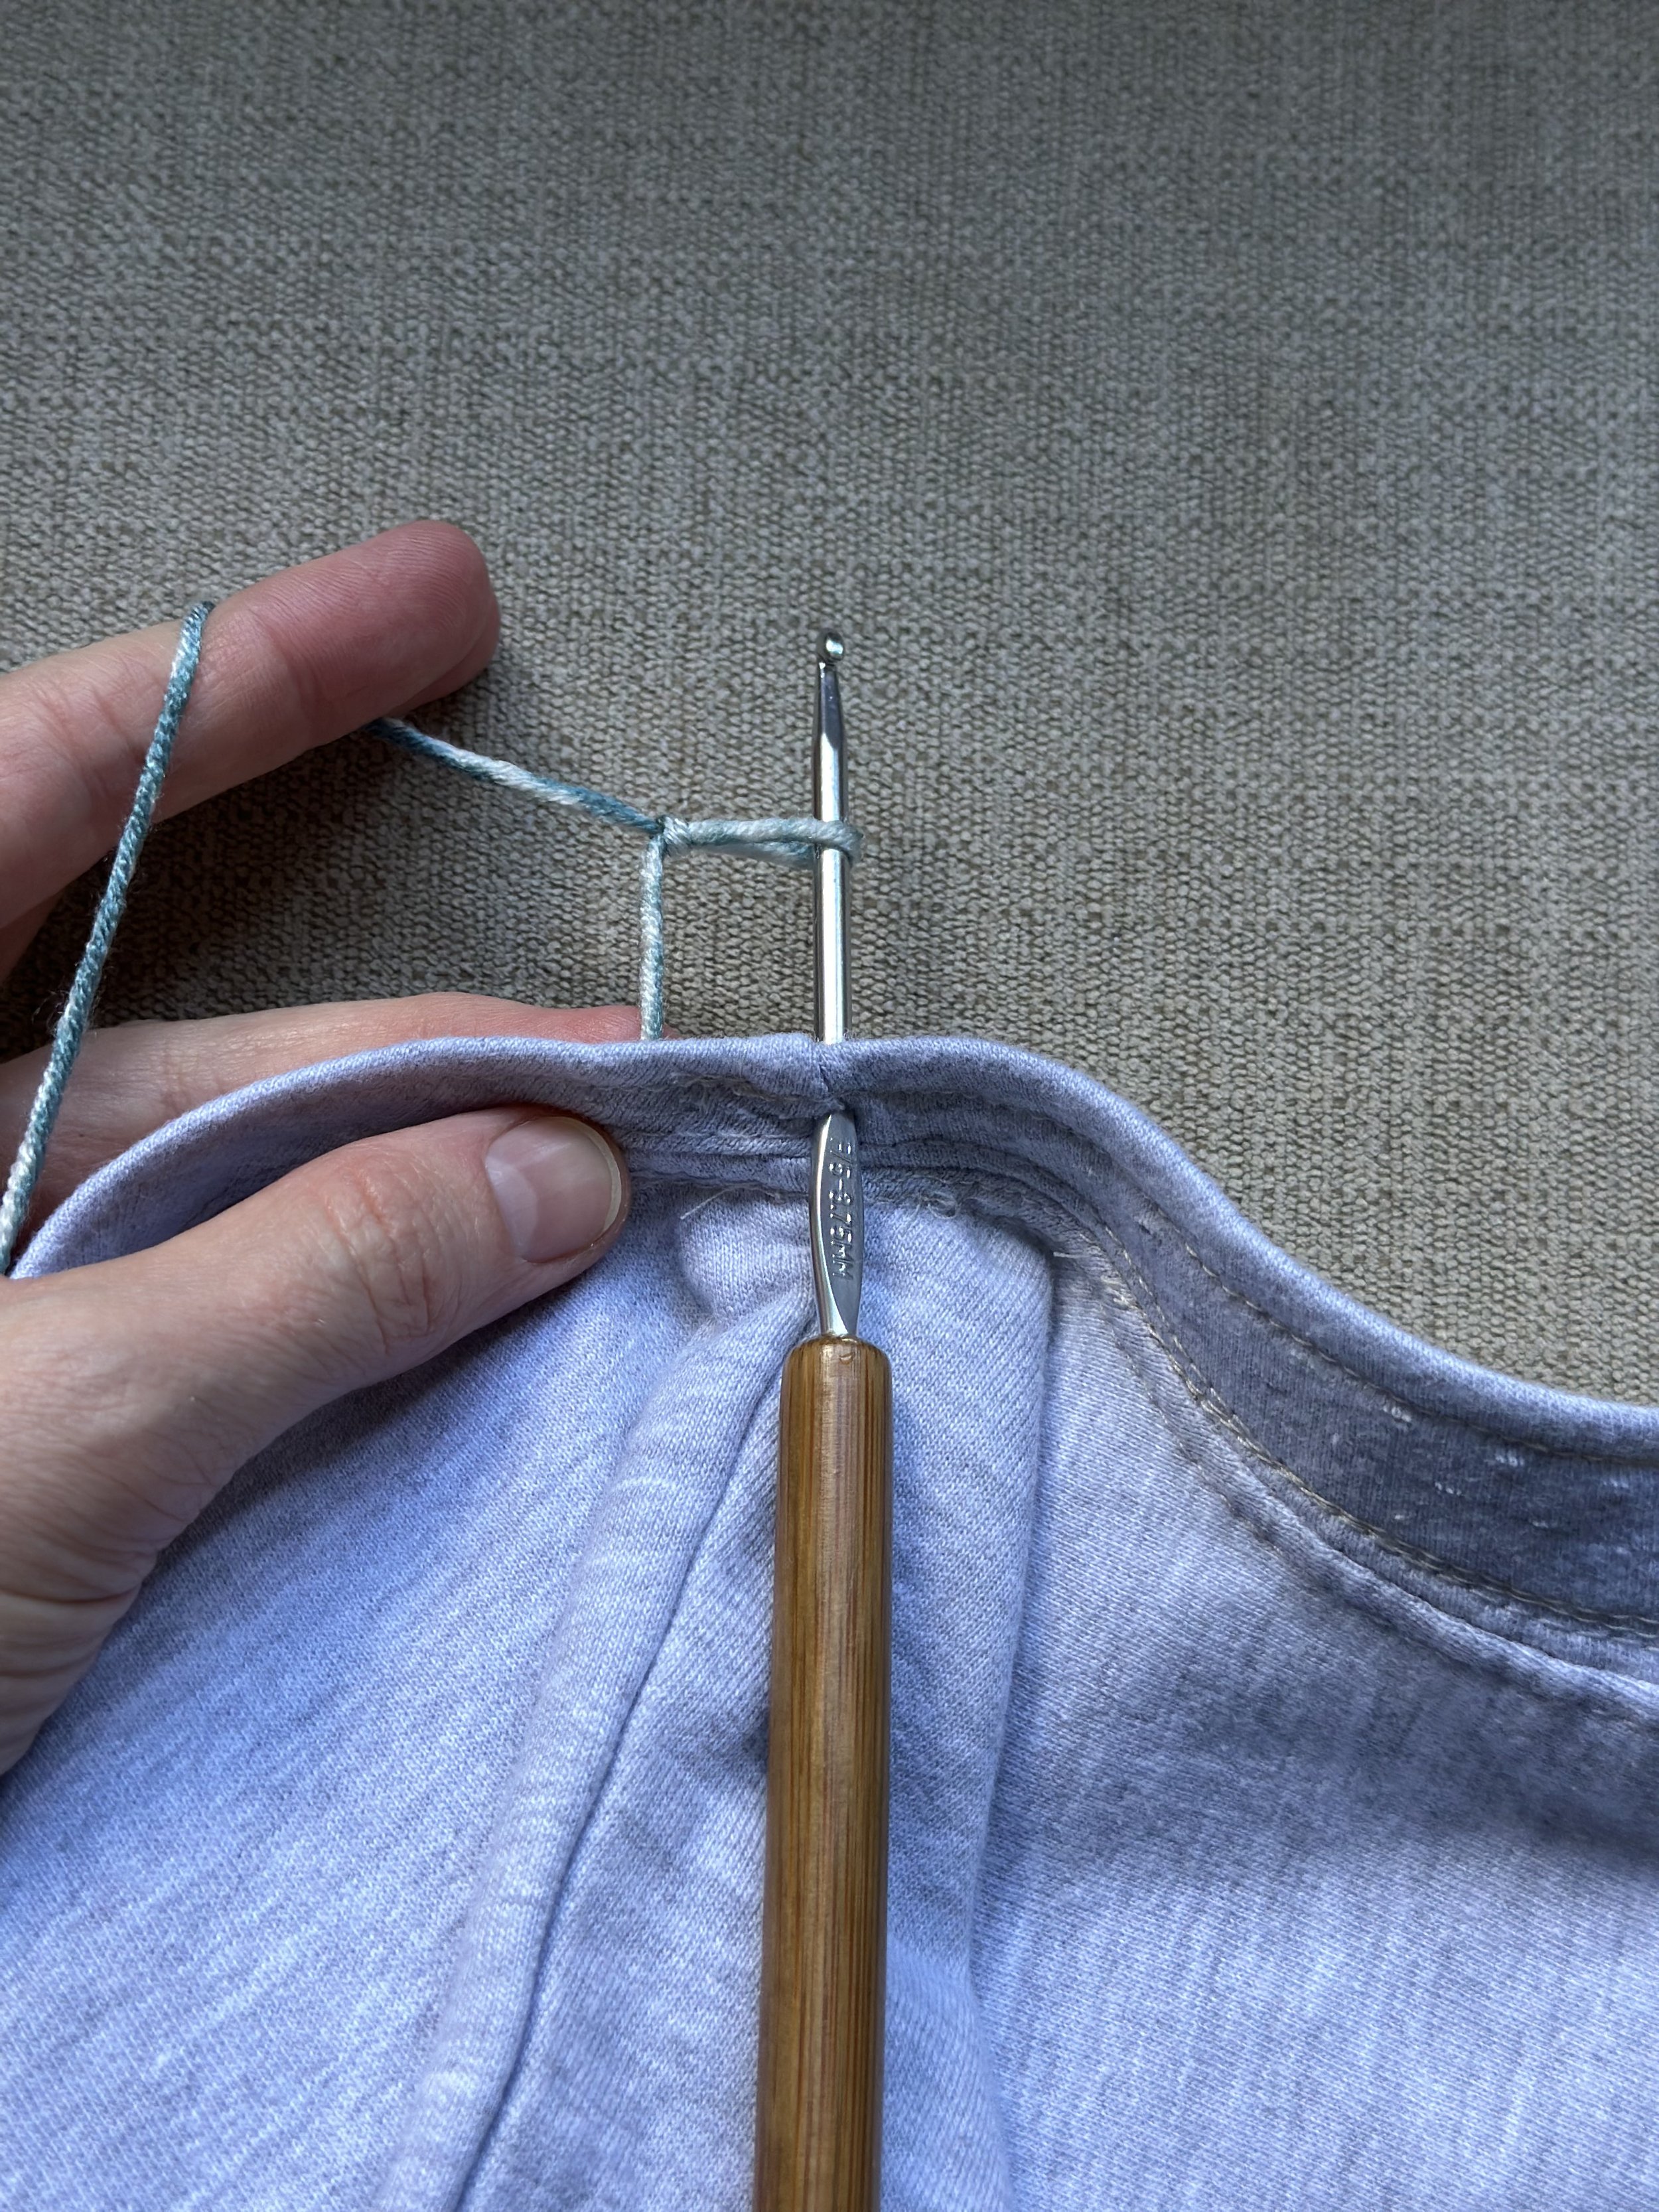

To “join” the foundation round, pull up a tall loop, remove your hook from your working loop, insert your hook from back to front in the very first hole of the round, add working loop to hook and gently pull it to the back. It should look like the rest of the surrounding sl sts, and will be treated as a sl st.


Begin Sleeves
Round 1 (RS): Switch to 5.5 mm hook. Ch 1, working into the BLO of each sl st around, 2 hdc in same st as “joining”, hdc in each st around, 2 hdc in last st of round. Join with an Invisible sl st.
Stop and count your sts. You need an even number of sts to make the st pattern work. I recommend writing this number down so you can be sure to match this number on the opposite sleeve.
Round 2 (WS): Ch 1, TURN, working in the 3rd loops in every st around hdc2tog over the first 2 sts, hdc in each st to last 2 sts, hdc2tog over last 2 sts. Join with a normal sl st.
Round 3 (RS): Ch 1, TURN, * hdc both loops, hdc BLO; rep from * around. Join with an Invisible sl st.
Round 4 (WS): Ch 1, TURN, * dc, sl st; rep from * around. Join with a normal sl st.
Round 5: (RS): Ch 1, TURN, hdc in the BLO in every st around. Join with an Invisible sl st.
Rounds 6-41: Rep Rounds 2-5.
Round 42 (WS): Rep Round 2.
Cuff
Switch to a 5.0 mm hook. Turn so the RS of your work is facing you.
Row 1: Ch 9, sc in the 2nd ch from your hook and in each st across. Sl st into the first 2 sts of Round 42. [8 sc]
Row 2: TURN, sk sl sts, sc both loops of first st, sc BLO in next 6 sts, sc both loops of last st. [8 sc]
Row 3: Ch 1, TURN, sc both loops in first st, sc BLO in next 6 sts, sc both loops of last st. Sl st into the next 2 open sts of Round 42.
Rep Rounds 2-3 until all sts from Round 42 are completed. You should have the same number of cuff rows as sts in Round 42.
Sl st once more in the same st as beginning row, ch 1, place RS of first and last rows together and line up sc sts, sl st through all 8 sts in both layers. Fasten off and weave in tails.
Repeat entire process to opposite sleeve, making sure your st counts match up.
Add a crochet hood tie
If you chose to make a hoodie, I think a matching hood tie adds a bit of pizazz without being “too much”. I did not use a specific st count, but I did create a Romanian cord in the same length as the original tie. If you would like to make a Romanian cord, I recommend watching the video starting here.
If you would prefer to keep it simple, I would simply double your strands and make a chain in the length of the hood tie. It will look about the same as the Romanian cord without the hassle. I also recommend leaving longer tails and threading them onto a yarn needle to feed the cord through the holes in the hood for the ties. (I have also used a straw to feed the tie through the hood in the past.)
Once the tie is inside the hood I recommend knotting off both ends so it doesn’t easily work its way back out.
Think outside the box!
Make it Trendy
For my niece I purchased a trendy sweatshirt and added funky sleeves to match her personality. I tried to match the colors of the lettering as shown on the front using random yarn from my stash. I used granny clusters instead of the pattern in this post, but the concept is the same.

I’m seriously OBSESSED with this!
I will tell you that you want your first round to be a multiple of 3 if you choose to do the granny clusters. I also decreased every fuzzy round.

How cute is this stinkin’ tiger?!
I just finished this one where I decreased every 3rd round. It really just depends on how wide you want your sleeves to be. You can always adjust it to your preferences. I do wish I had decreased every 4th round instead. It still turned out cute, though!
Add Iron-on Decals
I have also gotten a plain white sweatshirt and added colorful sleeves and an iron on decal for the front to add a bit of flair and character. The sleeves are simple hdc rounds, but I still decreased in the same fashion as this pattern and turned every round. I love how cute it turned out! I got the iron-on decal from Hobby Lobby for about $5.

I love how well the iron-on patch matches the sleeves! I used a self-striping yarn from Michaels.
Add Crochet Embellishments
You could also realistically add a crocheted embellishment to the front. I haven’t done this yet, but if I do I will likely reinforce the crocheted portion somehow, possibly with more interfacing, otherwise it might lose its shape over time. You could also replace (or add) a front pocket like a hoodie usually has to add a bit of flair, add a crocheted border along the existing pocket, or along the outer edge of the hood.
Make Granny Square Sleeves
I also plan to make one with granny square sleeves and follow the basic concept, simply joining them to the first round. I will likely seam them with a funky eyelash yarn or faux fur yarn to give it a bit of pizazz, but I haven’t made up my mind yet. Using a fuzzier yarn keeps the seam at the shoulder level from being quite as noticeable, as I am showing you here on the one I made for my niece.

You may also notice that I crocheted around the seam edge and skipped the foundation round altogether. That’s the magic of fuzzy eyelash yarn, baby!
The Sky’s the Limit!
Honestly, once you prep your fabric, you could make any kind of sleeve you wanted to. You could even follow the concept with a heavier fabric like a jean jacket (or maybe turn regular jeans into crochet bell bottoms, add a crochet slit embellishment to a jean skirt, etc.).
The good news is with thicker fabrics you aren’t likely to need to use the interfacing because the holes will probably hold up to wear and washing. WOOT!!
I Use This Technique Elsewhere
If you didn’t already know it, I also used this concept to make my Block Party Bag. In this project I crochet into faux leather squares and join the squares to make a funky boho bag. It is a fun technique to try out. You can check that project out here if you’re interested!

Your project is complete! I would love to see your finished work! If you want to tag me on IG, I’m @dayscrochetnc. You could also use the hashtag #hookeduphoodie to follow what others are making. I can’t wait to see your projects! If you would like to see other versions that I will be making after this publication, be sure to check me out on IG!
Come join my Facebook group, Crochet for Days! We have a lot of fun and I often offer discounts and coupon codes to my members that I don’t offer anywhere else! Request to join and answer the questions by following this link.

PIN it here!
Please note that you do not have my permission to sell, illegally share, copy, or duplicate this pattern or use my photos in any way. Please do not use this pattern for a video, blog, or class tutorial. Thank you so much for following these simple rules!

What will you make with this technique? Let me know in the comments!
Happy Hooking!
~Dana