
The Dahlia Lampshade Crochet Pattern + Video
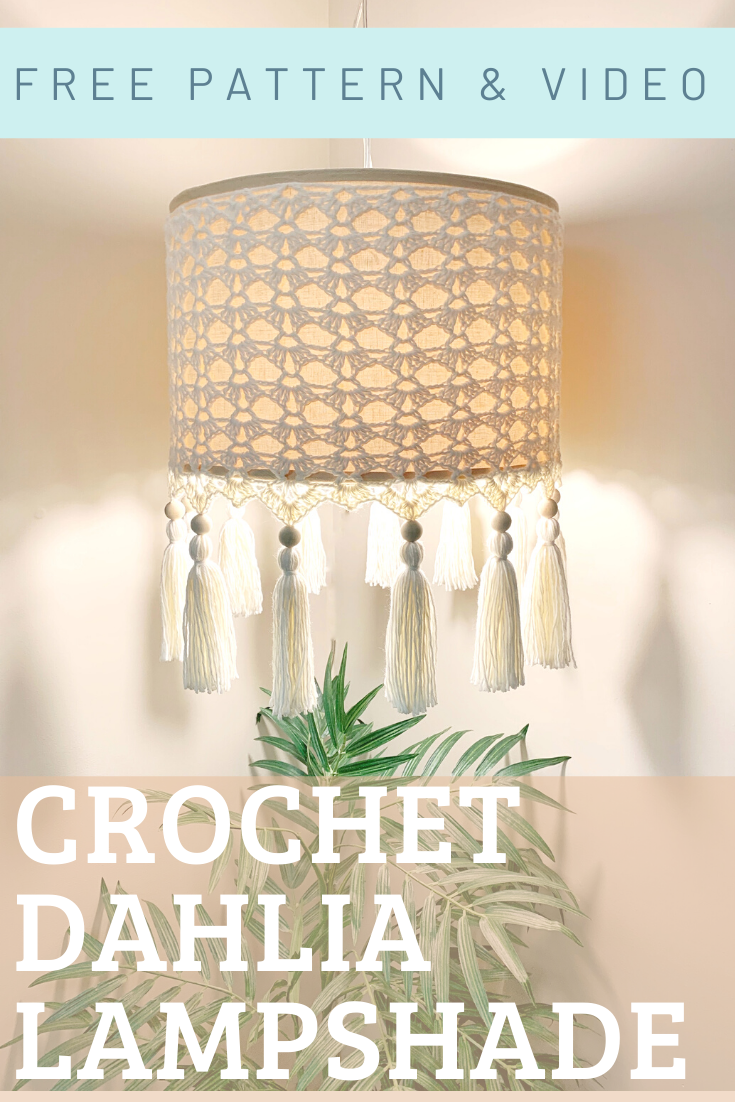
I created this lampshade cover because I couldn’t find one that was the look I wanted at an affordable price. The lighting kit was only $20 at Lowe’s and I purchased the lampshade at a thrift store for $1.50. I was infinitely happier with the cost, and I love the simple beauty it adds to my room. It’s a lovely statement piece that won’t overwhelm your space!
For all my weekly content follow me below:
On Pinterest Click Here
On YouTube Click Here
On Instagram Click Here
On Facebook Click Here
Etsy shop Click Here
Ravelry shop Click Here
Come join my Facebook group Crochet for Days! We have a lot of fun in there and I often offer coupons and discounts to my members that I don't offer anywhere else! Just follow this link to answer the questions and request to join: Facebook Group
For an Ad-free printable pdf, see my Etsy shop or my Ravelry store.
Ravelry: https://www.ravelry.com/patterns/library/dahlia-lampshade
Etsy shop: https://www.etsy.com/listing/837223900/the-dahlia-shade-pdf-pattern-only-not-a
Supplies Needed:
-Size 3 DK weight yarn, approx. 600-650 yds for larger pendant and 250-300 yds for a smaller lamp. Yardage is approximate since it will vary by the size of your lampshade. (I do not recommend using a heavier weight yarn for this pattern. I also advise you to use cotton or cotton blends per fire hazard recommendations) I used Lion Brand Comfy Cotton Blend in the color Whipped Cream.
-Size H 5.0 mm hook
-Wooden beads, size 25 mm for larger pendant, 20 mm for smaller. (Optional. Amount needed will vary by your stitch counts)
-cylinder or square/rectangular lamp shade in the size of your choice (NOTE: Shade can have a slight increase in diameter towards the base of approximately 0.5-1”, but otherwise, needs to be uniform in shape for this cover to work)
piece of cardboard 6” wide
Terminology Used and Abbreviations:
Pattern is written in US terminology.
Beginning - beg
Chain(s) - ch(s)
Cluster V-Stitch(es) - Cl V - st
Double Crochet - dc
Fasten Off - FO
Repeat - rep
Single Crochet - sc
Skip - sk
Slip Stitch - sl st
Space(s) - sp(s)
Stitch(es) - st(s)
V-Stitch(es) - V-st
Yarn Over - YO
Special Stitches:
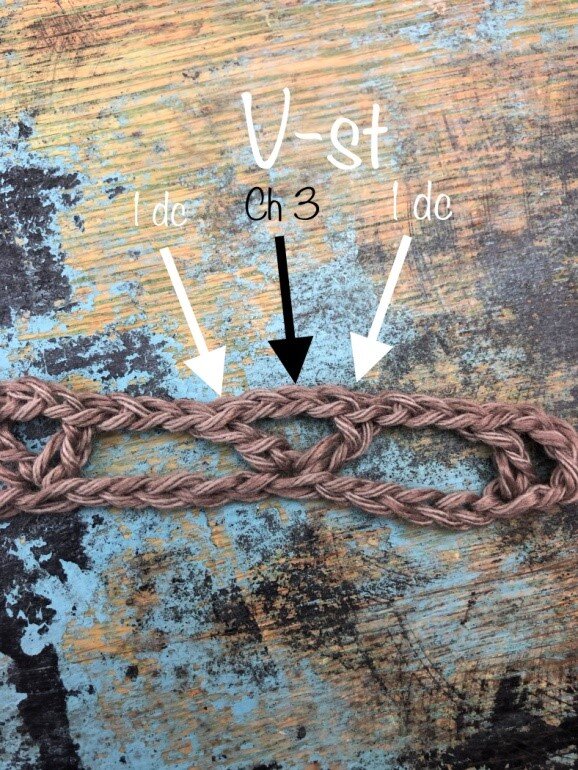
V-Stitch: {1 dc, ch 3, 1 dc} in the same st or sp.
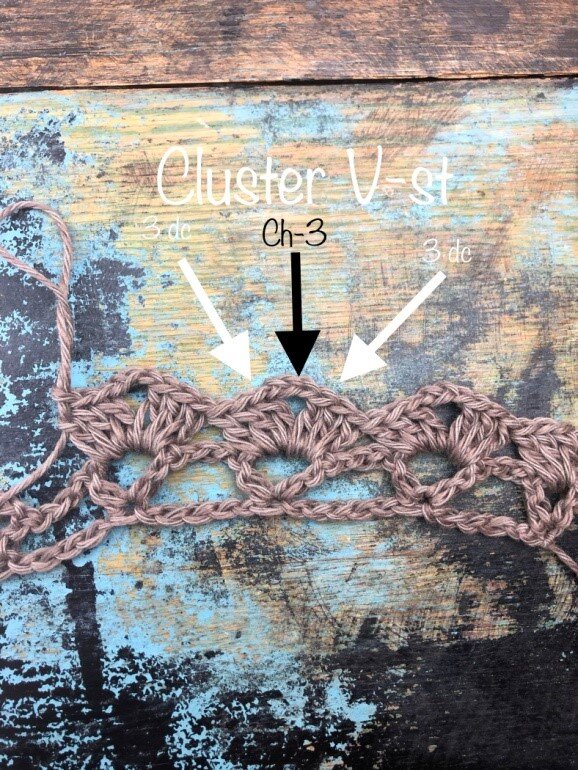
Cluster V-Stitch: {3 dc, ch 3, 3 dc} in the same st or sp.
Gauge:
Not necessary for this project due to the simple use of st multiples.
Subscribe to my YouTube channel.
Instructions:
Cover is made from the top to the bottom of the shade in the round. You will have to have your lampshade nearby when beginning so you can test out the size of your foundation ch. I also tried it on for size every 3 or 4 rounds to make sure it was fitting properly.
Begin by making a ch in multiples of 12 until you can make the full circumference of the top of the shade. You do NOT want it to be loose; snug is best. If you need to adjust your hook size to a smaller hook to make your foundation ch fit more properly, I highly recommend it. Err on the side of small rather than large. I am going to include my st counts to help you visualize the math. My shade size is 15” (38 cm) in diameter at the top, and then expands to 15.5” (39.4 cm) diameter at the bottom. It is 10” (25 cm) in length. My foundation ch was 156.
Being careful not to twist your ch, join with a sl st in top of first ch to make a ring.
Round 1: Ch 6 (beg ch counts as a dc, ch 3), dc in same st (counts as a V-st), ch 3, sk 5, *V-st in next st, ch 3, sk 5; rep from * around, sl st in 3rd st of beg ch to join. [26 V-sts]
Round 2: Sl st into ch-3 sp of V-st, ch 3 (beg ch counts as a dc), {2 dc, ch 3, 3 dc} in same sp (Cl V-st made), sk next ch-3 sp, *Cl V-st in next ch-3 sp, sk next ch-3 sp; rep from * around, sl st in top of beg ch 3 to join. [26 Cl V-sts]
Round 3: Sl st in next 2 sts and into ch-3 sp. Ch 6 (beg ch counts as a dc, ch 3), dc in same sp (V-st made), ch 3, *V-st in next ch-3 sp, ch 3; rep from * around, sl st in third ch of beg ch to join. [26 V-sts]
Rounds 4-16: Rep rounds 2-3, ending on a round 2 rep. NOTE: You will essentially rep rounds 2-3 until your piece is approximately 1” (2.5 cm) from the bottom of your lamp shade. Be sure to end on a round 2 rep.

Finishing rounds
To visualize these last 2 rounds, see my YouTube video at minute 10:30: https://youtu.be/SA2xM006nSs
Round 17: Sl st in next 2 sts and into ch-3 sp below. Ch 6 (beg ch counts as a dc, ch 3), dc in same st (V-st made), ch 3, {V-st, ch 3, V-st} in next ch-3 sp, ch 3, *V-st in the next ch-3 sp, ch 3, {V-st, ch 3, V-st} in the next ch-3 sp, ch 3; rep from * around, sl st in 3rd ch of beg ch to join. [39 V-sts]
Round 18: Sl st into ch-3 sp of V-st, ch 3 (counts as a dc), {2 dc, ch 3, 3 dc} in same sp (Cl V-st made), sk next ch-3 sp, 3 dc in next ch-3 sp, Cl V-st in next ch-3 sp, 3 dc in next ch-3 sp, sk next ch-3 sp, *Cl V-st in next ch-3 sp, sk next ch-3 sp, 3 dc in next ch-3 sp, Cl V-st in next ch-3 sp, 3 dc in next ch sp, sk next ch-3 sp; rep from * around, sl st in top of beg ch 3 to join. [13 larger points, 13 smaller points]
Make sure your shade cover fits your shade satisfactorily. The last 2 rounds should hang below the bottom of your shade. The bottom rounds may curl slightly, but the beaded tassels will serve to weigh it down and make it straight. FO and weave in tails.

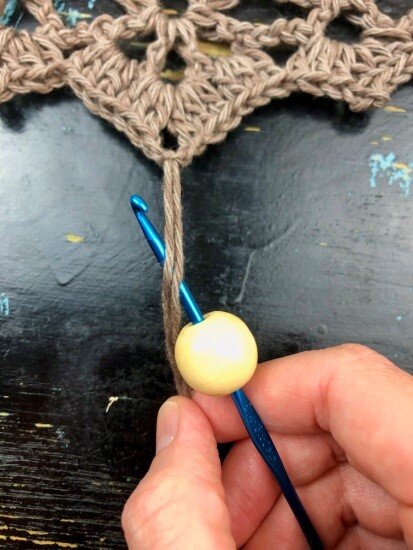
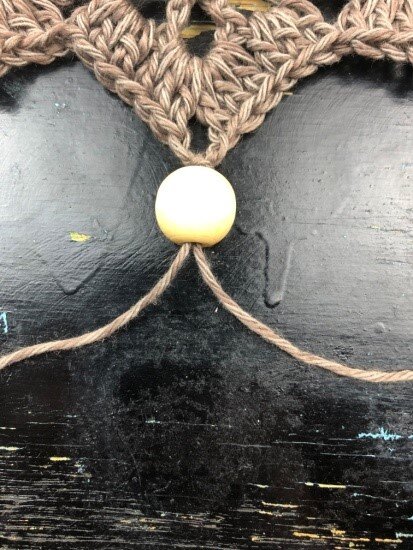
Make your tassel
To visualize this process, see my YouTube video at minute 18:09: https://youtu.be/SA2xM006nSs
You will need to count how many larger points on your shade. You will need that number of wooden beads and tassels.
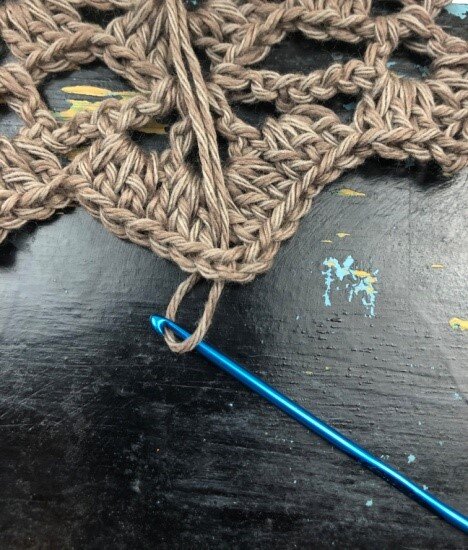
Using your 6” piece of cardboard, wrap your yarn 40 times per tassel. Depending on your yarn choice, you may want to wrap your cardboard more or fewer times than I chose to. Attach your tassel to the middle of each larger point, as shown in the photos below.


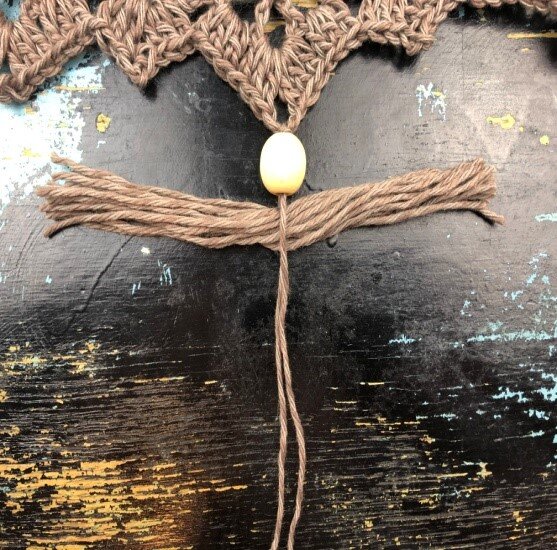
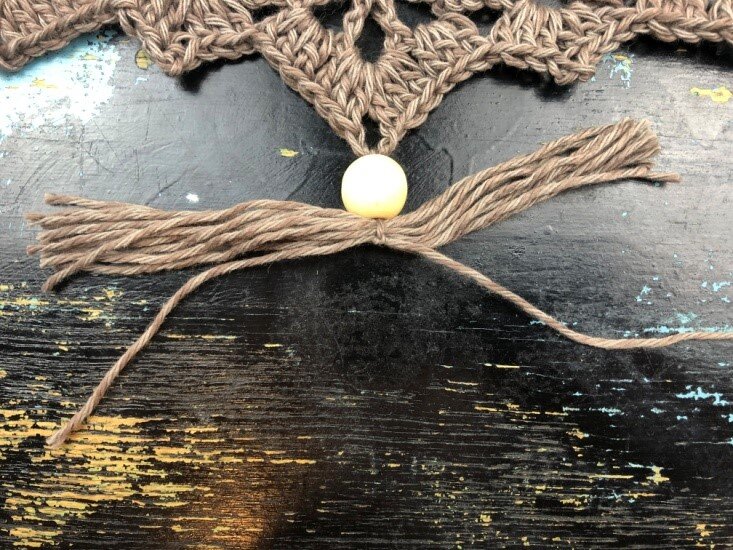
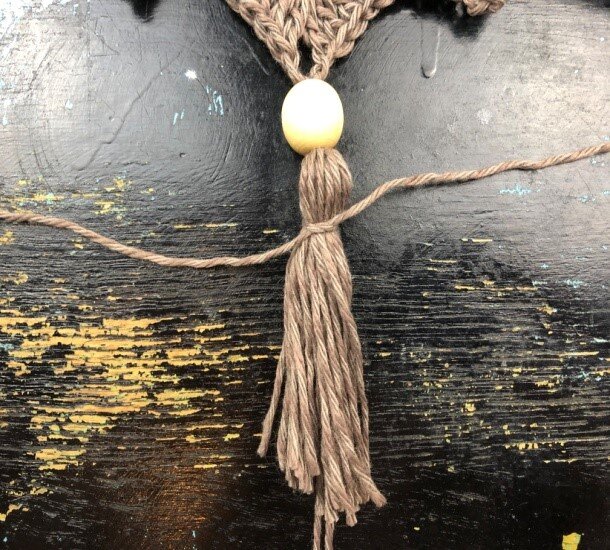
Slide your cover onto your shade and make sure the rounds are not warped by straightening them out. Cut all tassels to equal lengths.
NOTE: If you crocheted your cover to be too large, you may have to glue the top round of your cover to your shade. Since I made mine to fit snugly to the shade, it was not necessary for me.
Your Dahlia Shade is complete! I would love to see your finished work! If you want to tag me on IG, I’m @dayscrochetnc. You could also use the tags #dahlidashade, #crochetlampshade, #bohocrochet, #moderncrochetdecor – you get the idea! I can’t wait to see your projects! If you would like to see other versions that I will be making after this publication, be sure to check me out on IG!
If you liked my pattern please let me know in the comments!
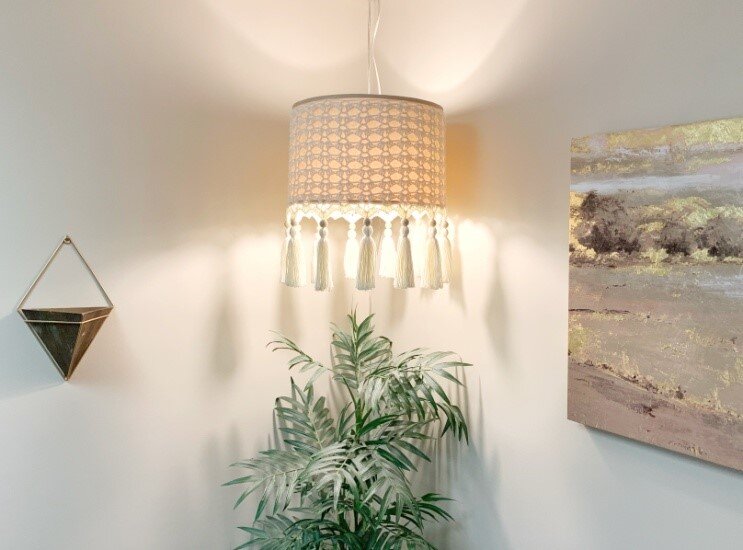
Both lampshades pictured are made with Lion Brand Comfy Cotton Blend in the color Whipped Cream.
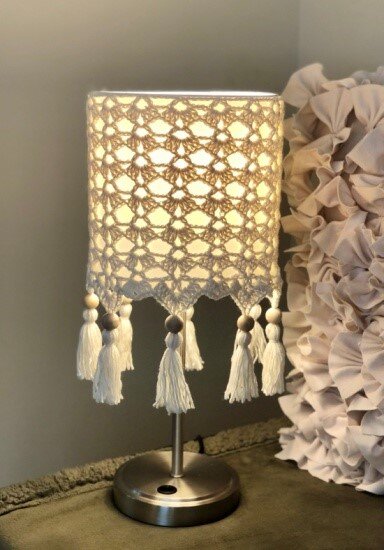
The smaller shade is a lamp I purchased from Wal-mart and measures 8” x 8” (20 x 20 cm)
Please note that you do not have my permission to sell, share, copy, or duplicate this pattern or my photos in any way. Please do not use this pattern for a video, blog, or class tutorial. Thank you so much for following these simple rules!