
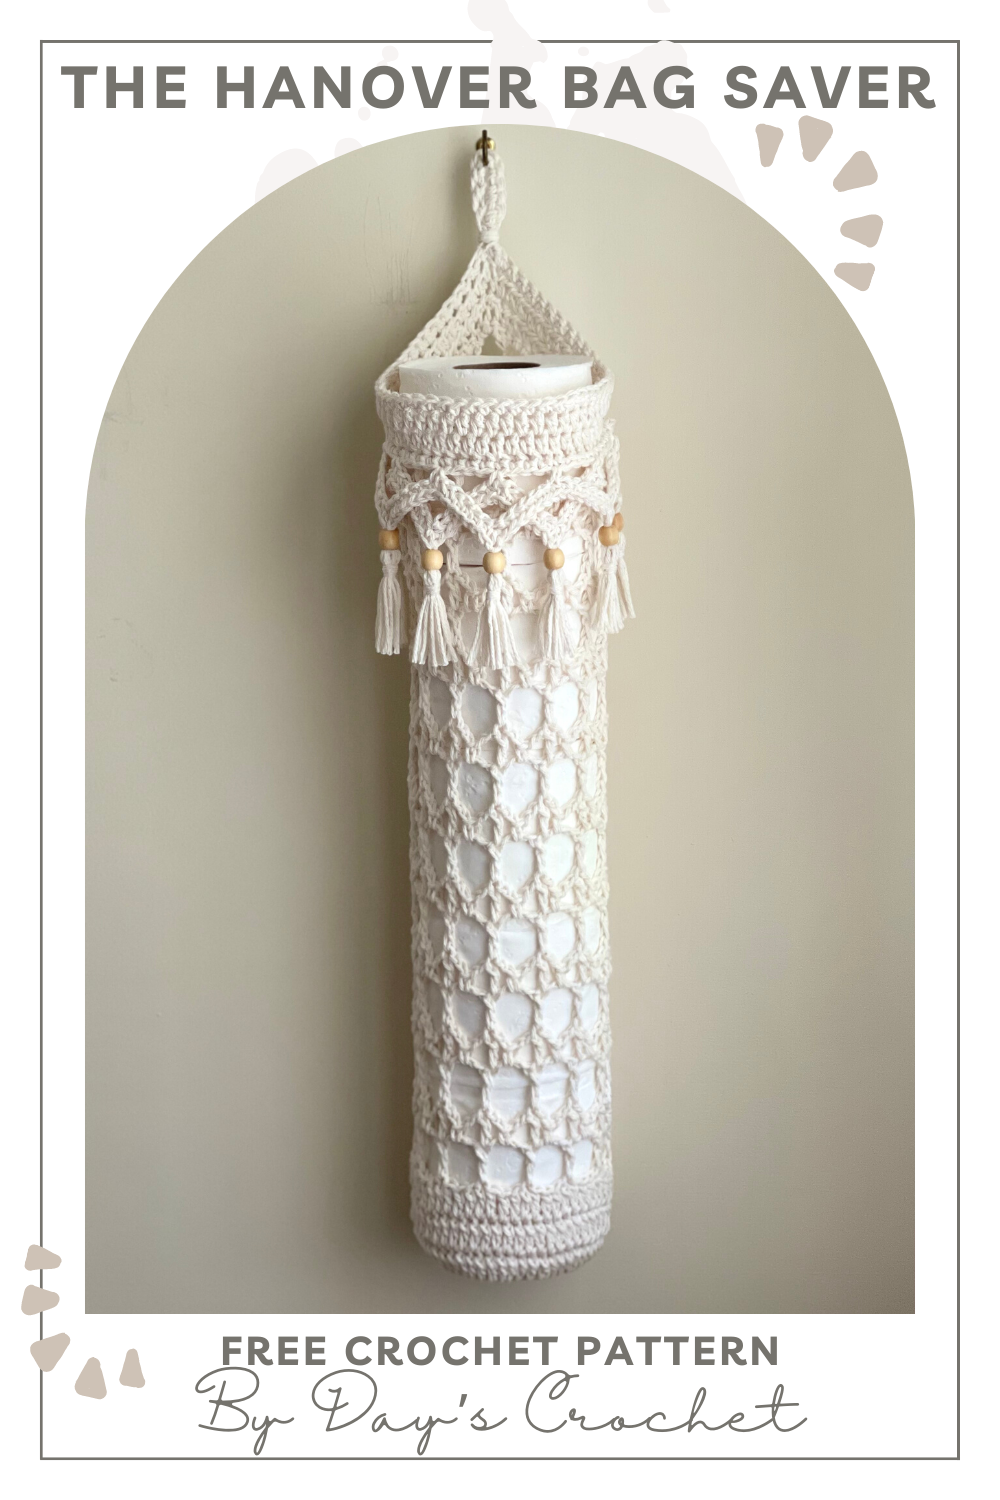
The Hanover Bag Saver
PIN it here!
This adorable bag saver is a sister pattern to my Hanover Hammock. They both make great kitchen décor and I thought some might want items that sort of match. I also thought that those who sell their crochet wares might like to push matching sets.
This post may contain affiliate links that help make it possible for me to continue to post free content. If you wish to skip the ads and have a printable pdf, you can find the pattern for relatively little cost in my Etsy and Ravelry shops.
This is actually my second bag saver pattern. My original Boho Bag Saver (pictured below) was my very first Mystery CAL (crochet along) for my Facebook group Crochet For Days. My Boho Bag Saver is my most popular YouTube video, and one of my best sellers. If you are interested in making the Boho Bag Saver design instead, you can find it on my YouTube channel and my blog, and of course in Etsy and Ravelry.

The Hanover Bag Saver uses a different mesh stitch pattern that sort of reminds me of the boho rattan pattern that is so popular right now. The beaded overhang gives the look of a macramé piece, making the entire design modern without losing its function. You are definitely going to want to display this beauty somewhere instead of hiding it away in your pantry!
It takes relatively little by way of supplies and can be whipped up in 2 hours or less, making it an ideal gift or market prep item. It can be made with cotton or acrylic yarns, making it a great stash buster (just keep in mind acrylic yarn tends to stretch over time). The beads are not essential, but they do help weight the points down of the front embellishment to help them hold their shape.
And as you probably noticed from the pinnable photo at the top of this blog post, the bag saver can also double as a toilet paper storage in your bathroom. You will have to go up a hook size or 2 from your gauge hook and I will also note that it will not hold the mega rolls. I think it would look great in a boho bathroom, or be especially functional in an RV bathroom where storage is very limited.
Let’s get to it!
Supplies Needed:
-Approx. 130-140 yds of worsted weight size 4 cotton (My favorite cotton is Knit Pick’s Dishie)
-A size H 5.0 mm hook, or size needed to obtain gauge
-7 10 or 12 mm wooden beads (If you plan to make more of my designs, I recommend getting a variety pack of beads like this one.)
-1 medium sized hair elastic
-Measuring tape, scissors
Terminology Used and Abbreviations:
Pattern is written in US terminology.
Back Loop Only - BLO
Beginning - beg
Chain - ch
Double Crochet - dc
Fasten Off - FO
Front Loop Only - FLO
Right Side - RS
Single Crochet - sc
Slip Stitch(es) - sl st(s)
Stitch(es) - st(s)
Space(s) - sp(s)
Wrong Side - WS
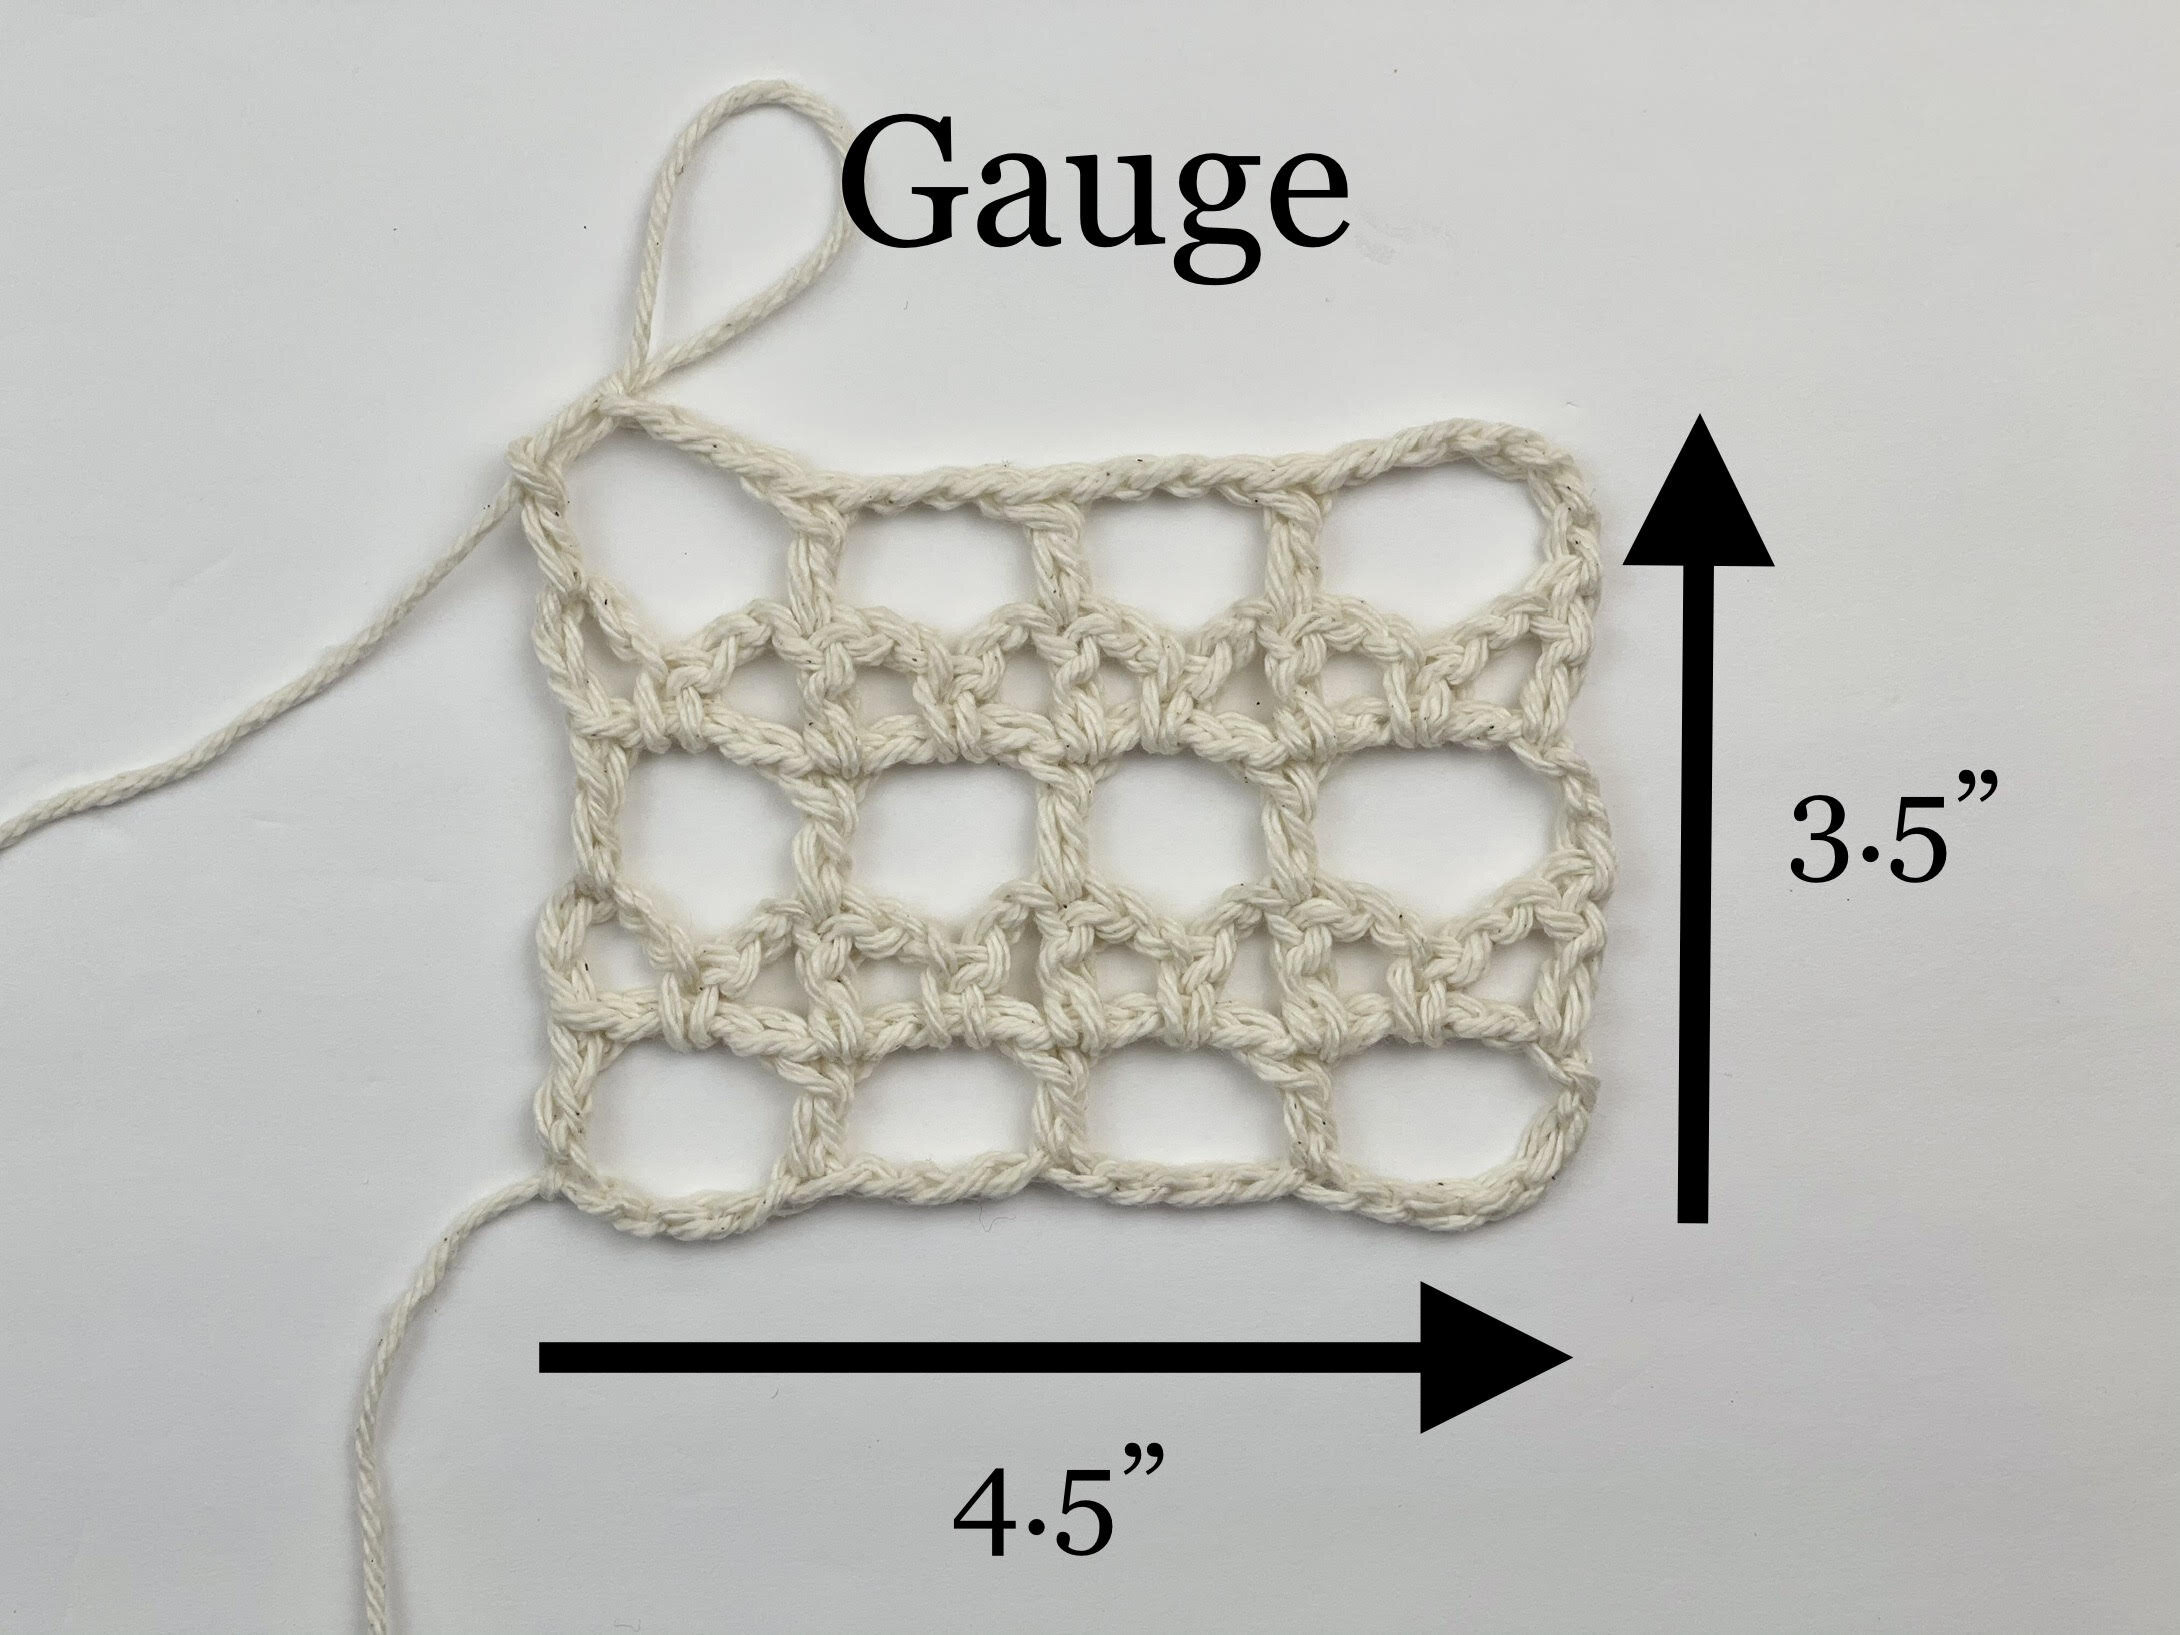
Gauge:
5 rows of gauge pattern = 3.5” x 4.5” (9 x 11.4 cm)
Pattern for gauge
Row 1: Ch 22, dc in 10th st from hook (beg ch counts as a dc + ch-3 sp), * ch 3, sk 3, dc in next st; rep from * across. [5 dc, 4 ch-3 sps]
Row 2: Ch 5 (beg ch counts as a dc + ch-2 sp), turn, sc in next ch sp, ch 2, dc in next dc, * ch 2, sc in next ch sp, ch 2, dc in next dc; rep from * across. [5 dc, 4 sc, 8 ch-2 sps]
Row 3: Ch 6 (beg ch counts as a dc + ch-3 sp), turn, dc in next dc, * ch 3, dc in next dc; rep from * across. [5 dc, 4 ch-3 sps]
Row 4: Rep row 2.
Row 5: Rep row 3.
Finished Measurements:
Bag saver measures approx. 16” x 6” (40.5 x 15 cm) when measured empty and lying flat.
Instructions:
Bag saver is made in the round from bottom to top, with the front detail added last.
Round 1: Join with a sl st into your hair elastic. Ch 1, 39 hdc in a hair elastic. Join with a sl st in first hdc. [39 hdc]
Round 2: Ch 2 (beg ch does not count as a st), 2 dc in same st, 1 dc in next 2 sts, * 2 dc in next st, 1 dc in next 2 sts; rep from * to end. Join with a sl st in first dc. [52 dc]
Rounds 3-4: Ch 2 (beg ch does not count as a st), dc in each st around. Join with a sl st in first dc. [52 dc]
Round 5: Ch 6 (beg ch counts as a dc + ch-3 sp), sk 3 sts, * dc in next st, ch 3, sk 3 sts; rep from * to end. Join with a sl st in the 3rd ch of beg ch-6. [13 dc, 13 ch-3 sps]
Round 6: Ch 5 (beg ch counts as a dc + ch-2 sp), sc in next ch sp, ch 2, * dc in next dc, ch 2, sc in next ch sp, ch 2; rep from * around. Join with a sl st in 3rd ch of beg ch-5. [13 dc, 13 sc, 26 ch-2 sps]
Round 7: Ch 6 (beg ch will count as a dc + ch-3 sp), * dc in next dc, ch 3; rep from * around. [13 dc, 13 ch-3 sps]
Rounds 8-23: Rep rows 6 and 7, making sure you end on a round 7 rep.
Round 24: Ch 1, sc in same st, 3 sc in next ch sp, * sc in next dc, 3 sc in next ch sp; rep from * around. Join with a sl st in first sc. [52 sc]
Round 25: Ch 1, hdc in the BLO of each st around. [52 hdc BLO]
Round 26: Ch 1, working through both loops, hdc in each st around, ch 12, sl st in first ch st made (hanging loop made), join with a sl st in first hdc. [52 hdc, 1 ch-12 sp]
Round 27: Ch 1, sc in each st to end, 12 sc in ch-12 loop, join with a sl st in first sc. FO, leaving a long tail of approx. 6-8”. Wrap tail around base of ch-12 loop to further secure. Weave in tails. [52 sc, 12 sc in hanging loop]
Front detail
With the back of your piece facing you, join in the 11th FLO made in round 25 to your RIGHT. (NOTE: Joining this way ensures the RS of our sc sts will be facing towards the RS of our piece. See photo below.)

Row 1: Ch 1, sc in same st and in next 31 FLO. [32 sc]
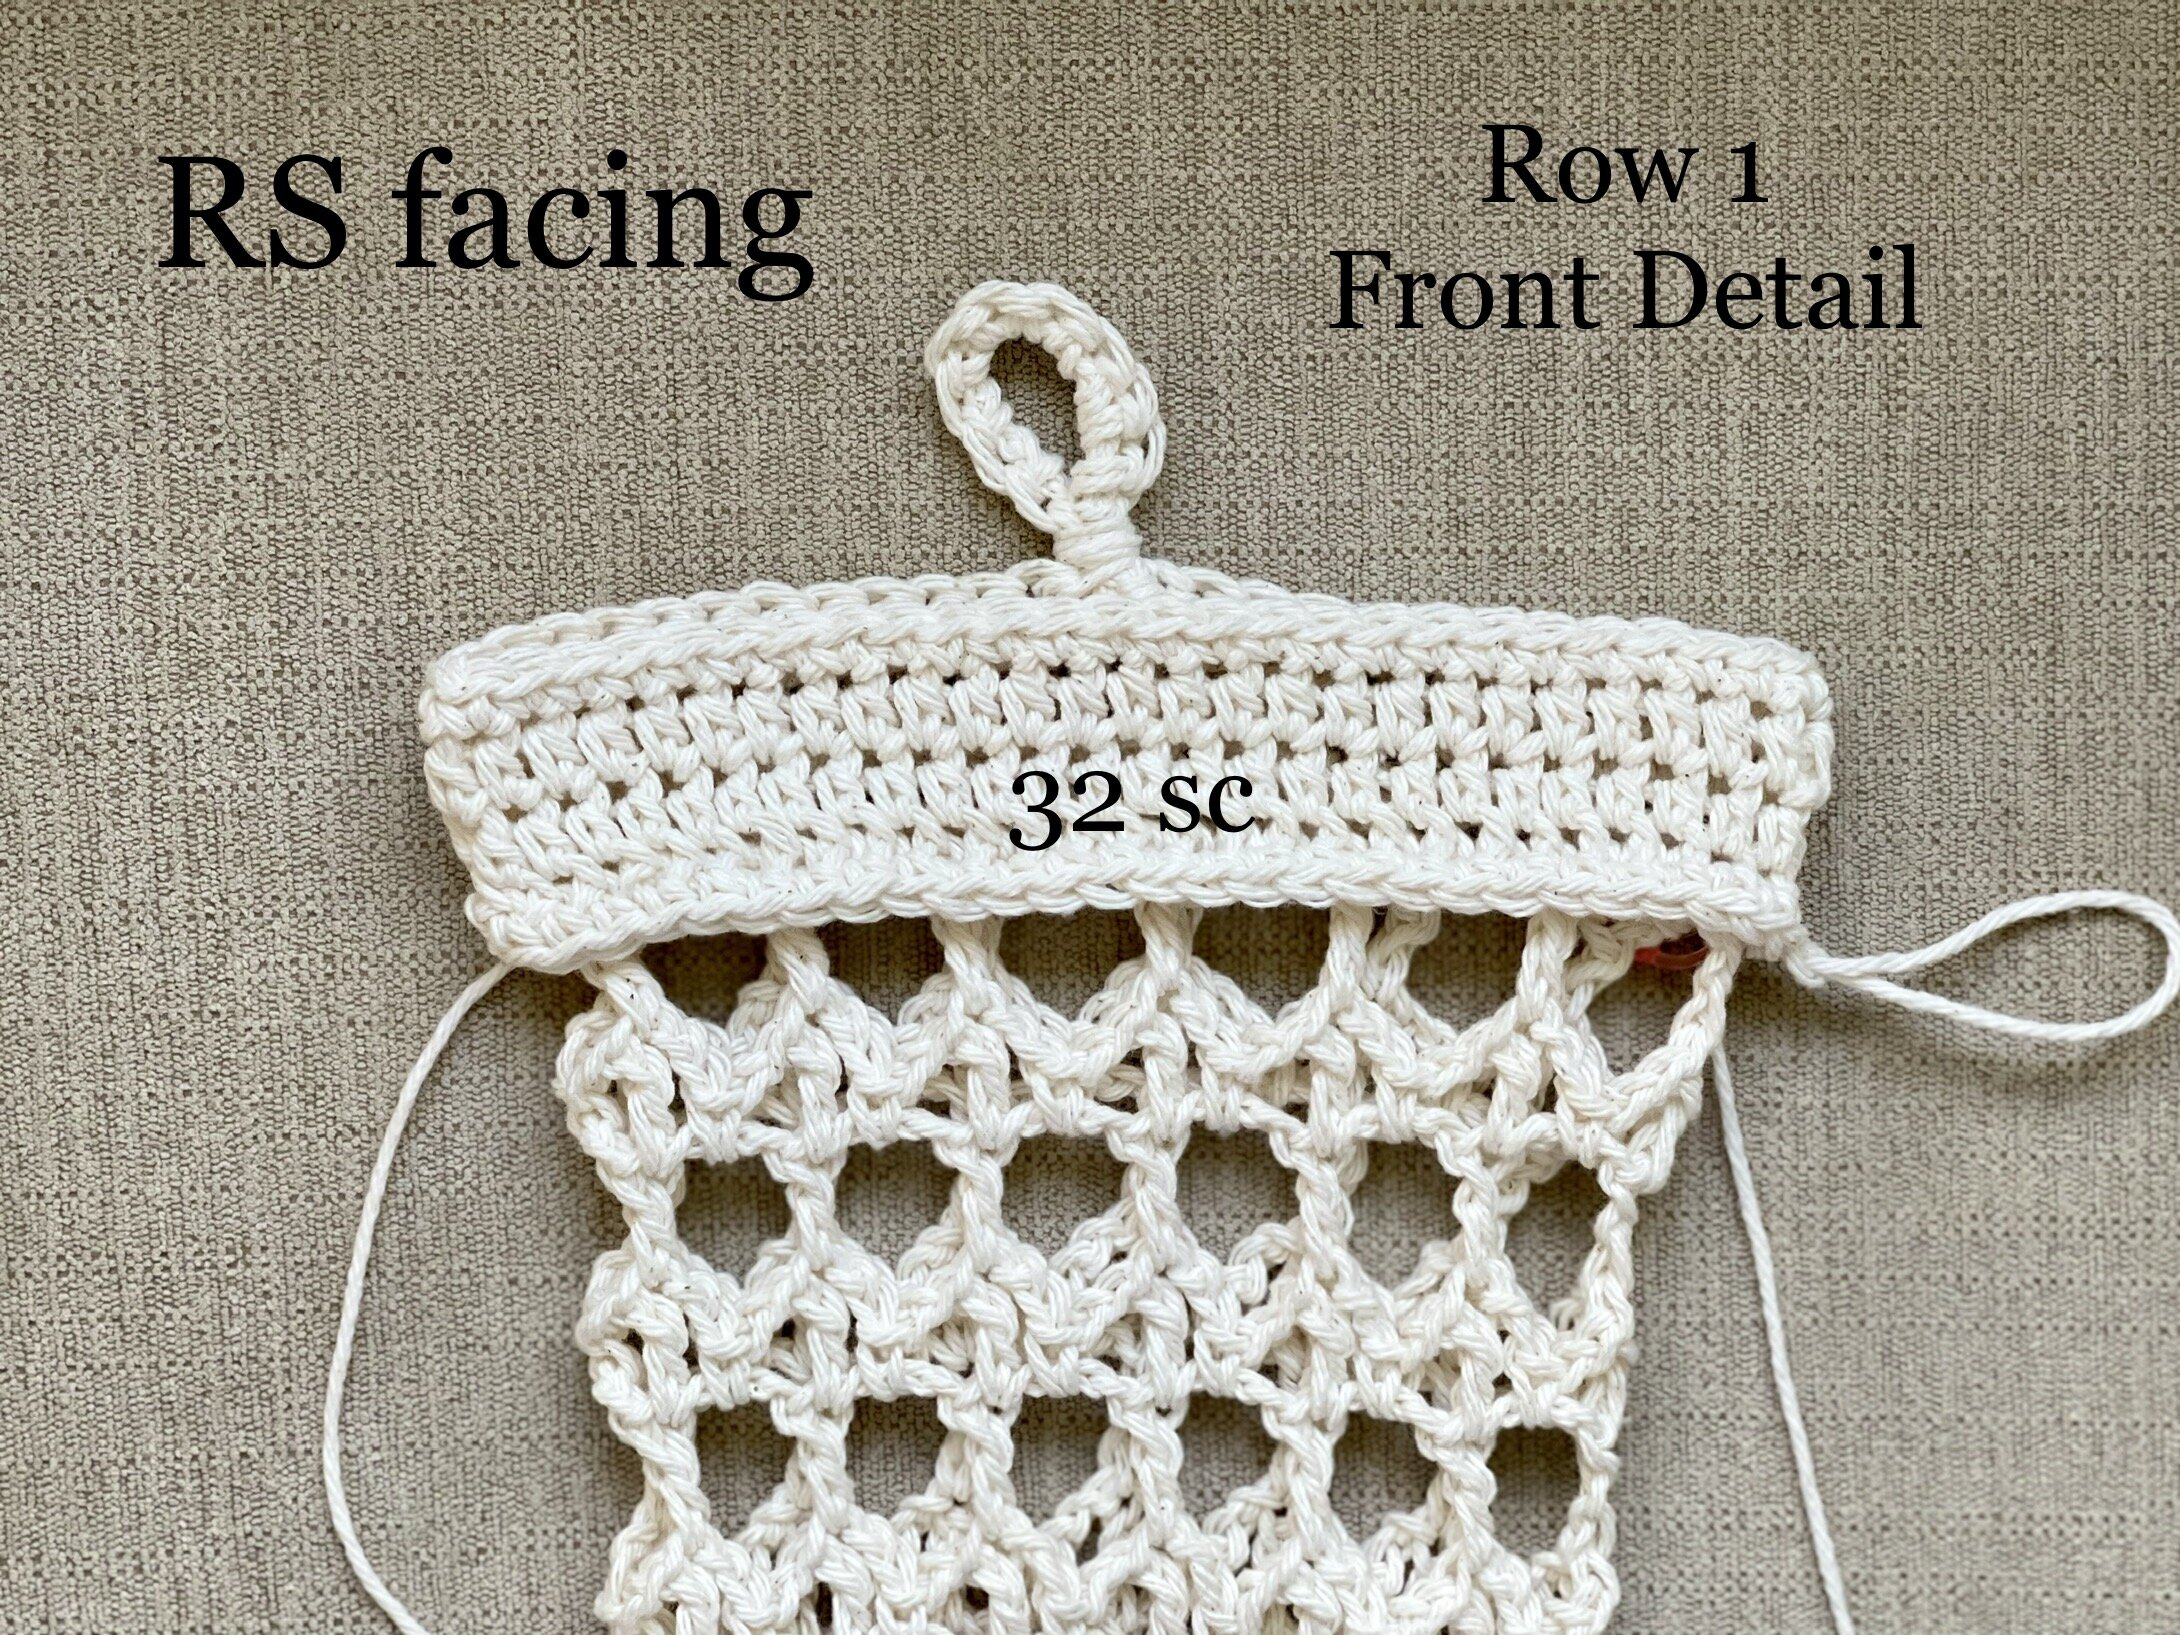
Row 2: Turn, * ch 13, sk next 7 sts, sl st in next st; rep from * to end. (See photo) [4 ch-13 sps]

Row 3: Ch 1, turn, * working into the ch-13 ch sts, sc in next 6 sts, {1 sc, ch 2, 1 sc} in next st, sc in last 6 sts; rep from * to end. FO and weave in tails. (See photo) [56 sc, 4 ch-2 sps]

Row 4: With the RS of your piece facing you and working into the sc sts of row 1 of the front detail, join in the 4th sc from first ch-13 sp on the right, * ch 13, sk next 7 sts, sl st in next st; rep from * twice more. (See photo) [3 ch-13 sps]


Row 5: Rep row 3. FO and weave in tails. (See photo) [42 sc, 3 ch-2 sps]

Add your beaded tassels
(NOTE: The beads are not only for looks, but also to help weigh the points down so that they are more distinct. If you choose to not use beads, it may not look quite as good.)
Cut 7 strands of yarn approx. 6-7” long. Using the larks knot, add one strand per ch-2 sp of rows 2 and 4 of the front detail. Using your yarn needle, slide one wooden bead onto both tails of each tassel, until it is flush again the points of rows 3 and 5.
Using a piece of cardboard that is approx. 4” wide, wrap your yarn 42 times and cut bottoms evenly to create tassel tails. Gather groups of 6 strands per beaded tassel and tie to the bottom of each bead.
Cut 7 more strands of yarn approx. 6” long and using the gathering knot, tie to all 7 of the tassel tails to secure them in place. Cut all tassels so that they are even in length. To visualize the gathering knot, see my video here.
Your Hanover Bag Saver is complete! I would love to see your finished work! If you want to tag me on IG, I’m @dayscrochetnc. You could also follow the hashtag #hanoverbagsaver to follow what others are making. I can’t wait to see your projects! If you would like to see other versions that I will be making after this publication, be sure to check me out on IG!

Please note that you do not have my permission to sell, share, copy, translate, or duplicate this pattern or my photos in any way. Please do not use this pattern for a video, blog, or class tutorial. Thank you so much for following these simple rules! Please message me on Facebook or send me an email at dayscrochetnc@gmail.com with any questions.
Come join my Facebook group, Crochet for Days! We have a lot of fun and I often offer discounts and coupon codes to my members that I don’t offer anywhere else! Request to join and answer the questions by following this link.
What will you use your Hanover Bag Saver for? Let me know in the comments!
Happy Hooking!
~Dana