
The Kalana Scarf

PIN it here!
I have recently acquired a new obsession with triangle scarves.
I have made several different styles this year, but none that were made with super bulky weight yarns. You know me; I also have an obsession with super bulky weight yarns.
This post may contain affiliate links that help me to continue to post free content. To skip the ads and have a printable pdf of this pattern, you can find it for relatively little cost in my Etsy and Ravelry shops.
There is something so satisfying about how cozy and warm items are when made with super bulky weight yarns. I also love how quickly they work up. I am excited to be able to offer them in my next vendor market because my customers seem to really love my items made with chunky yarns. Who can blame them? It’s like wearing a chunky blanket on a cold day!
The cool thing about this pattern is that it can actually be made 2 ways—WOOT! I used the same concept for a granny square in this pattern, but I added 2 rows of alternating puffs and V-stitches at the bottom to make it more unique and give it some visual interest. You could realistically forego the puffs and V-stitch rows and continue in the granny stitch pattern for 12 rows to get a different look altogether. I have made it both ways and found that leaving out the puffs saves both time and yarn and it still looks great.

Pictured is the same basic scarf pattern. You simply repeat row 3 until you have 12 rows made. That’s it! I made this one using LBWET&Q in the color Oatmeal.
Pictured above is the same scarf without the puffs and V-stitches. It has a classic look that I really love. I added wooden beads to the ties to add a bit of interest since it was a bit boring. I only regret how small my beads are. If you decide to add beads, I would use around 18-20 mm beads.
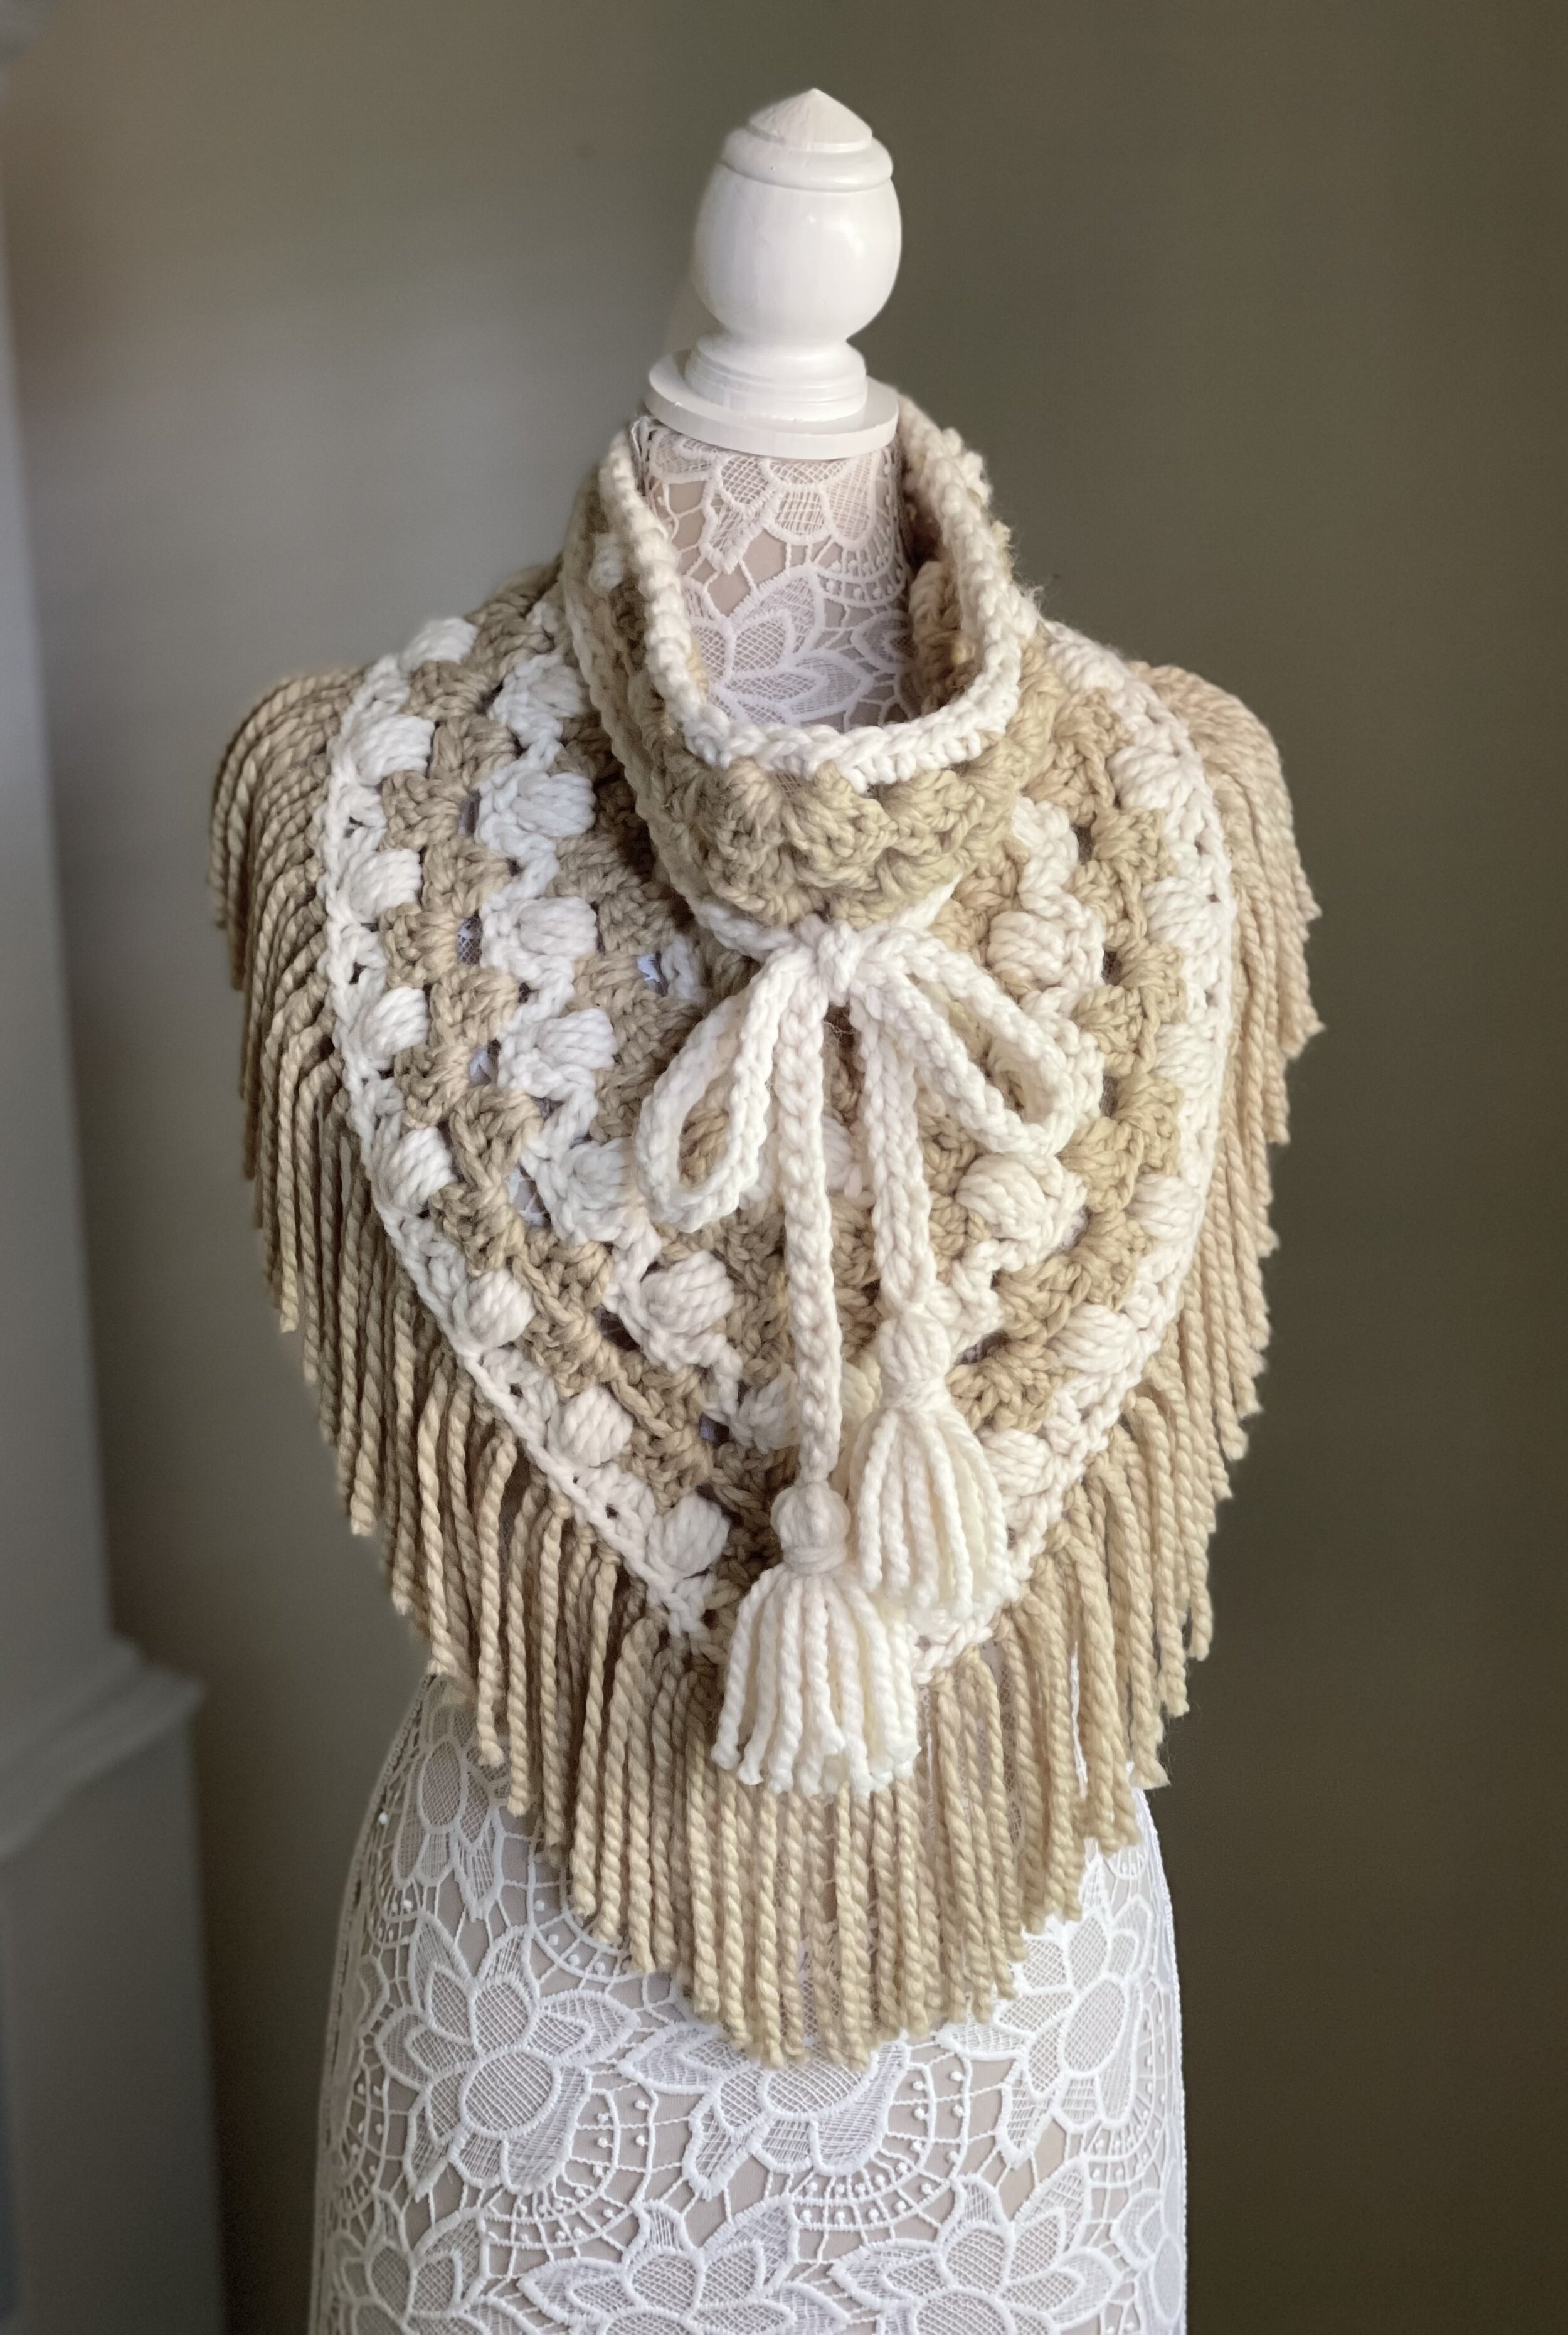
I also decided to play around with the stitch pattern and make a 2-toned version. I really wanted the puffs and V-stitch rows to pop and I think it really made a lovely scarf. I used about two-thirds of the skein of the cream color and a little over 1 skein of the tan color (106 yards each) to get this look. The colors I chose are Fisherman and Peanut. I can’t wait to make some in other colors!
Enough of my rambling. Let’s make this thing!
Supplies Needed:
-200-220 yds of any super bulky weight (size 6) yarn (My absolute favorite is Lion Brand Woolease Thick & Quick)
-size N 9.0 mm hook, or size needed to obtain gauge
-piece of cardboard 5” wide
-scissors, yarn needle, tape measure
Terms Used and Abbreviations:
Pattern is written in US terminology.
Back Loop Only - BLO
Begin(ning) - beg
Chain(s) - ch(s)
Cluster - Cl
Double Crochet - dc
Fasten Off - FO
Front Loop Only - FLO
Half Double Crochet - hdc
Increase – inc
Single Crochet - sc
Skip - sk
Slip Stitch - sl st
Space(s) - sp(s)
Stitch(es) - st(s)
V-Stitch(es) - V-st
Yarn Over - YO
Special Stitches:
Cluster (Cl): 3 dc in same st or sp.
Puff Stitch (PS): *YO, insert hook in indicated st or sp, YO, pull up a loop; rep from * 3 more times (9 loops on hook), YO, draw through 8 loops, YO, draw through last 2 loops on hook.
V-Stitch (V-st): {Dc, ch 1, dc} in same st or sp.
Gauge:
8 dc and 4 rows = 4" (10 cm)
Finished Measurements:
Triangle measures approx. 28.5" x 15.5" (72 x 39 cm) not including fringe or ties. Ties should measure approx. 27" (69 cm) in length not including tassels.
Instructions:
Scarf is worked in the row from top to bottom adding the ties, tassels, and fringe last.
Ch 6, sl st in 6th ch from hook to form a ring. Work next row inside ring.
Row 1: Ch 4 (beg ch 4 counts as a dc + ch-1 sp from here on out), Cl, ch 3, Cl, ch 1, dc. [8 dc, 2 ch-1 sps, 1 ch-3 sp]
Row 2: Ch 4, turn, Cl in ch-1 sp, ch 1, sk next Cl, {Cl, ch 3, Cl} in ch-3 sp, ch 1, sk next Cl, Cl in ch-1 sp, ch 1, dc in 3rd ch of beg ch below. [14 dc, 4 ch-1 sps, 1 ch-3 sp]
Row 3: Ch 4, turn, *Cl in ch-1 sp, ch 1, sk next Cl; rep from * to ch-3 sp, {Cl, ch 3, Cl} in ch-3 sp, **ch 1, sk next Cl, Cl in ch-1 sp; rep from ** to end, ch 1, dc in 3rd ch of beg ch below. [20 dc, 6 ch-1 sps, 1 ch-3 sp]
Row 4: Rep row 3. [26 dc, 8 ch-1 sps, 1 ch-3 sp]
Row 5: Rep row 3. [32 dc, 10 ch-1 sps, 1 ch-3 sp]
Row 6: Rep row 3. [38 dc, 12 ch-1 sps, 1 ch-3 sp]
Row 7: Rep row 3. [44 dc, 14 ch-1 sps, 1 ch-3 sp]
Row 8: Rep row 3. [50 dc, 16 ch-1 sps, 1 ch-3 sp]
Row 9: Ch 4, turn, *PS in ch-1 sp, V-St in 2nd dc of next Cl; rep from * to ch-3 sp, {PS, ch 3, PS} in ch-3 sp, **V-st in 2nd dc of next Cl, PS in next ch-1 sp; rep from ** to end, ch 1, dc in 3rd ch of beg ch below. [18 PS, 34 dc, 18 ch-1 sps, 1 ch-3 sp]
For help with this row, see my video.
Row 10: Ch 4, turn, *Cl in ch-1 sp, ch 1; rep from * to ch-3 sp, {Cl, ch 3, Cl} in ch-3 sp, **ch 1, Cl in ch-1 sp; rep from ** to end, ch 1, dc in 3rd ch of beg ch below. [62 dc, 20 ch-1 sps, 1 ch-3 sp]
Row 11: Rep row 3. [68 dc, 22 ch-1 sps, 1 ch-3 sp]
Row 12: Rep row 9. [24 PS, 46 dc, 24 ch-1 sps, 1 ch-3 sp] Do not FO.
Make ties
Ch 56, loosely sl st in 2nd ch from hook and in each st across (1st tie made). Continue across top of piece placing 2 sc around every dc post across top. Ch 56, loosely sl st in 2nd ch from hook and in each st across (2nd tie made). FO, weave in all tails.
Make tassels
For help with this process, see my video.
1. Cut a length of yarn approx. 10" long. Using the larks knot, attach to bottom of tie.
2. Using your 5” piece of cardboard wrap yarn 15 times and cut to make tassel tails.
3. Open tails of tie and set tassel tails in center, tying around tassel tails several times to secure.
4. Cut another length of yarn approx. 10" long. Using the gathering knot, tie around top of tassel tails to secure.
5. Cut bottoms evenly and rep to other tie.
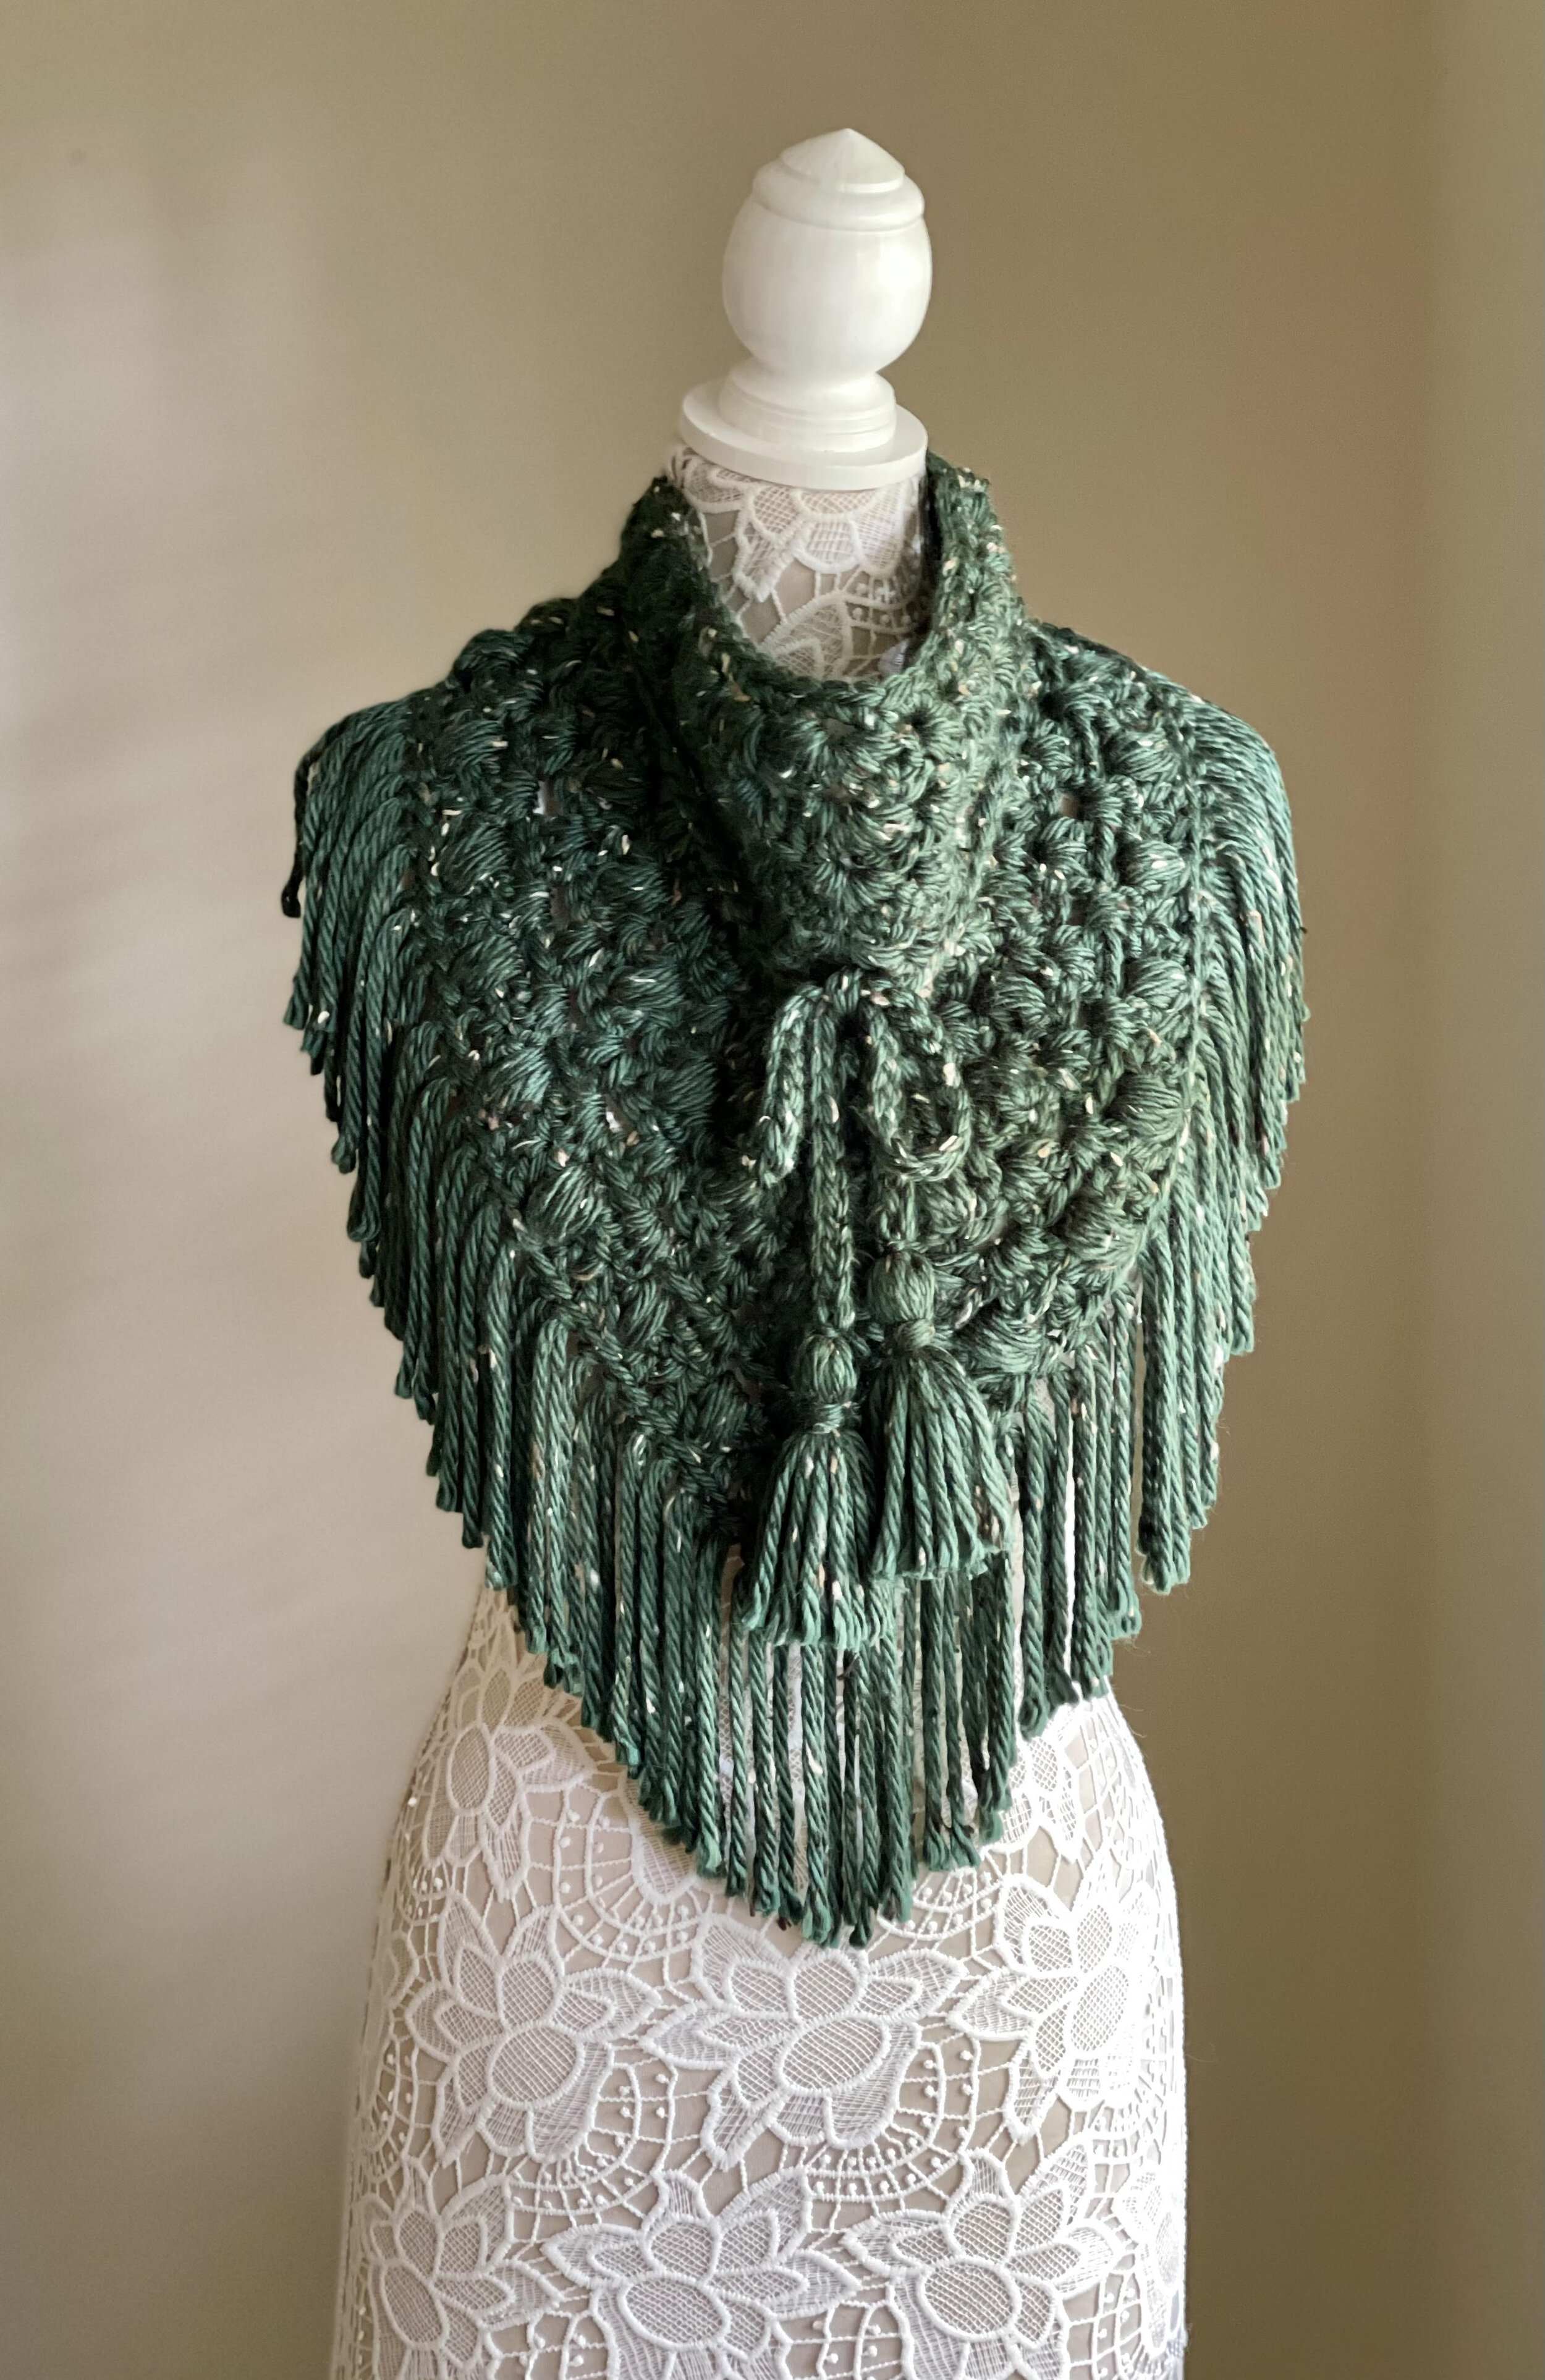
Pictured is Lion Brand Hometown USA in the color Riverdale Tweed.
Make fringe
Using your 5" piece of cardboard wrap yarn 69 times and cut to create fringe pieces. Using the larks knot, add one piece of fringe in the BLO of ch-3 sts. Work your way up each side starting at ch-3 sp putting 1 piece of fringe in the BLO, in 34 sts on each side + middle st of ch-3 sp.
(NOTE: the verbiage sounds confusing but you will have a piece of fringe in every ch st of the ch-3 sp. You should not be skipping any sts, merely leaving the top portions of scarf undone because they will be in the back of the neck.)
Tip: If your fringe is really wrinkled simply use a flat iron (for hair) on a low setting and straighten the strands as if they were hair.

This Kalana Scarf was made using Yarn Bee Juliette in the color Rosewater & Lace. I only repeated Row 3 throughout because the yarn is too busy for the puffs and V-stitches to really stand out. I also added another row for a total of 13 rows because the yarn is slightly lighter in bulkiness (even though it says it is a size 6 super bulky weight yarn).
Your Kalana Scarf is complete! I would love to see your finished work! If you want to tag me on IG, I’m @dayscrochetnc. You could also follow the hashtag #kalanascarf to follow what others are making. I can’t wait to see your projects! If you would like to see other versions that I will be making after this publication, be sure to check me out on IG!

I absolutely love the way this one turned out! It’s LBWET&Q in the color Coney Island. I will mention that because the yarn is a bit ‘busy’, you cannot see the puff stitches as well. If I make another one in this colorway, I will likely just repeat Row 3 for 12 rows to save time and yarn.
Please note that you do not have my permission to sell, share, copy, translate, or duplicate this pattern or my photos in any way. Please do not use this pattern for a video, blog, or class tutorial. Thank you so much for following these simple rules! Please message me on Facebook or send me an email at dayscrochetnc@gmail.com with any questions.

This one was made using a Lion Brand Homespun cake in the color Circus. It is only a size 5 bulky weight yarn, so I went down to a size K 6.5 mm hook and did more rows. Since the cake only has 185 yards, I almost ran out of yarn (I seriously only had about 3 inches of yarn leftover!). If I make another one, I will leave off a row and stop at row 14 so I will not cut it quite so close. I also only repeated row 3 to save on yardage since I knew I would not have a lot of yarn leftover.
Another thing to note about Homespun yarn is the fringe will be super frizzy if you do not treat it. I plan to treat all fringe tips with Fray Check so they will not create a fuzzy mess for the wearer.
Did you enjoy this project? Let me know in the comments!
Happy Hooking!
~Dana