
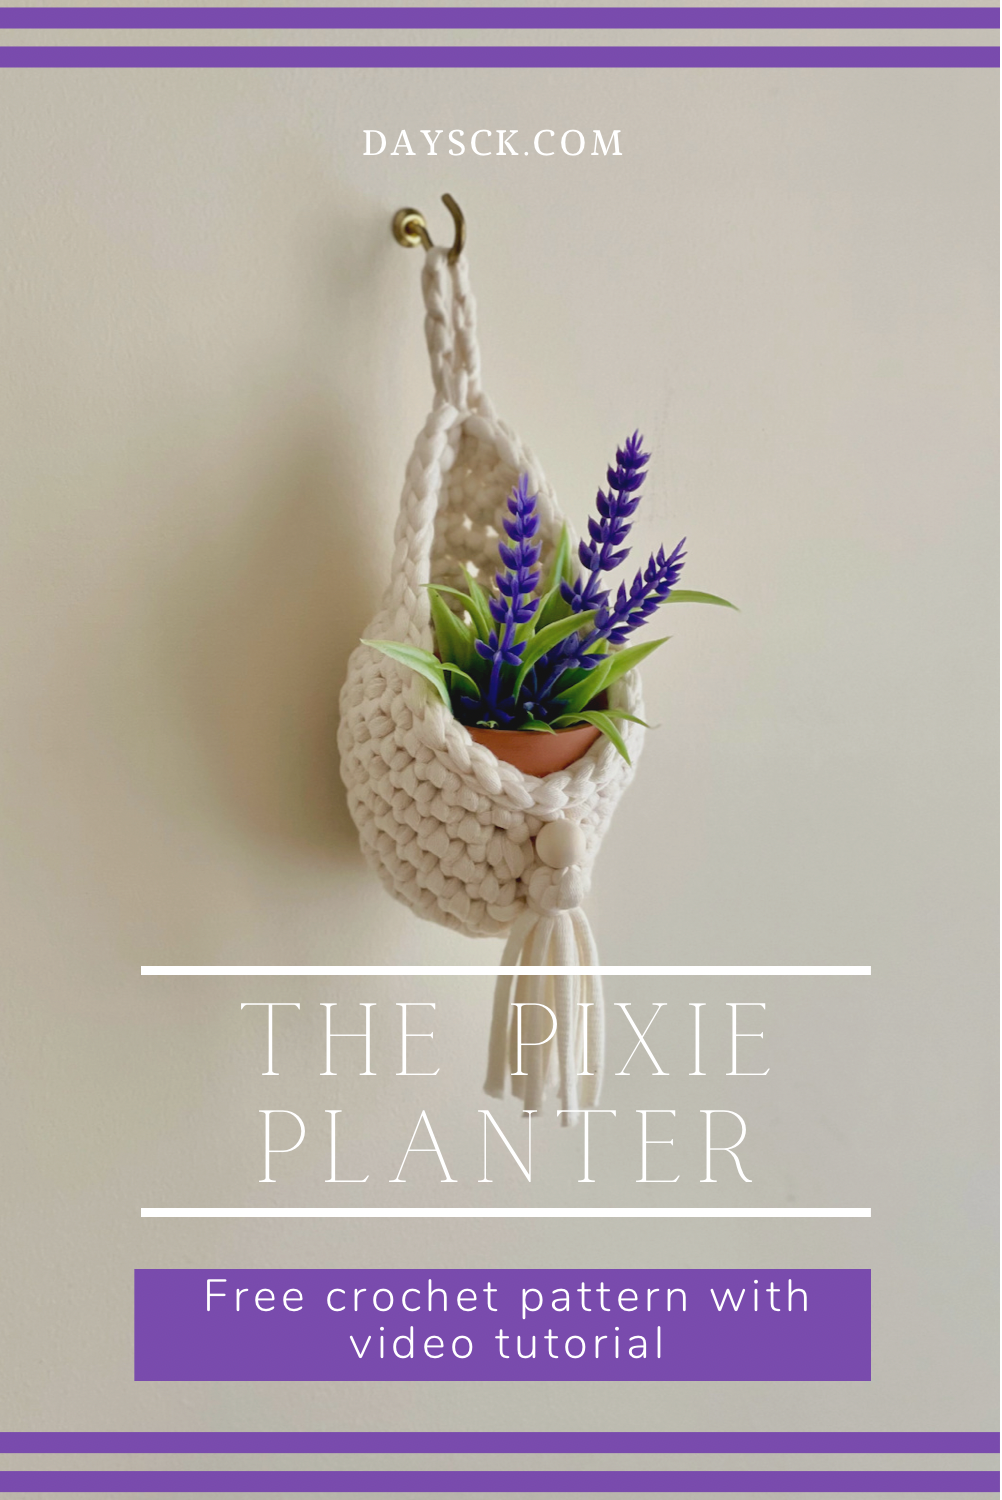
The Pixie Planter ~ Mini Crochet Hanging Planter
These warmer days we’ve been having has me dreaming about flowers and sunshine and getting in the garden!
Without a doubt, Spring is my most favorite time of the year. I know as crocheters, Winter and Fall is usually our jam. Bundling the world up and making it a warmer place when it’s cold outside is where we SHINE!
To skip the ads and have a printable copy of this pattern, you can find it Etsy and Ravelry for a low cost.
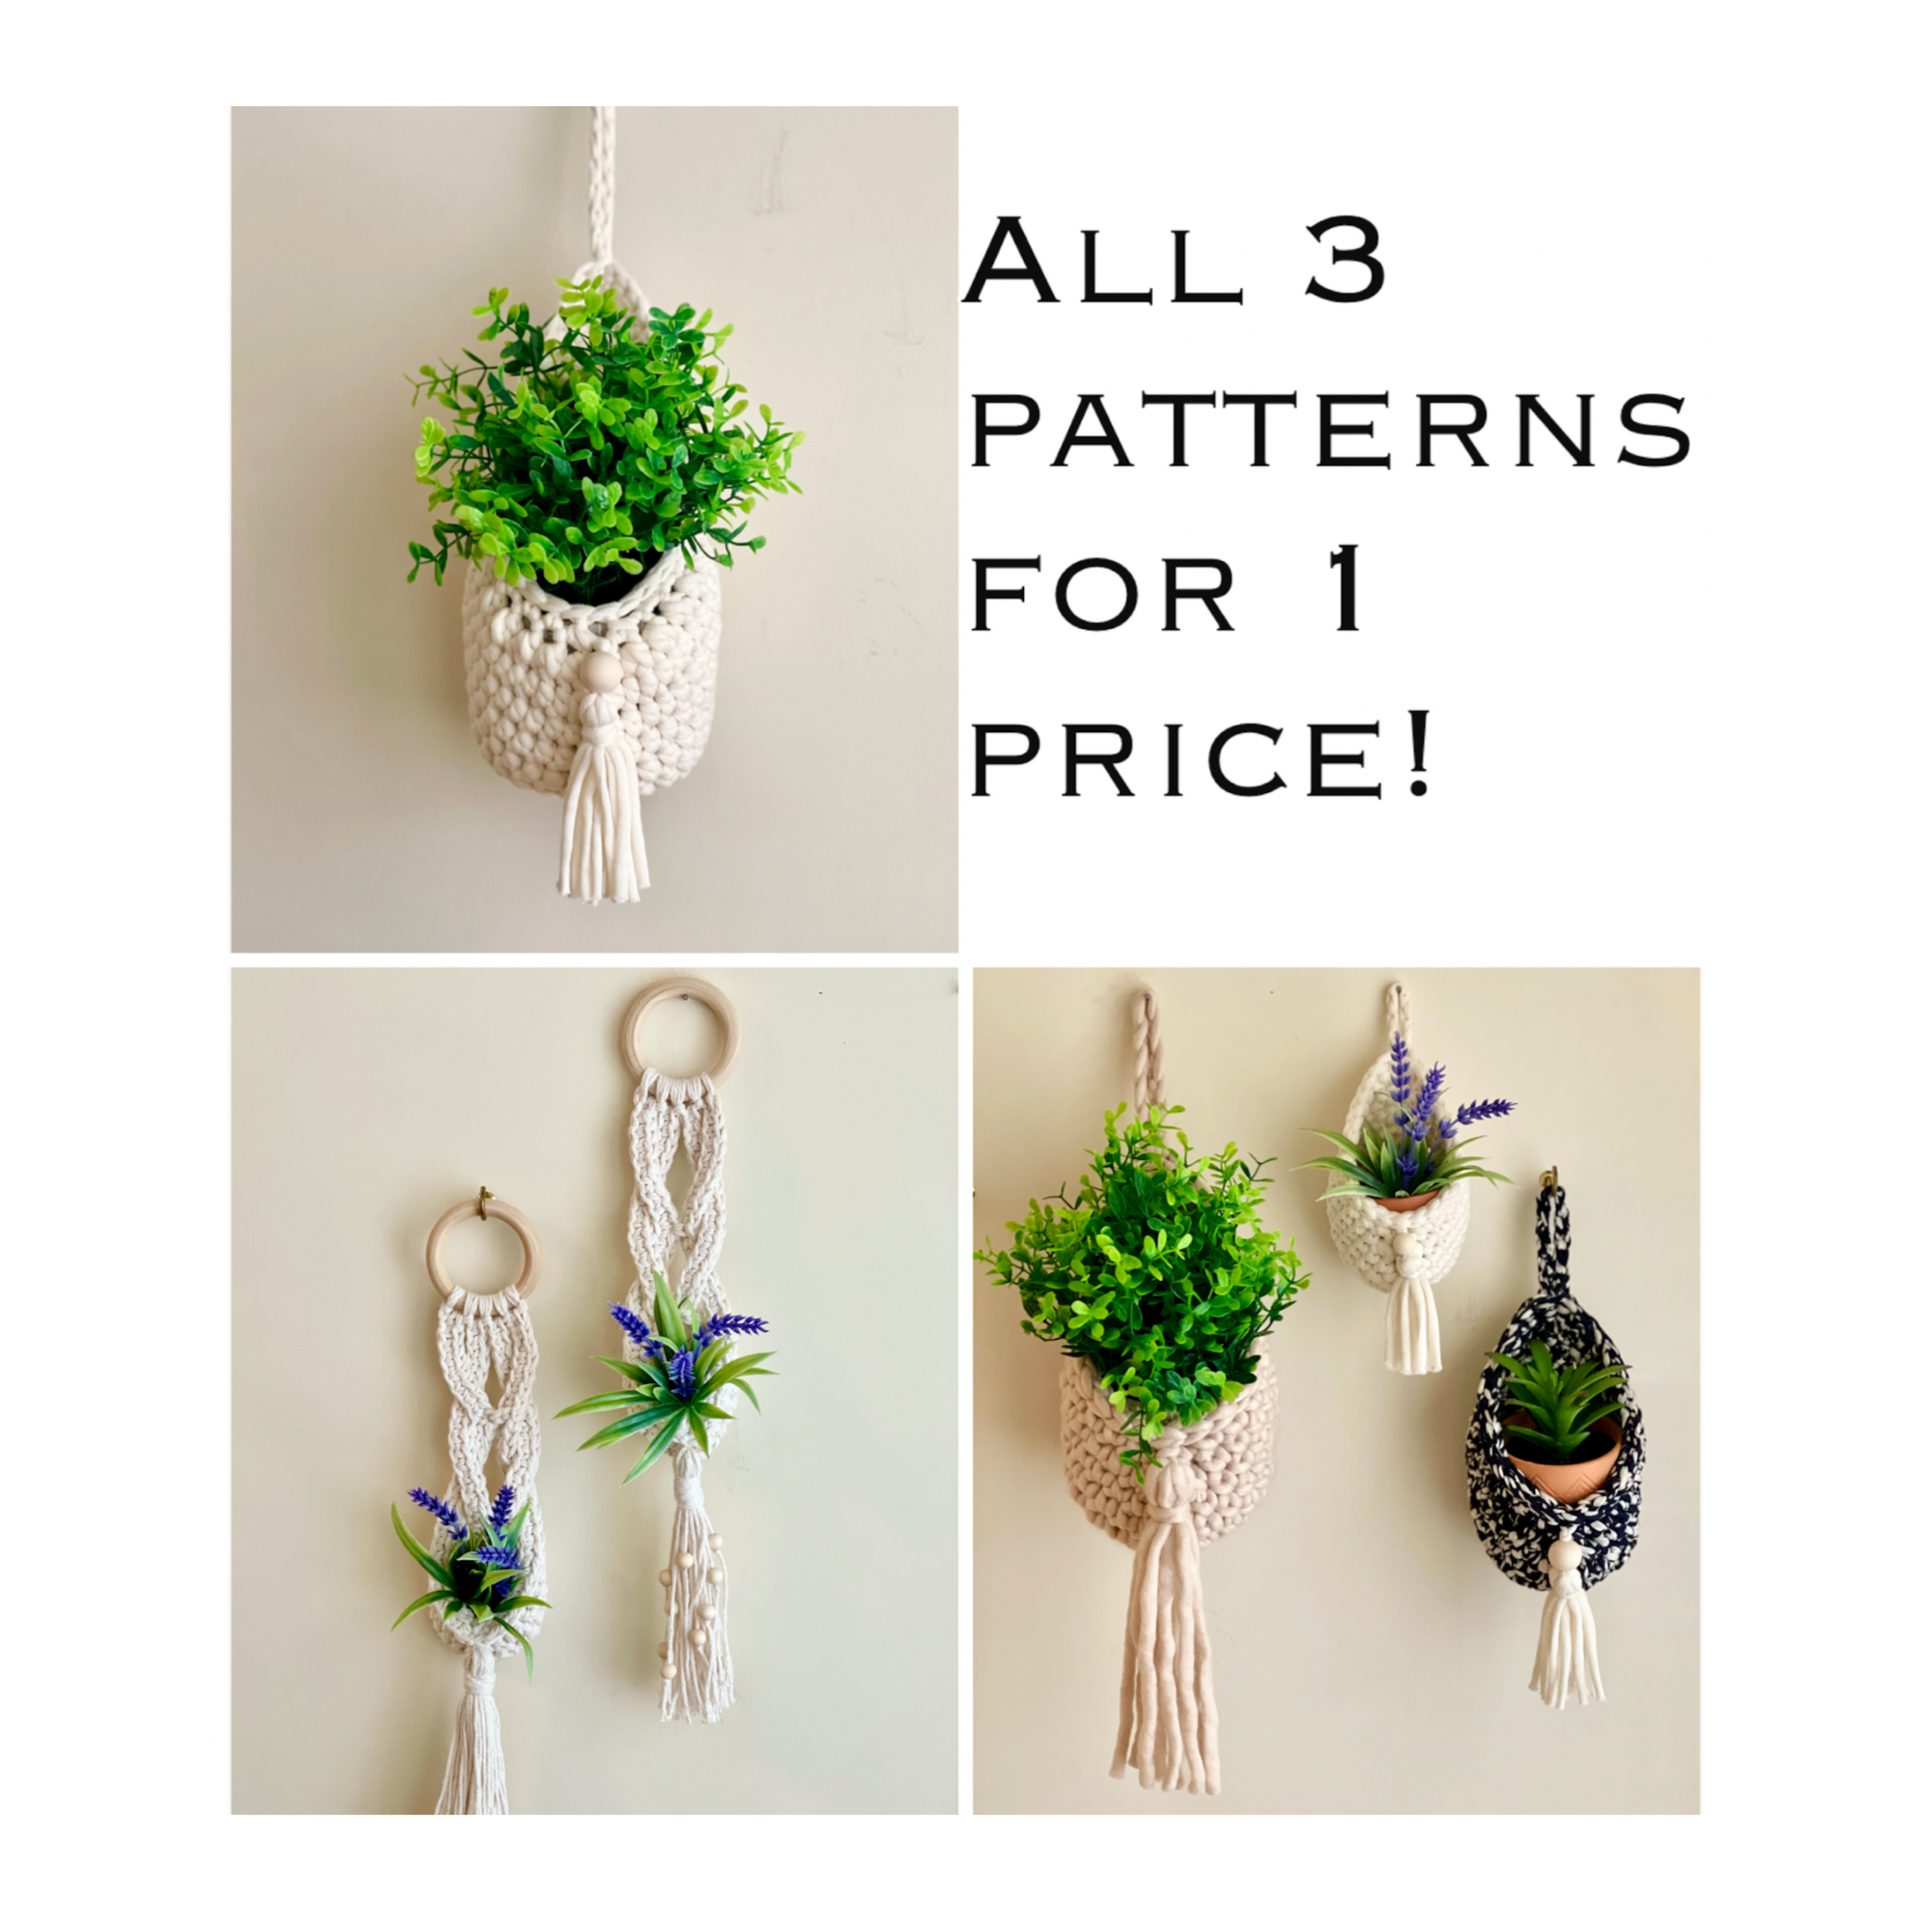
You can buy it in my Planter Lover pattern bundle that includes this pattern, my Macrochet Mini Planter pattern, and my Dewdrop Planter and save $2! The Etsy listing is separate with no code needed, and simply put all 3 patterns in your Ravelry cart to receive the automatic discount!
But I will be honest here….I actually prefer to crochet for the warmer months. SHOCKING, I know! I get bored with hats after a while, ya’ll! And there’s just something about the sunshine and the extra vitamin D that gets me in a sing-songy mood and ready to take on the world!
My first love in the warmer months will always be making bags (of course!), but here lately, I have been on a plant hanger kick. I have found this DREAMY new yarn that JoAnn’s carries called Big Twist Textile yarn and I want to make ALL THE THINGS with it!
It is basically just like the beloved Bernat Home Maker Dec yarn that Yarnspirations carries (but alas, NEVER has in stock), only it is bulkier/thicker than the Home Maker yarn. Home Maker is a size 5 bulky weight yarn, whereas this yarn is a size 6 super bulky weight yarn. It is PERFECT for bags, baskets, purses, and hanging planters.
I have cruised through nearly 10 skeins of this yarn in about a week’s time, so needless to say, I absolutely love it! They usually have more colors in stock, but I am in love with their neutrals anyways.
I have ordered White (which is more of a cream), Off-white (which is basically the same color as the cream Home Maker yarn), and Tan (which reminds me of a creamy latte….yum!). The stitch definition of this yarn is amazing, which is why most people love the Home Maker yarn.
If you are lost on why everyone loves that yarn, it is basically a tubular cotton t-shirt yarn with a thin polyfil center. It makes the stitches really pop and it is extra squishy and soft (yet it holds its shape great!). You want to give this yarn a try, I promise!
If you haven’t tried it yet, NOW is your chance! I have designed this adorable little mini plant hanger just for this yarn. If you don’t want to get this yarn, or if you can’t get it where you live, you could always make this planter using a regular t-shirt yarn, or even doubled/tripled cotton yarn. Here’s a photo of one I made using some t-shirt yarn. It turned out a bit bigger than the one using the Big Twist Textile yarn, but it is still a cool little planter.

This t-shirt yarn turned out amazing! I bought it second-hand, so I don’t know the brand.
Before we get to the pattern, I am going to put a shameless plug in for my Dewdrop Planter pattern I have just released. These planters are made differently and are the Mama and Grandmama of these baby Pixie Planters.

Pictured is the Dewdrop Planter that holds a 4” pot. I used Big Twist in the color White.
The pattern includes 2 sizes: one that holds a 4” pot and one that holds a 6” pot. I wrote it especially for this Big Twist yarn as well, so be sure to order more if you would like to make these bigger hangers!
One skein should be enough for one Pixie Planter and one Dewdrop Planter that holds a 4” pot. The Grandmama hanger takes almost a whole skein.
To snag a pattern bundle of all 3 of my planter patterns, you can find it on Etsy here and simply put all 3 patterns in your cart on Ravelry to automatically receive the discount!

This is the Dewdrop Planter for the 4” pot in the Big Twist yarn in the color Tan.
Speaking of moms and grandmas, these planters will make a great Mother’s Day gift. They would also be a great gift to a teacher, or a great way to brighten up your desk at the office. The boho style that is in really makes it a great decor item for anywhere in your home, so you don’t really need an excuse to make one LOL! I have full confidence these would make a great market prep item for the Spring and Summer vendor markets.
Whether you choose to sell them or gift them, I wanted to mention that I found some really adorable faux succulents at Dollar General for just $2! If you’re like me and you kill all indoor plants (may they all rest in peace), you can’t go wrong with the look and the price of these little plants!

I got this adorable faux succulent from Dollar General for only $2!
They also look awesome with some air plants. If you were wanting to actually plant a real plant in there, Michael’s carries flower pots that are about 2.75” in diameter and are the perfect size for these little guys. The sky’s the limit here, so have fun!
Enough of my rambling! Let’s get crocheting!
Supplies Needed:
-Approx. 25-35 yds of Big Twist Textile yarn, or a super bulky weight size 6 yarn of your choice (good subs would be Bernat Maker Outdoor, Bernat Maker Big, or Lion Brand Hometown USA. You could also double or triple ww size 4 cotton yarn, double Bernat Home Maker yarn, or use t-shirt yarn.)
-An L 8.0 mm hook, or size needed to obtain gauge
-1 14-16 mm wooden bead (optional)
-scissors, yarn needle, tape measure, stitch marker
-A piece of cardboard 3” wide
-Mini pot, approx. 2.75” (7 cm) in diameter (or if you make one out of t-shirt yarn, you may need a 3.5” pot)
Terms Used and Abbreviations:
Pattern is written in US terminology.
Begin(ning) - beg
Chain - ch
Fasten Off - FO
Repeat – rep
Single Crochet - sc
Single Crochet 2 Together - sc2tog
Skip - skip
Slip Stitch - sl st
Stitch Marker - SM
Space(s) - sp(s)
Stitch(es) - st(s)
Gauge:
9 sc and 9 rows = 4” (10 cm)
Row 1: Ch 10, sc in 2nd ch from hook and in each st across. [9 sc]
Rows 2-9: Ch 1, turn, sc in each st across. [9 sc]
Finished Measurements:
Measurements are taken with the planter folded flat and does not include the tassel:
6.5” long x 4.5” wide
Instructions:
Planter is made in the round from the bottom up. The first 6 rounds are made in the continuous round, so you will need your SM. You will need to move your marker to the first st of every round as you go. Do not sl st to join until you are told to do so.
Round 1: Ch 2, 5 sc in 2nd ch from hook. [5 sc]
Round 2: 2 sc in every st around. [10 sc]
Round 3: {2 sc, sc in next st} 5 times. [15 sc]
Round 4: {2 sc, sc in next 2 sts} 5 times. [20 sc]
Round 5: {2 sc, sc in next 3 sts} 5 times. [25 sc]
Round 6: Sc in every st around. Join with a sl st to first sc. [25 sc]
Round 7: Ch 1, 2 sc in first st, sc to last st, 2 sc in last st. Join with a sl st in first sc. [27 sc]
Round 8: Ch 1, 2 sc in first st, sc in next 12 sts, sk next st, sc in next 12 sts, 2 sc in last st. Join with a sl st in first sc. [28 sts]
Round 9: Ch 1, 2 sc in first st, sc in next 11 sts, {sc2tog} twice, sc next 11 sts, 2 sc in last st. Join with a sl st in first sc. [28 sts]
Round 10: Ch 1, 2 sc in first st, sc in next 12 sts, sc2tog, sc in next 12 sts, 2 sc in last st. Join with a sl st in first sc. Ch 7 to make a hanging loop. Sl st into next st. [29 sts]
Finish
Continue making loose sl sts in every st of last round until you reach the ch-7 sp. Push ch-7 forward and sl st to join around ch loop and back into first sl st of round. FO and weave in tails.
Add tassel
1) Using your 3” piece of cardboard, wrap your yarn approx. 5 times and cut bottoms to create tassel tails. Set aside.
2) Cut another piece of yarn approx. 6” long and tie to the middle st of the last row from the top of the front of the planter.
3) Thread your 14 mm bead onto both tails using your yarn needle. Push the bead upwards to the top.
4) Open the ends below the bead. Grab your tassel tails and place them in the middle of those strands to tie around the tassel tails to secure.
5) Cut another length of yarn approx. 5” long and line up your tassel so that it is lying in the exact middle of the front. Take the strand you just cut around the front of the tassel (approx. ¾” down from the top) and into the inside of the planter. Tie the ends to secure the tassel to the front of the planter so that it doesn’t hang forward so far when it’s hanging. Weave in your tails and cut the bottom of the tassel so that the ends are even.

I used the tiny pot from Michael’s and a faux lavender stem from Walmart for this one. This is Big Twist in the color White.
Your Pixie Planter is complete! I would love to see your finished work! If you want to tag me on IG, I’m @dayscrochetnc. You could also use the hashtag #pixieplanter to follow what others are making. I can’t wait to see your projects! If you would like to see other versions that I will be making after this publication, be sure to check me out on IG!
Please note that you do not have my permission to sell, share, copy, or duplicate this pattern or my photos in any way. Please do not use this pattern for a video, blog, or class tutorial. Thank you so much for following these simple rules! Please message me on Facebook or send me an email at dayscrochetnc@gmail.com with any questions.
Come join my Facebook group, Crochet for Days! We have a lot of fun and I often offer discounts and coupon codes to my members that I don’t offer anywhere else! Request to join and answer the questions by following this link.
Did you enjoy making this mini planter? Let me know in the comments!
Happy hooking!
~Dana