
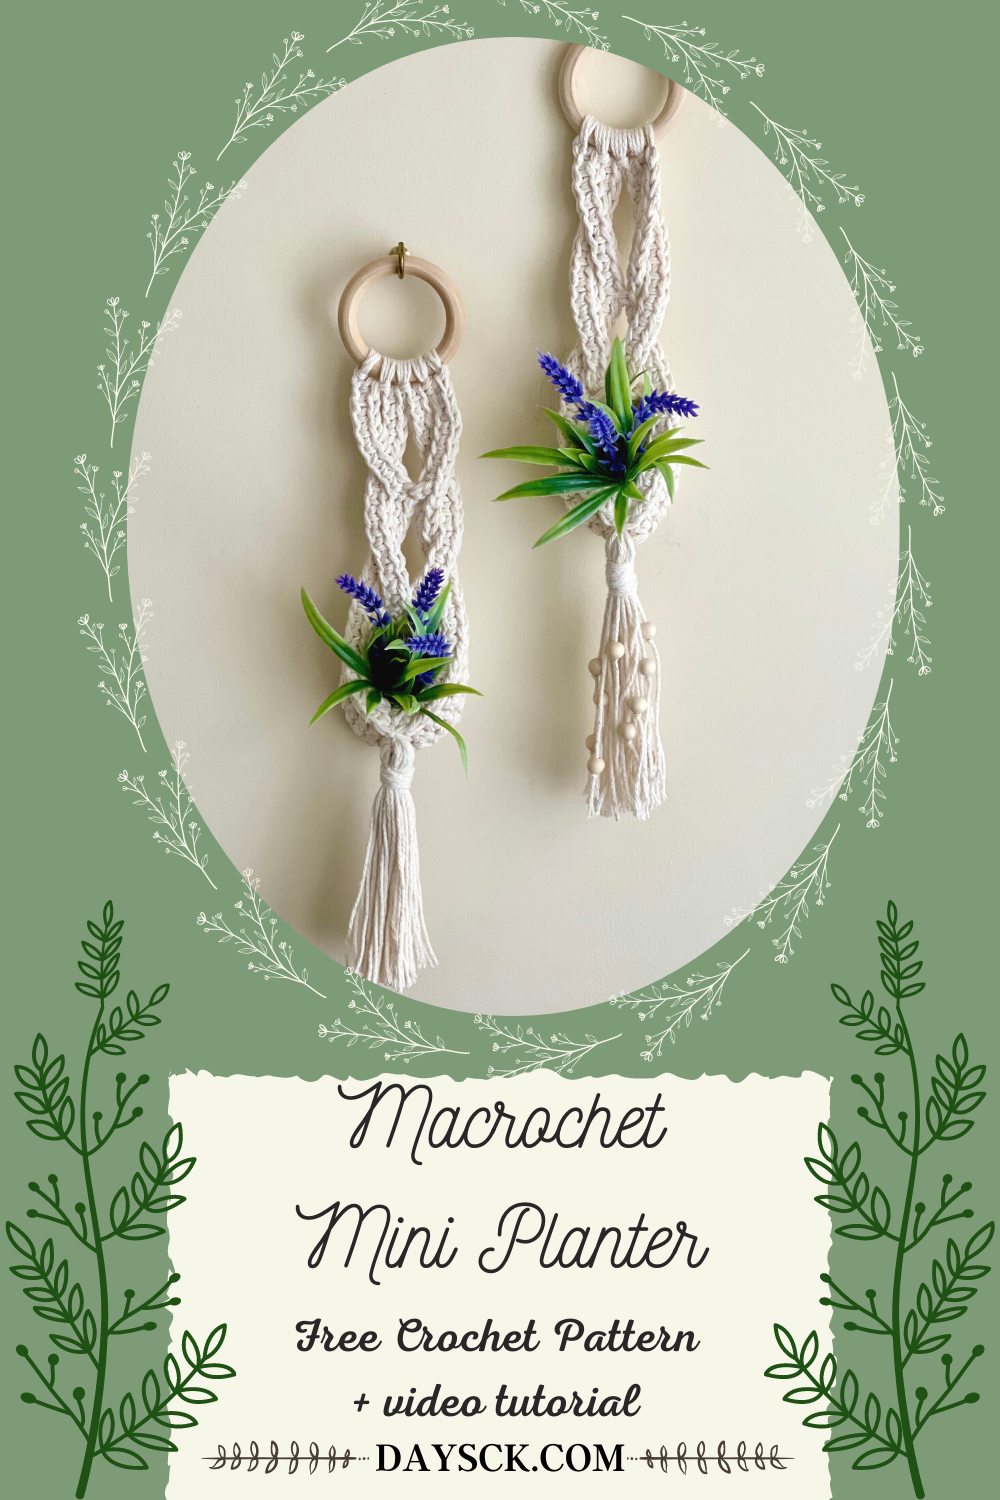
Easy Crochet Mini Planter
If you haven’t noticed, I have an obsession with mimicking macramé with crochet.
I have dubbed my designs “macrochet”, because it looks like macramé, but it’s crochet (catchy, ain’t it?!).
This design combines my most recent obsession with plant hangers with my obsession of recreating macramé using crochet stitches, and I absolutely LOVE how it turned out! I got my inspiration from a photo on Pinterest and knew I HAD to try and make one.
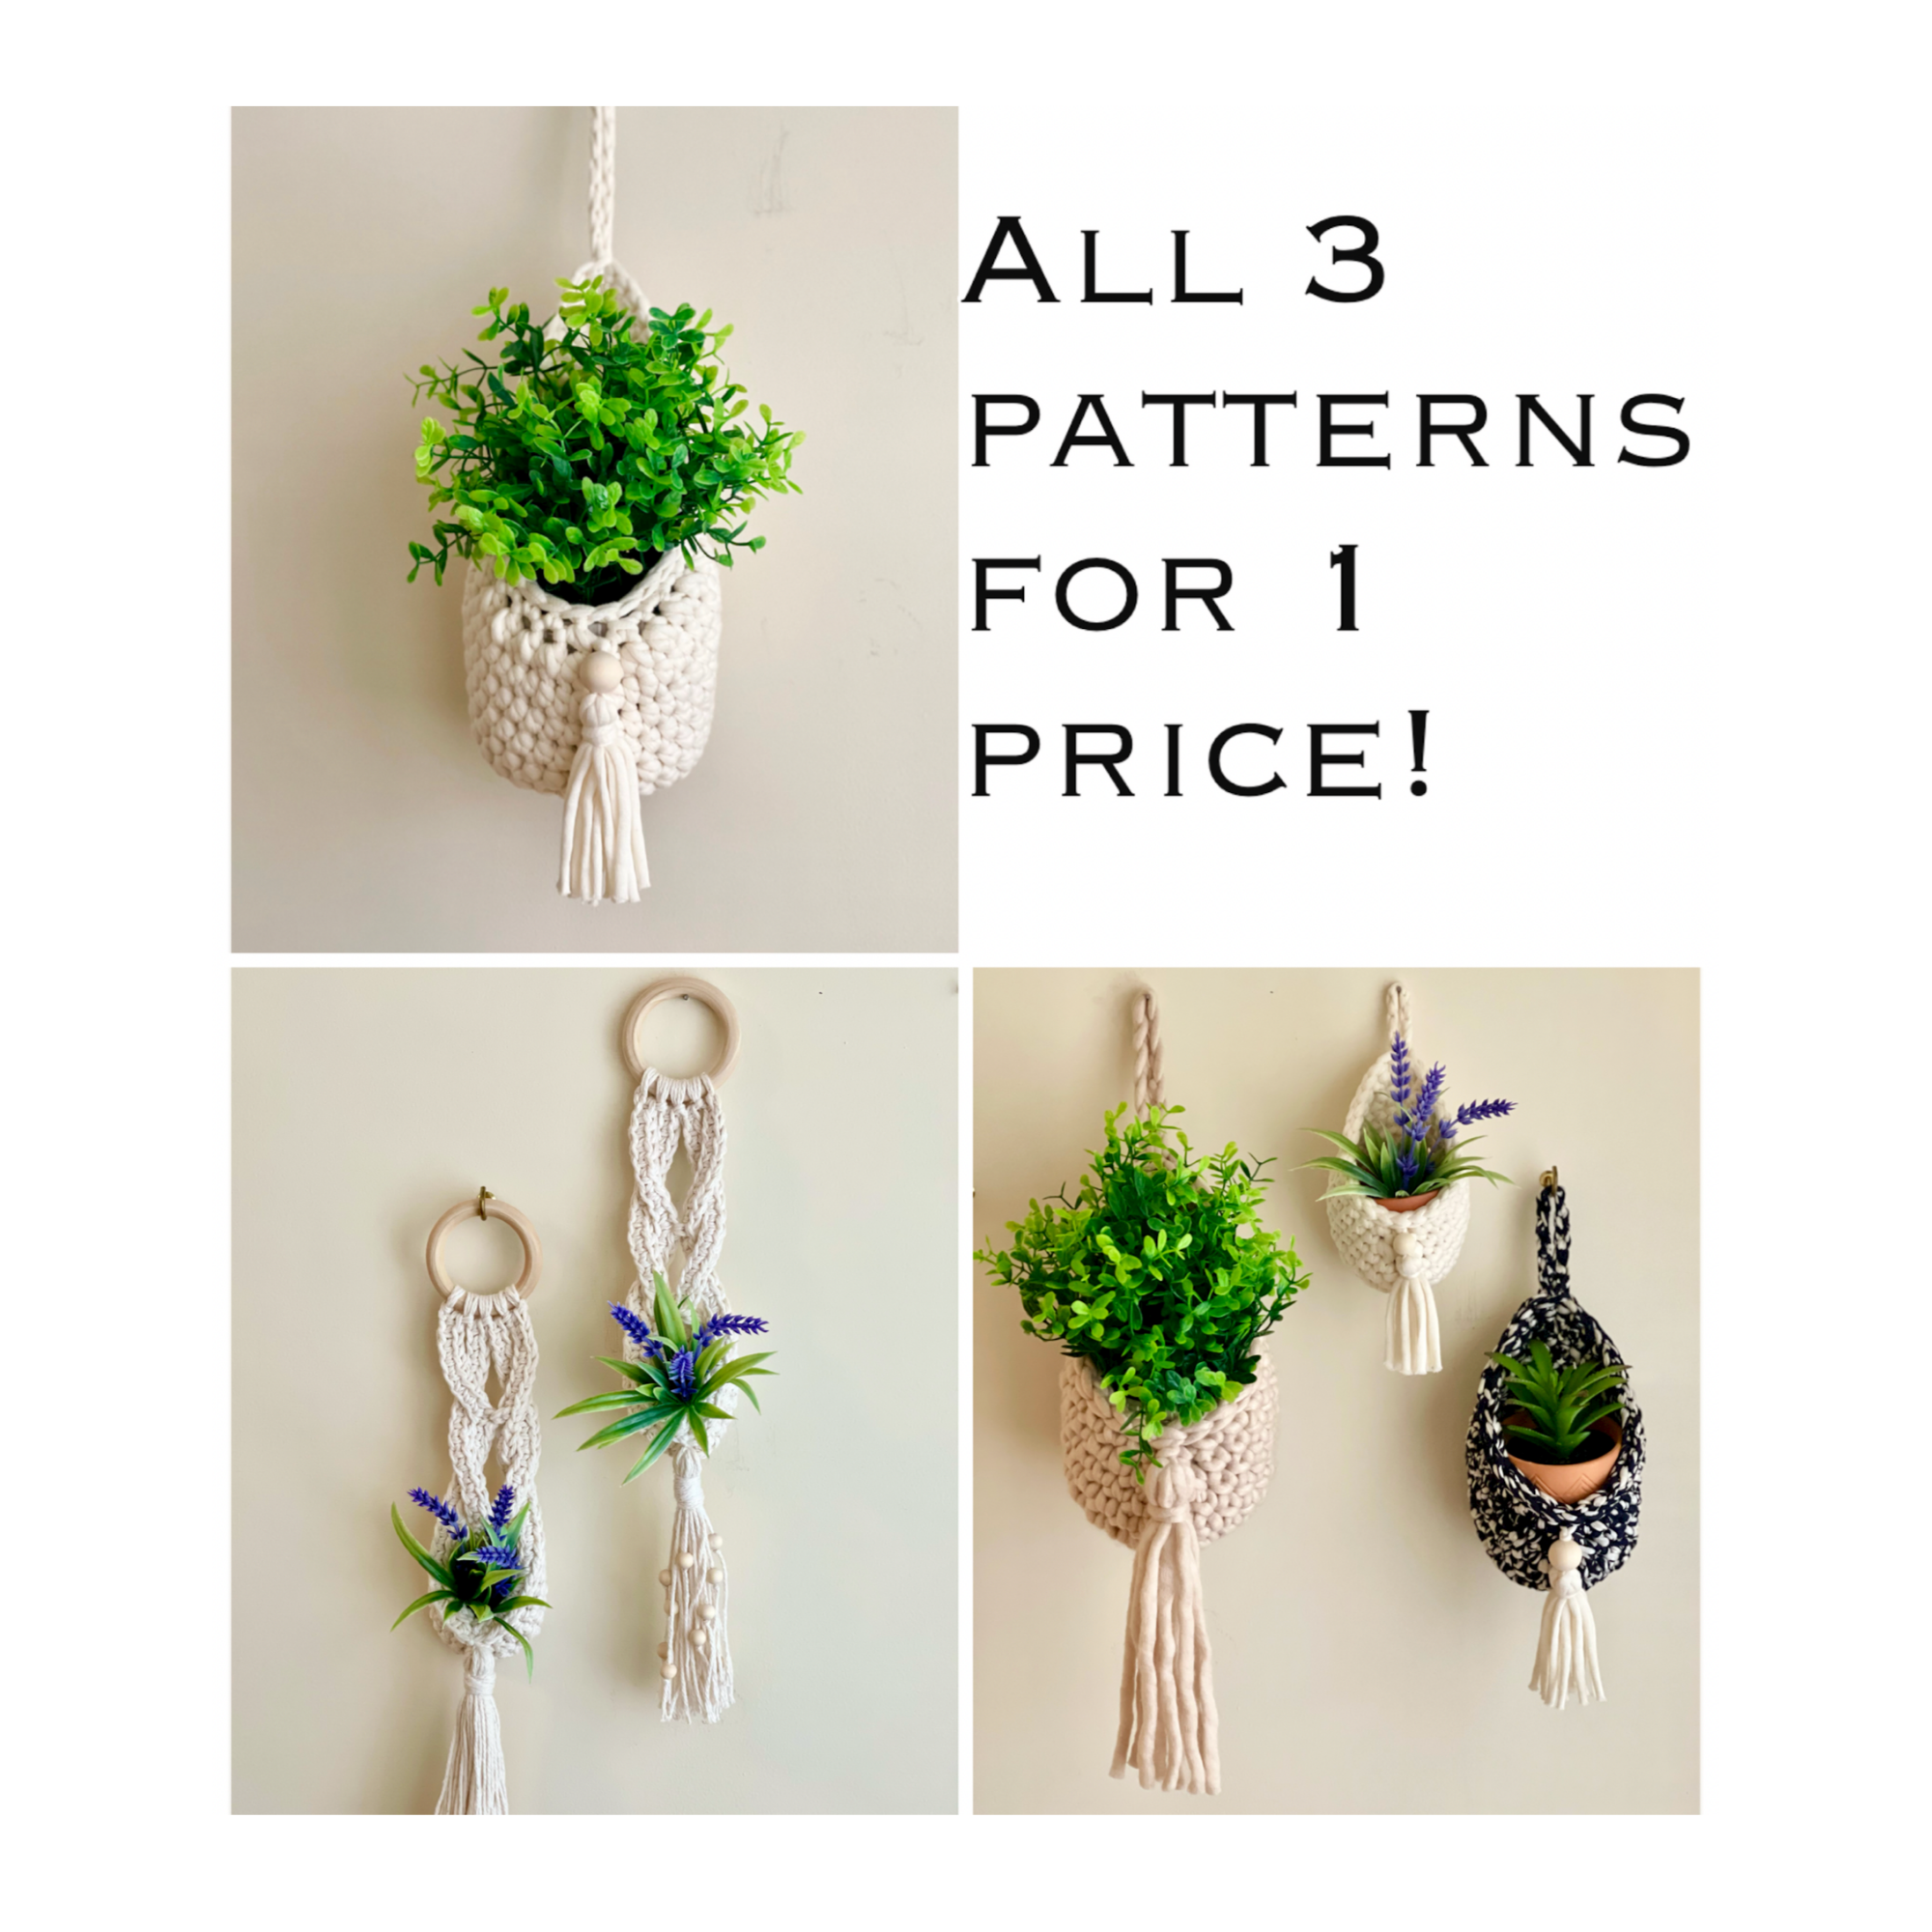
To skip the ads and have a printable pdf, you can find one for cheap in my Etsy and Ravelry shops.
To save even more, you can buy all 3 of my planter patterns in my pattern bundle and automatically save $2! You can find the pattern bundle on Etsy here and simply put all 3 planter patterns in your Ravelry cart to receive the automatic discount.
I am SO excited about this planter, ya’ll! They are simple yet stunning, and though they are small, they pack a LOT of potential! I have dreamed up ALL kinds of ways you could use these as gifts or for selling at vendor markets.
My first thought that came to mind was for a Mother’s Day gift. They are just the right size to use for those little air plants that are so popular right now (which are also very low maintenance—WOOHOO!) or for little succulents and cacti.
One of my testers found some adorable faux succulents in these little tiny clay pots for $1 at the Dollar General store that are just the right size for these, and they look absolutely adorable in them! Here’s a photo:
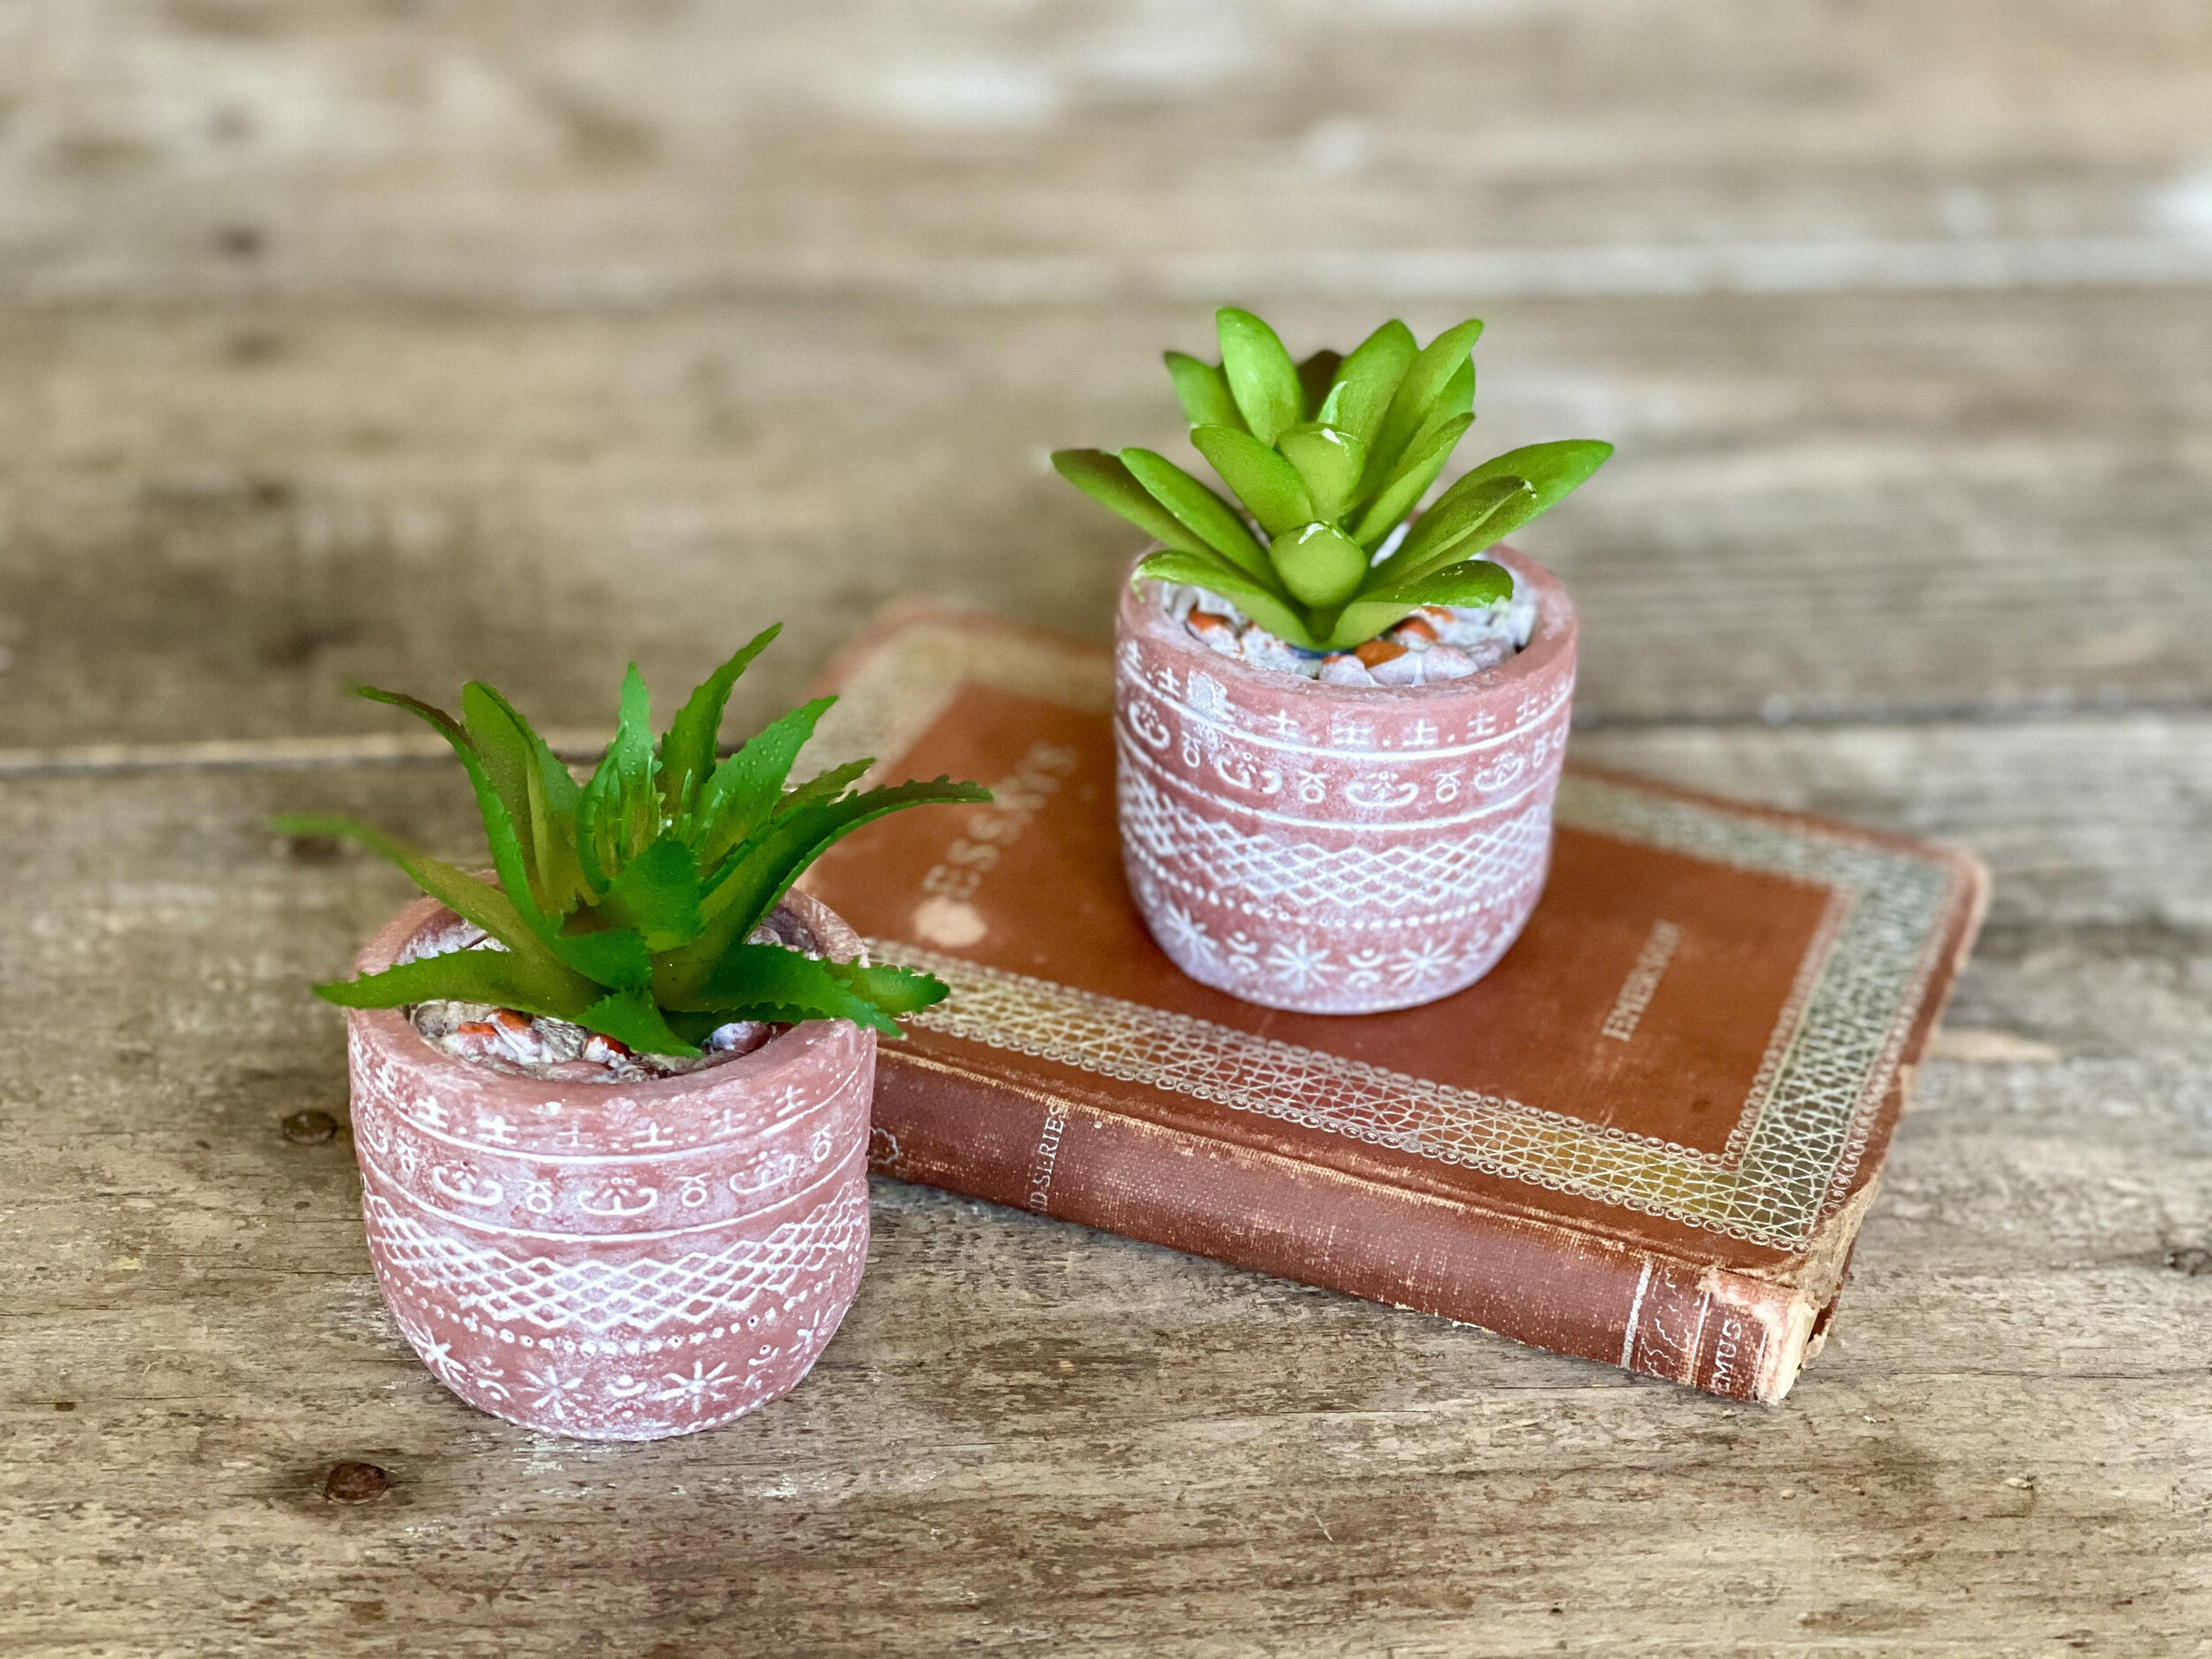
These were only $1 each! Those pots are real clay, too!

They are just the right size for this mini planter!
You could also give this as a gift to a friend, sister, aunt, daughter—whoever loves plants or boho decor! It would be great for brightening up a boho dorm room, an office cubicle, or even a boho camper (for those who are into the glamping trend that I love so much).
I have included a printable pdf for tags that you can print and cut out to include with your planter if you decide to gift them to spruce it up just a bit. You can find it here.
If you are getting married soon (or know someone who is), these would also make a wonderful wedding favor! It would also be adorable in a boho nursery or given as a favor at a baby shower.
You could even use a smaller hook and ring with a single strand of yarn and make a little keychain, glue a faux plant inside and hang it in a dollhouse, or make a tiny one to hang from your rearview mirror, putting a little air freshener in the pot!

Here’s one I made using Red Heart Fashion Thread (size 3) in the color Natural. I used a single strand, an F 3.75 mm hook, and a 1” ring.

As you can see, it is basically the same size as a regular air freshener. Some of my Facebook group members suggested a lava bead (instead of the wooden bead here) and some essential oils to function as the air freshener. I just hot glued the bead inside and bought a mini plant from the miniature section at Michael’s. I think it turned out SO cute!
They are also SUPER quick to make and require very little by way of materials, so they make a fabulous Spring and Summer market vendor item. My testers have reported that people are buying these up at $20 each with no problem.
I was able to make 4 mini planters out of just 2 skeins (because you have to double your yarn) of Peaches N’ Cream cotton yarn. You can buy those from Walmart for around $2 or less! You can also find the wooden rings in bulk here. I am planning to sell them at my next vendor market next month, and I am pretty excited about having them in my inventory because I know they will sell!
Let’s make it already!
Supplies Needed:
- Wooden ring, 2.75-3” in size
- Approx. 40-50 yards of size 4 worsted weight cotton yarn, double strands held together (so technically 80-100 yards). I used Peaches & Cream in the color Ecru
- Size J 6.0 mm hook, or size needed to obtain gauge
- 7-10 10 mm wooden beads (Optional. I like to get an assortment here.)
-scissors, tape measure, yarn needle, stitch markers
Terms Used and Abbreviations:
Pattern is written in US terminology.
Back Loop Only - BLO
Begin(ning) - beg
Chain - ch
Fasten Off - FO
Front Loop Only - FLO
Place Marker - PM
Repeat- rep
Right Side - RS
Single Crochet - sc
Single Crochet 2 Together - sc2tog
Skip - sk
Slip Stitch - sl st
Stitch Marker - SM
Stitch(es) - st(s)
Gauge:
Gauge is made using the suggested hook size and double strands held together.
10 rows of 11 sc = 4”
Row 1: Ch 12, sc in 2nd ch from hook and in each st across. [11 sc]
Rows 2-10: Ch1, turn, sc in each st across. [11 sc]
Finished measurements:
Piece is approximately 8” in length from attachment to ring to top of tassel. Length from top of ring to tip of tassel is approximately 16.5” when made exactly to pattern instructions.
Instructions:
Hanger is made in 2 main separate pieces and then joined together with the tassel added last.
Using double strands and leaving a length of tail of approximately 5” for weaving in later, sl st into the wooden ring. Ch 1 to further secure (it will not count as a stitch).
Row 1: Ch 26, working in the “back hump” of the ch sts, sc in 2nd ch from hook and in each st to end. Join with a sl st into the ring once more. Ch 1 to further secure (will not count as a st). [25 sc]
Count from the wooden ring down to your 8th sc and PM in it before moving on.

Row 2: Ch 16, working in the “back hump” of the ch sts, sc in 2nd ch from hook and in each st across. Join with a sl st into the wooden ring once more. Ch 1 to further secure (will not count as a st). [15 sc]
Row 3: Rep row 2.
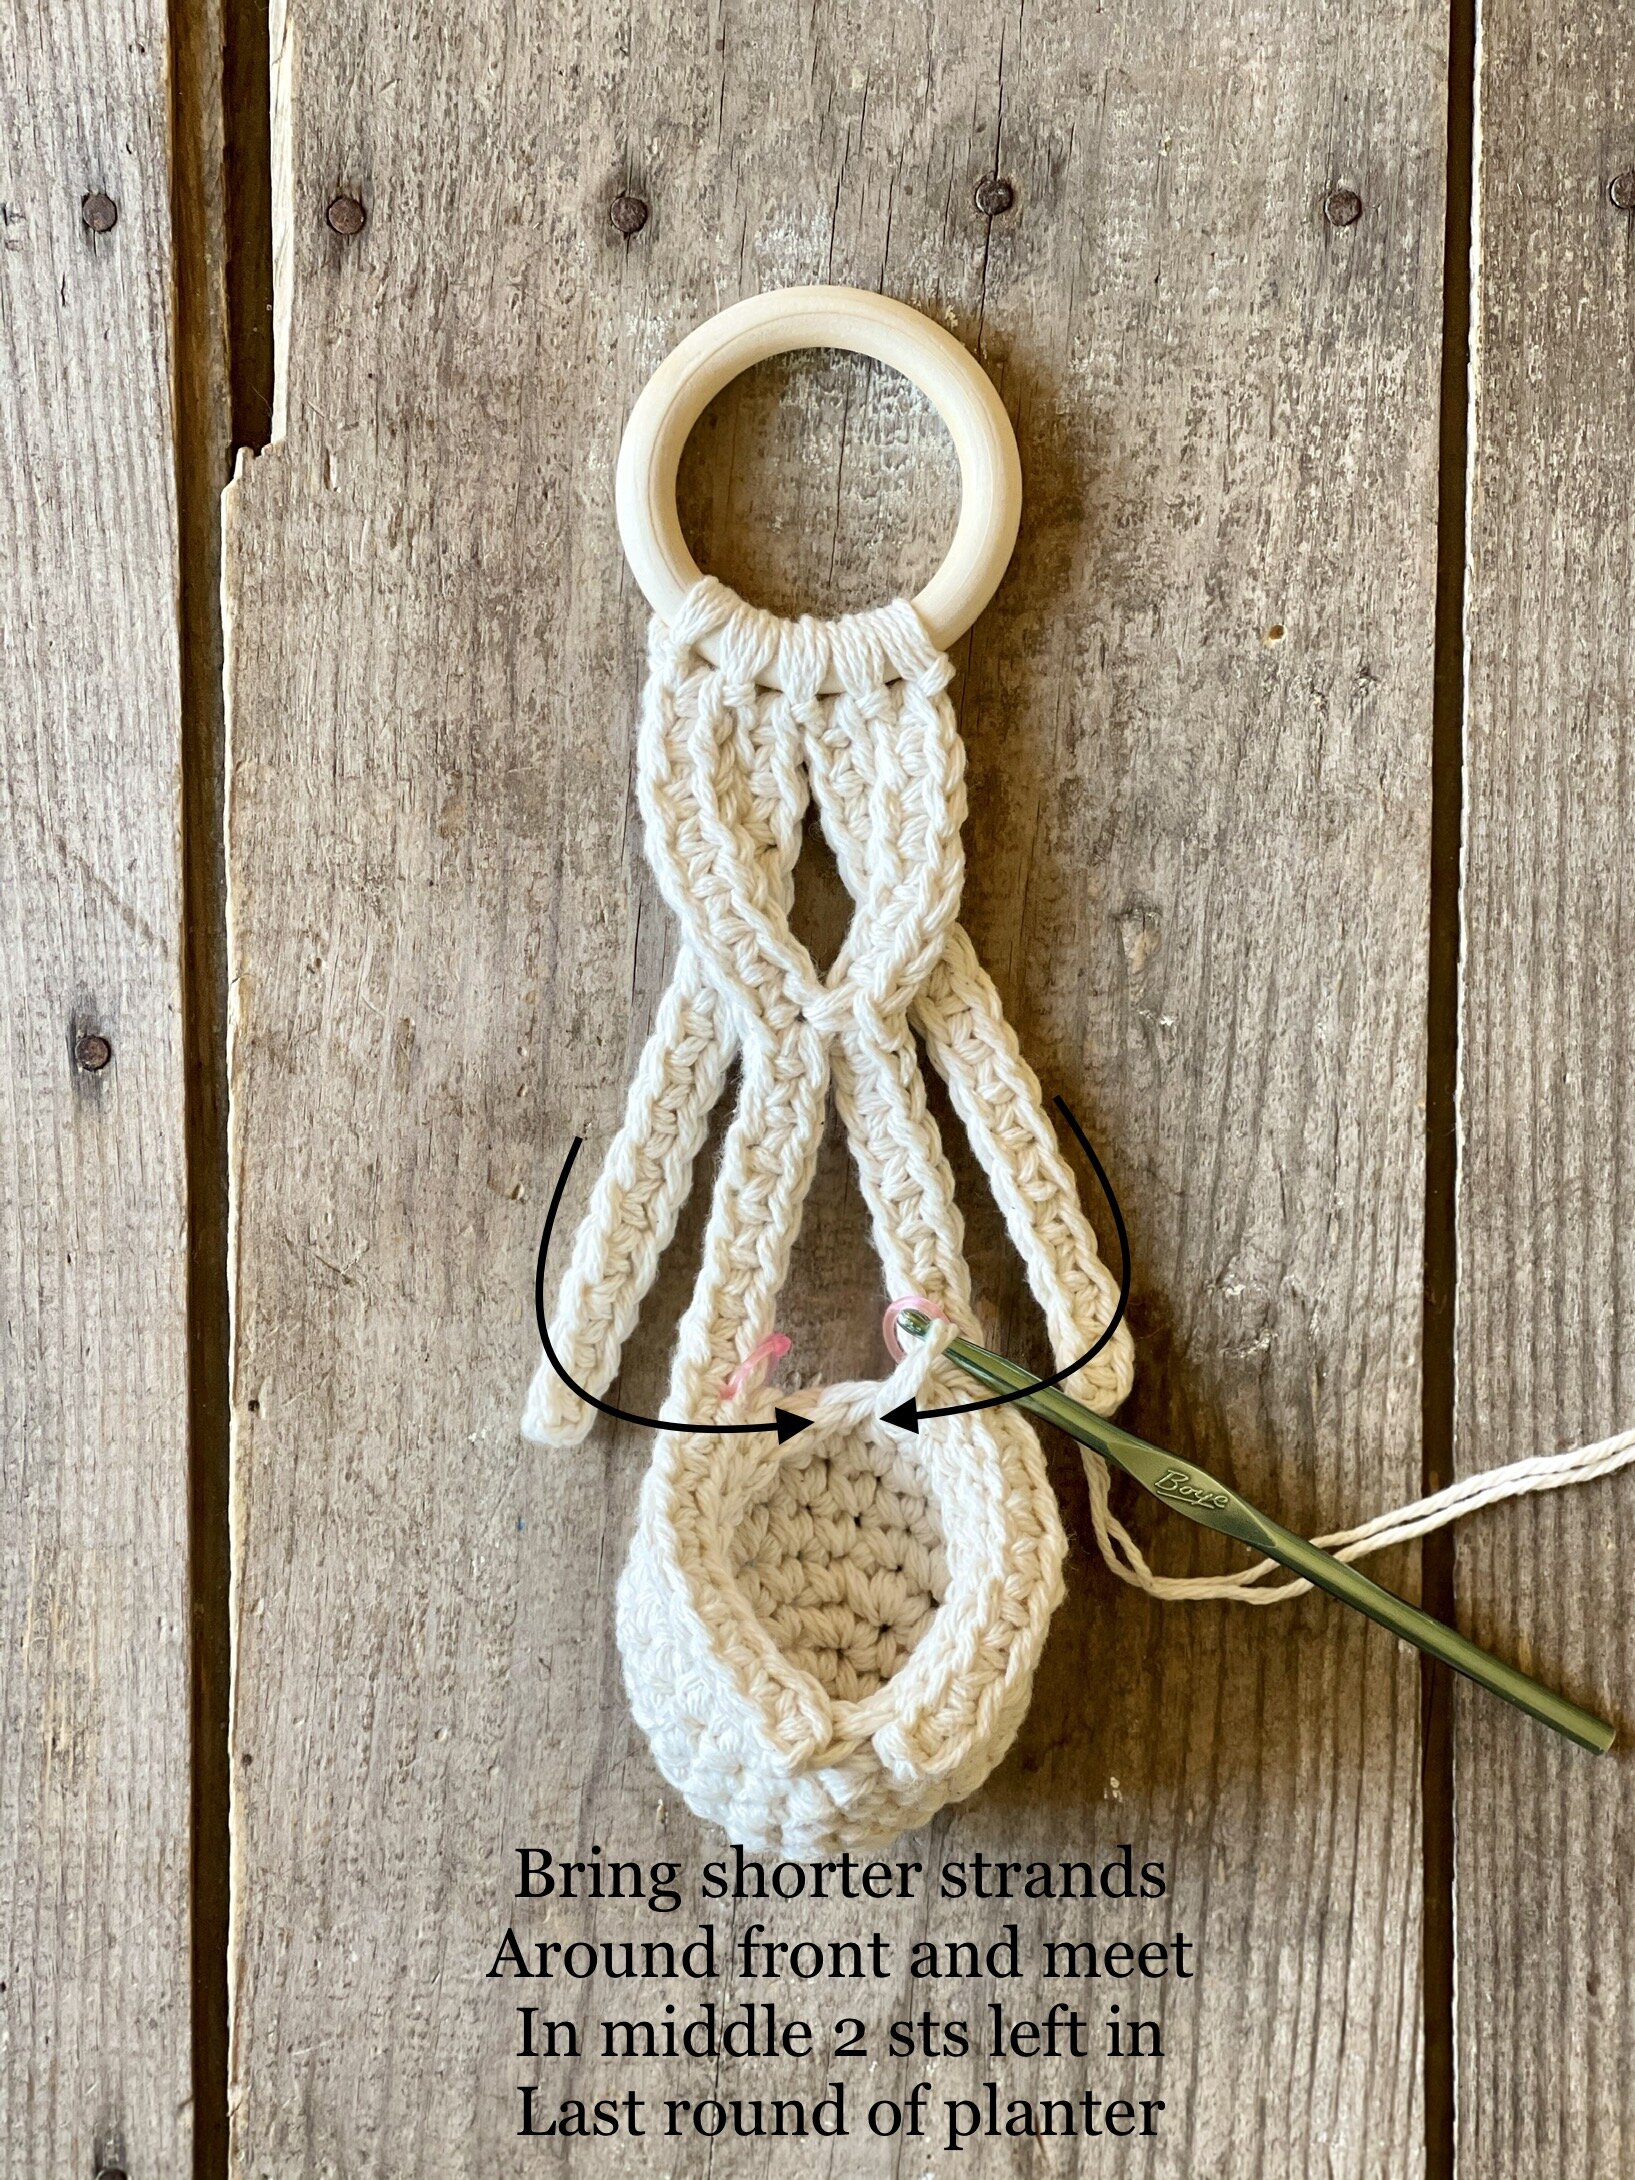
Row 4: Ch 26, working in the “back hump” of the ch sts, sc in 2nd ch from hook and in next 17 sts. Bring both longer strands side-by-side, being careful not to twist either strand. Going through both the st with the SM and the next ch, sc loosely in next st. Sc to end. Join with a sl st into the ring once more. Ch 1 to further secure (will not count as a st) and FO, leaving a length of tail of approximately 5” and weave in tails. [25 sc] See next photo below.

This part can be kinda tricky, so maybe the YouTube video will help you:
Make the mini planter
Mini planter is worked in the continuous round, so you will need a SM. Do not sl st to join unless instructed to do so. PM in first st of each round, moving it as you go.
Round 1: Ch 2, 5 sc in 2nd ch from hook. [5 sc]
Round 2: {2 sc} in first 2 sts, sc in next st, {2 sc} in last 2 sts. [9 sc]
Round 3: {2 sc, sc in next st} twice, sc in next st, {2 sc, sc in next st} twice. [13 sc]
Round 4: {2 sc, sc in next 2 sts} twice, sc in next st, {2 sc, sc in next 2 sts} twice. [17 sc]
Round 5: {2 sc, sc in next 3 sts} twice, sc in next st, {2 sc, sc in next 3 sts} twice. [21 sc]
Round 6: {2 sc, sc in next 4 sts} twice, sc in next st, {2 sc, sc in next 4 sts} twice. [25 sc]
Round 7: Sc in first 12 sts, sk next st, sc in last 12 sts. [24 sc]
Round 8: Sc in first 10 sts, {Sc2tog} twice, sc last 10 sts. [22 sc]
This next round will be joining our 2 longer strands to the mini planter. Mark the 10th sc from the bottom on each of the longer strands. See next photo below.

Round 9: Sl st into the next st.
● With the RS of the left longer strand facing you, sl st through the FLO of the next st of the planter and the FLO of the marked st; sl st in same manner in last 9 sts of strand 1.
● Bring RS of the right longer strand to meet your next st. Sl st through the FLO of the next st of the planter and the FLO of the bottom st of strand 2; sl st in same manner in last 9 sts of strand 2, ending on the st with the SM.

Before moving on, push your 2 shorter strands so that they are behind the 2 longer strands and not twisted. Going from outer to inner, bring the bottom tips to meet in the center top of the planter.
● Beg with the shorter strand on the far right, sl st in both FLO of next st of planter and bottom of strand. Continue in same fashion of next shorter strand. FO, leaving a long tail for sewing the shorter strands further to the planter to clean up the appearance. Weave in tails.
Add your tassel
Cut double strands of yarn approximately 12” in length. To prevent the planter from having a tiny toilet appearance, we are going to bring the tips of the longer strands together while simultaneously adding our tassel.

Thread your yarn onto your yarn needle. With the planter facing you, take your yarn from bottom to top of the tip of the left strand’s last st. Going from top to bottom, take your yarn through the tip of the last st of the other strand on the right. Make your ends even and tie in a knot to secure. Set aside.
Using a piece of cardboard 7” wide, wrap double strands of yarn 10 times. Cut bottoms to create tassel tails. Open remaining tails at bottom of planter and place tassel tails inside so that they are even on both sides. Tie remaining tails around the center of the tassel tails and knot a few times secure.
In order to keep the tassel tails from going wild, wrap double strands of yarn around top of tassel approximately 1” from top of tassel until it is the thickness you desire. Weave those ends with your yarn needle into inside of tassel to secure and hide.
Add 10 mm beads to random strands of your tassel at varying lengths and knot below where you want them to stay. When satisfied, cut tassel ends evenly. You could also dip dye the ends of your tassel, or add a beaded tassel to the bottom. Add your own flair!

I just added my beads randomly. No method to my madness here!
Your Macrochet Mini Planter is complete! I would love to see your finished work! If you want to tag me on IG, I’m @dayscrochetnc. You could also follow the hashtag #macrochetminiplanter to see what others are making. I can’t wait to see your projects! If you would like to see other versions that I will be making after this publication, be sure to check me out on IG!
Please note that you do not have my permission to sell, share, copy, or duplicate this pattern or my photos in any way. Please do not use this pattern for a video, blog, or class tutorial. Thank you so much for following these simple rules! Please message me on Facebook or send me an email at dayscrochetnc@gmail.com with any questions.

What will you do with yours? Did you have fun making it? Let me know in the comments! If you decide to share on social media, I would love to see them. Please tag me @dayscrochetnc.
Happy Hooking!
~Dana