
Crochet Craft Fair Apron

PIN it here!
I made this super fun crochet apron using sunburst granny squares and I am in LOVE!
I don’t know about you, but I am constantly trying to think of new ways to stand out a craft fairs and vendor markets. There are always so many distractions and sometimes it’s hard for people to notice your booth as they walk by. With so much stimuli surrounding them, you got to find ways to stand out and get their attention.
So I decided I was going to create an apron that was for this express purpose. I wanted it to match my booth but yet stand out with a beautiful color palette. Not only do I think this will get people’s attention, I think it will make me and booth more memorable and raise my brand’s awareness, which I definitely want!
Even if you don’t do craft fairs, this would be a fun project to make for a person who loves to cook. You could swap out the business name to say something like, “Dana’s Kitchen”, or a funny saying of your choice.
Just as a heads up, I’ve also got another project up my sleeve in the near future for something else I will be wearing at my markets, so stay tuned for that! It’s going to complete my ensemble and I cannot WAIT to show you what it is!
let’s make it!
Supplies Needed
1 Basically Yours adult apron with front pockets (I got mine from Hobby Lobby)
Pen + Gear Fabric Transfer Paper (See pattern notes)
Iron and ironing board (if using fabric transfer paper)
500-525 yds. of any acrylic worsted weight (size 4) yarn in at least 5 colors (I used 10 colors total). You will need more of the color you choose for Round 5 of the motif, as this will be the same throughout.
Yarn for the letters. You can either use matching super bulky weight yarn like I did, or you can triple the strands of the worsted weight yarn you chose for the motifs. You need very little yardage for the letters
Size H 5.0 mm hook (or size needed to obtain gauge) for motifs
Size K 6.5 mm hook for letters
Hot glue gun and glue sticks (for attaching lettering. See pattern notes)
Sewing machine and matching thread (See pattern notes)
Scissors, yarn needle, tape measure
Terms Used & Abbreviations
Pattern is written in US terminology.
Begin(ning) - beg
Chain - ch
Cluster - Cl
Double Crochet - dc
Fasten Off - FO
Granny Cluster - GC
Puff Stitch - PS
Repeat - rep
Right Side - RS
Single Crochet - sc
Skip(ped) - sk
Slip stitch - sl st
Space(es) - sp(s)
Stitch(es) - st(s)
Treble Crochet - Tr
Yarn Over -YO
* - Repeat directions given from *
[ ] - Indicates the number of stitches you should have
( ) - Work stitches within ( ) in the same stitch or space
{ } - Indicates a group of repeating instructions
Special Terminology
Beginning Cluster (Beg Cl): Ch 2 (counts as a dc), {YO, insert hook into indicated st or sp, pull up a loop, YO, draw through 2 loops on your hook} complete brackets a total of 3 times, YO, draw through all 4 loops on your hook.
Cluster (Cl): {YO, insert hook into indicated st or sp, pull up a loop, YO, draw through 2 loops on your hook} complete brackets a total of 4 times, YO, draw through all 5 loops on your hook.
Granny Cluster (GC): 3 dc in same st or sp.
Puff (PS): {YO, insert hook into indicated st or sp, draw up a loop} complete brackets a total of 3 times, YO, draw through all 7 loops on hook, ch 1.
Gauge
Motif diameter should measure 4 inches after completing rounds 1-3.
Finished Measurements
Each completed square motif should measure approx. 6 inches in diameter. The crocheted bottom portion should measure approx. 17.5 x 17.5 inches, not including the ruffled portion.
Pattern Notes
This pattern is written for the specific apron listed in the supplies. It has curved pockets and I created curved motifs to line up with the edge. If your apron is different, you can follow the same overall concept.
I used super bulky weight yarn from the Yarn Bee line that matched my motifs (also the Yarn Bee line). If you want your letters to match but you don’t wish to buy super bulky weight yarn, simply triple your strands of worsted weight yarn to create your letters.
I do recommend using a different color for every letter. I tried it all in one color first and the words were almost indistinguishable.
I used the fabric transfer paper to iron on my letters first as a sort of template so I would know exactly where to put my chains for my letters. If you have a Cricut machine, you could probably forego this and use your vinyl heat press. NOTE: The fabric transfer paper requires an ink jet printer to work. If you don’t want to use the fabric transfer paper, you could always print out your wording and put it behind the apron and trace it like a template using a pen or pencil.
I used hot glue to attach my chains for my letters. If you don’t like this method, you could also realistically hand sew them to your apron. You could also even use a sharper hook and slip stitch through the apron, but I didn’t want to risk the apron fabric fraying or bunching up.
I used a sewing machine to attach my motifs to my apron. This is the first project I have ever successfully sewed with crochet fabric, and there were a LOT of mistakes, so I am going to tell you how I was able to finally get it to work (to the point now where I feel confident enough to sew ALL the crochet things!!) It’s not as hard as you think if you follow my steps.
I have created a YouTube video tutorial for this project. You can watch it here:
Instructions
I encourage you to begin with your brand name at the top of the apron.
Step 1
I started with typing my business name in Canva on an 8.5 x 11 inch size project using Beth Ellen font. I turned the words so they were oriented lengthwise along the page (see photo below).

Step 2
I printed it off and laid it behind my apron (if you use black ink, you can see it through the apron) to decide on placement and letter sizing.

step 3
Once I was satisfied with my lettering, I saved it to my desktop as a png with a transparent background (this step is important!).
Step 4
Once I had it saved to my desktop, I then uploaded it to Canva as an image. This allows you to flip your words so that they are mirror image. NOTE: You must have a mirror image of your words for the transfer paper method.

Step 5
Print your design on regular paper to make 100% sure everything is where it should be.
step 6
Once satisfied, print onto the fabric transfer paper, following the instructions on the package.
step 7
Cut out your graphic, but not too close to the letter edges, or it may smear the ink when you iron, which is what happened to me because I cut too close to the edge of the letters.

step 8
Make sure your steam settings on your iron are turned off before you iron your fabric transfer paper to your apron. I forgot to turn mine off and it became discolored and smeared the ink a little. Also make sure you remove the back of your transfer paper while it’s still warm per the instructions.
Make Letters
This next part will be completely to your preference. I personally used the 6.5 mm hook and super bulky weight yarn (Yarn Bee True Colors); however, you absolutely could triple your worsted weight yarn you chose for your motifs instead.
Once you have chosen the yarn you intend to use, you will simply make a chain until it’s long enough to outline the letter. Then you will hot glue the chains to the letters, following the letters you printed out. This is much easier to understand when visualized. See my video for further explanation.

I do encourage you to change colors for every letter because I found it was much more legible that way. I started off using all the same color and you couldn’t really read what it said without diffficulty. I also encourage you to chain tightly and use very little hot glue.

Heart Applique
As you can see in the photo above, I also added a cute little heart applique in the place of the letter O in the word crochet. I think it turned out super cute! If you would like to make your own heart applique, I did use the smaller hook and the regular worsted weight yarn. I used the same color for my heart as my ruffle, but you can use any color you would like.
To make the heart, simply follow these instructions:
Ch 3, work all the following into the 3rd ch from hook: 3 dc, 2 hdc, ch 1, dc, ch 1, 2 hdc, 3 dc, ch 2, sl st.
Fasten off and weave in tails to close center of the heart better.
apron
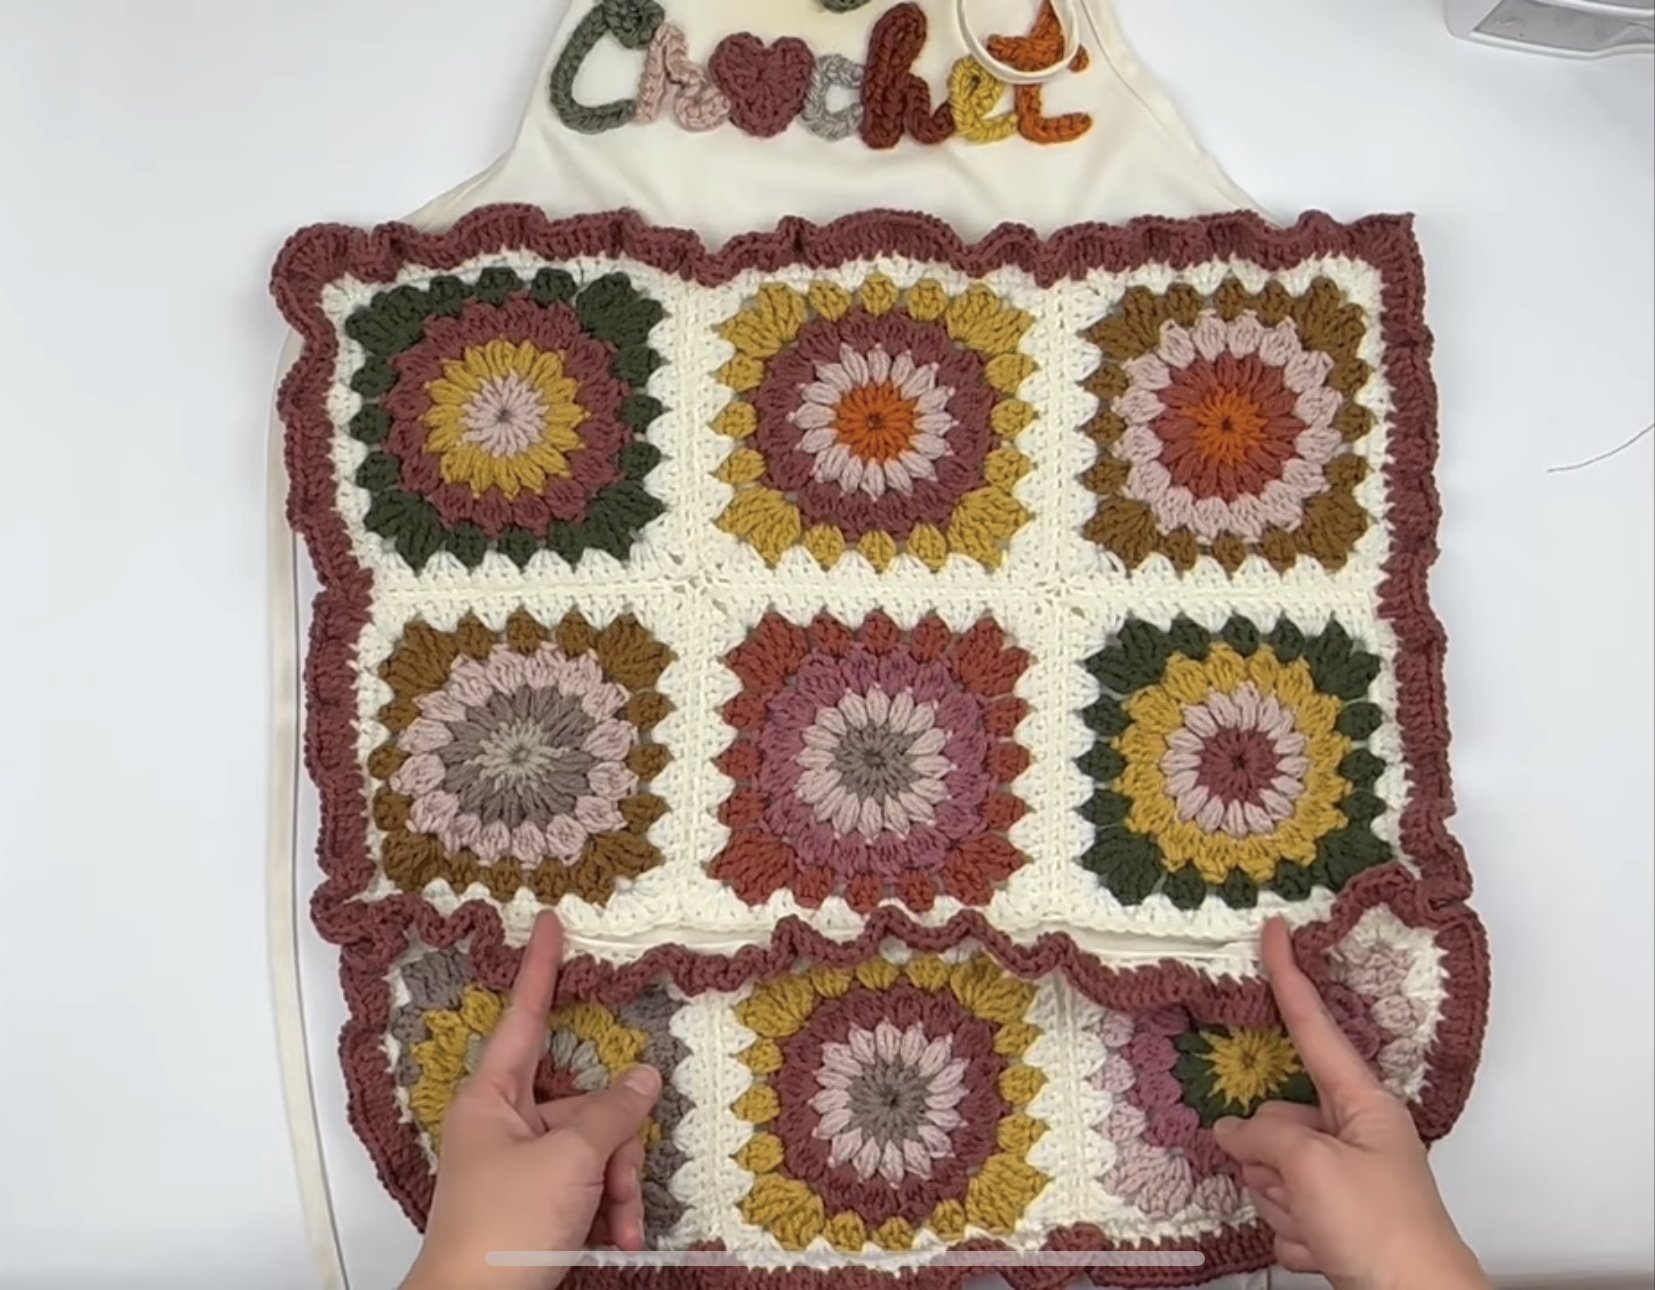
Apron is embellished with 7 square motifs and 2 rounded corner motifs for a total of 9 motifs. All motifs have 5 rounds, and I do recommend using the same color for round 5 on all motifs. Make sure your motifs will fit as you go. You can always add a wider ruffled border if your motifs are too small, but if they are too big, your project will turn out sloppy.
square Motif (make 7)
Be sure to change colors every round.
Round 1: Ch 4, join with a sl st in 4th ch from hook to create a ring, ch 3 (counts as a dc), 15 dc in ring. Join with a sl st in 3rd ch of beg ch. [16 dc] Cut yarn and change colors.
Round 2: Join in any sp between dc, ch 1, PS, PS in each sp between dc around. Join with a sl st in first PS. [16 PS] Cut yarn and change colors.
Round 3: Join in any sp between PS, Beg Cl, ch 2, {Cl, ch 2} complete brackets in sp between each PS around. Join with a sl st in first Cl. [16 Cl, 16 ch-2 sps] Cut yarn and change colors.
Round 4: Join in any ch-2 sp, ch 5 (counts as a Tr + ch-1), 3 Tr in same sp, GC in next 3 ch-2 sps, * {3 Tr, ch 1, 3 Tr} complete brackets in next ch-2 sp, GC in next 3 ch-2 sps; rep from * twice more, 2 more Tr in beg ch sp. Join with a sl st in 4th ch of beg ch. Cut yarn and change colors. [24 Tr, 36 dc, 4 ch-1 sps]
Round 5: Join in any ch sp of corner, ch 4 (counts as a dc + ch-1), GC in same sp, GC in sp between next 4 GC below, * {GC, ch 1, GC} in ch-1 sp of next corner, GC in sp between next 4 GC below; rep from * around, 2 more dc in ch-sp where you joined, join with a sl st in 3rd ch of beg ch. [72 dc, 4 ch-1 sps]
rounded edge motif (make 2)
The first 3 rounds of the rounded version will be exactly the same as the previous 7. Rounds 4 and 5 will be slightly different.
Round 4: Join in any ch-2 sp, ch 5 (counts as a Tr + ch-1), 3 Tr in same sp, GC in next 3 ch-2 sps, * {3 Tr, ch 1, 3 Tr} complete brackets in next ch-2 sp, GC in next 3 ch-2 sps; rep from * once more, GC in next 7 sps, 2 more Tr in beg ch sp. Join with a sl st in 4th ch of beg ch. Cut yarn and change colors. [18 Tr, 39 dc, 3 ch-1 sps]
Round 5: Join in ch sp of middle corner, ch 4 (counts as a dc + ch-1), GC in same sp, GC in sp between next 4 GC below, {GC, ch 1, GC} in ch-1 sp of next corner, GC in sp between next GC below, {3 sc} complete brackets in next 6 sps between dc below, GC in next sp between GC below, {GC, ch 1, GC} complete brackets in ch-1 sp of next corner, GC in last 4 sps, 2 more dc in ch-sp where you joined, join with a sl st in 3rd ch of beg ch. [72 dc, 4 ch-1 sps]
Join Motifs
Now we will join our motifs. You will need to whip st the top 6 square motifs together, but you will NOT want to join them to the bottom 3 motifs. You will join those 3 together but not to the top 6. That way you can open your apron pocket.

Once you have them laid out the way you want them, you will whip stitch them together. To do this, place the motifs right sides together and whip stitch through the outer loops only (or however you want to do it).

Sew Motfis to Apron
Do not let this header scare you! I have been scared of sewing my crochet work for YEARS. I’ve tried it many times and failed, but this project turned a lightbulb on for me. It is much easier than I thought. The problem was with my machine settings.
I will mention that in my YouTube video I use parchment paper to sew the bottom motifs to the apron pocket. I have had so many people tell me that it worked well for them that I thought I would give it a try.
Let’s just say it did NOT work out for me at all. the pocket turned out with ugly stitches. I left that in the video so you could see how I sewed them together, but I do NOT recommend using parchment paper (at least not for this project).
Before I sewed the motifs to the pocket, I used a seam ripper to remove the middle seams that turned the pocket into 3 pockets.

I did this for 2 reasons. 1) I needed to sew the motifs to the top pocket border without sewing the apron pocket to the back 2) I use a cash bank bag at markets and I really needed one big pocket. I know you’re thinking that the pocket will be flimsy and dump all the contents out. You are right! I show you how to fix that later.
Now you can go two ways here. You can sew your top motifs onto the top portion of the apron first, or you can sew your pocket motifs to the pocket portion first. I personally sewed the pocket motifs first so it wouldn’t be so bulky, but you don’t have to.
You will clip your motifs to the apron border and sew using the same color thread as Round 5 yarn. I personally found it looked the most professional when I layered it with my crochet stitches on top and my apron on the bottom. As you can see in the photo below, I lined up my presser foot with the outer edge of my stitches.

Before you start sewing you will want to loosen up your tension on your machine. This is one of the things that kept ruining my stitches. My machine goes up to the number 6, so this about halfway.
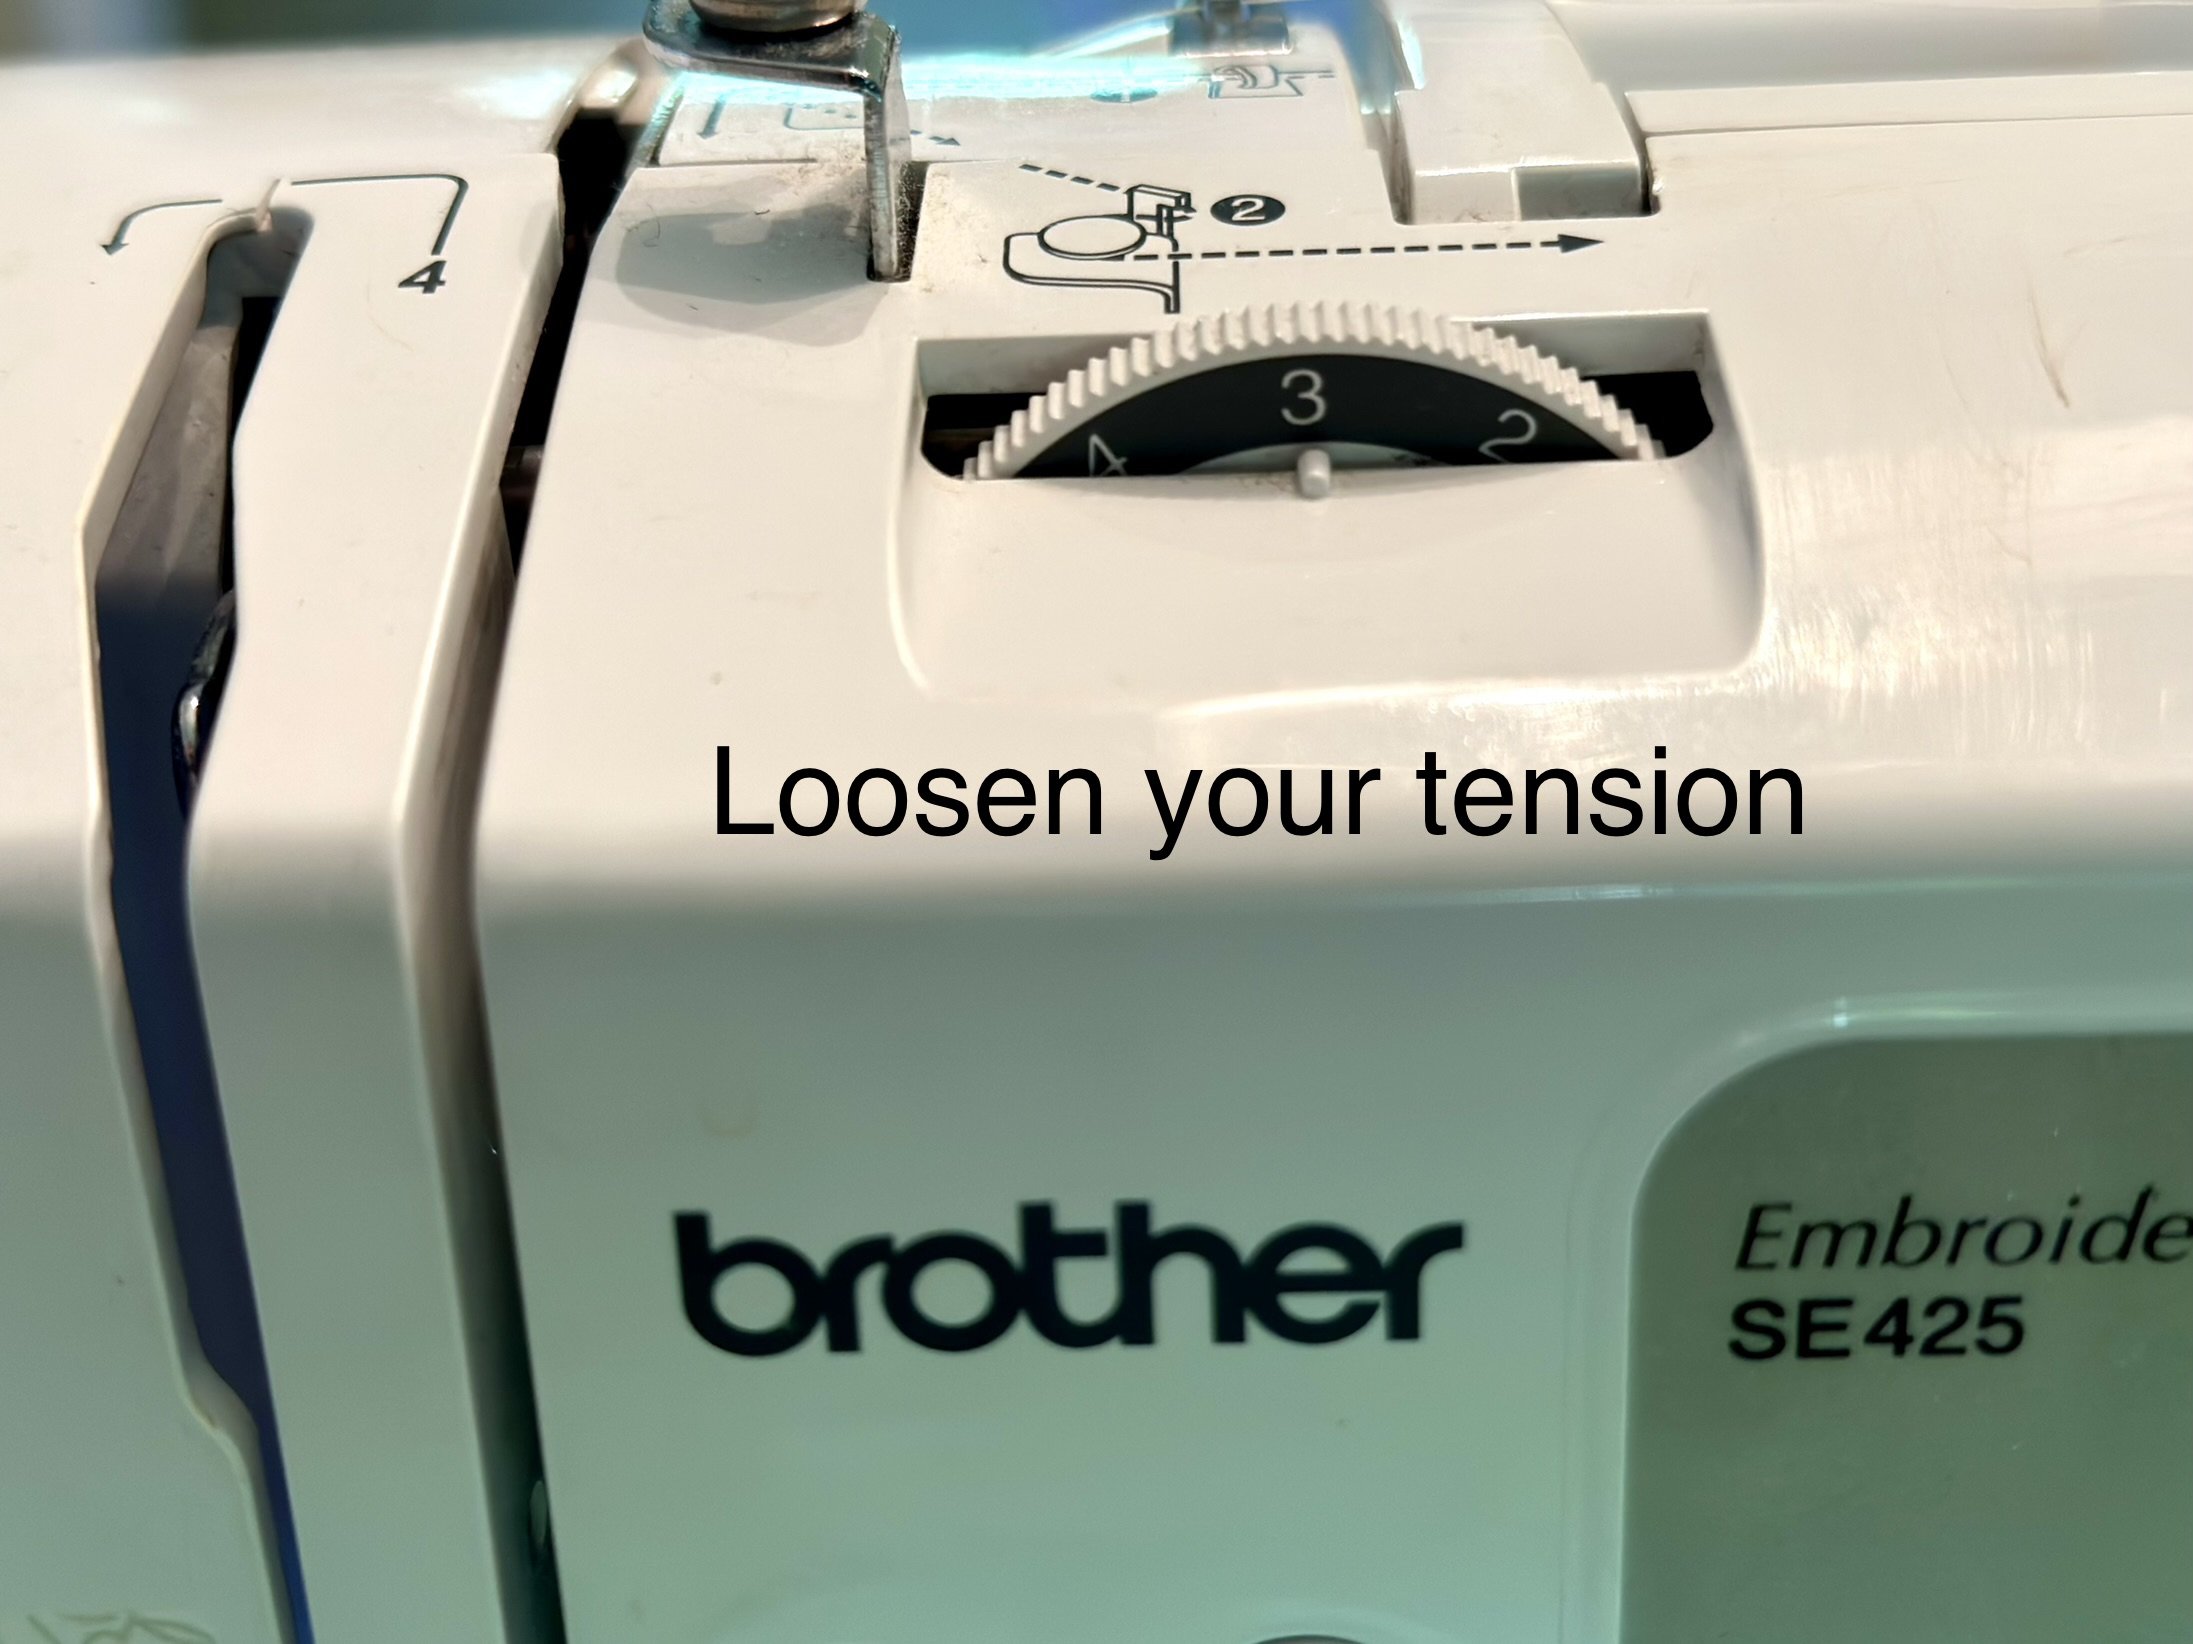
You will also want to choose the longest stitch length on your settings. I have a Brother SE425 Embroidery machine and this is what mine looks like:

Next I just recommend that you go very slowly! And just FYI, do NOT sew too closely to the tops of your double crochet stitches in Round 5 because we will be adding our ruffled border after it’s sewn onto the apron and you need to be able to access those stitches.
Add Ruffled Border
Once you have your motifs sewn to your apron, you will want to add a ruffled border to clean it up. If you don’t like the ruffle, you could just do a round or 2 of single crochet to clean it up. I think the ruffle is adorable, though and it was easy to do.
Join in the top right ch-sp of your top right motif. Ch 3 (will count as a dc), add 3 more dc to the same ch sp. Put 2 dc in every st, every ch-sp, and in the seams. Continue until you reach the top left ch-sp of the corner motif. Put 8 dc in the corner ch-sp.
Continue putting 2 dc in every st down the side until your top portion meets your pocket motifs. Since it’s hard for me to explain what I did to hide the seam here, watch my video.
You will follow the pattern concept all the way around the apron border, increasing in every stitch along the way. When you get to the beginning chain space where you started, you will add 4 more dc and join in the top of the beginning chain 3.
Next you will add a ruffle across the top of the pocket using the same concept. You can visualize this process in my video here.
optional steps
I did a few more things to further improve my apron. Firstly, you will want to sew the top outer portions of the pocket area closed so the contents don’t dump out. I sewed about 2.5 inches inward on each end to keep it from falling open while still being big enough to hold my bank bag.
You can either sew it with your sewing machine or whip stitch through the motifs to connect the top and bottom portions in this area. I do recommend using your sewing machine, as this won’t stretch over time like yarn will.
Sew pockets inward about 2.5 inches to keep the contents from dumping out.
I also recommend trying it on for size. The apron neck hole is much too big, in my opinion. I cut several inches off and sewed the neck strap back together at a better length for me.
If I had not done this, my pocket would have literally been at my knees (and I am a BIG gal!). I wanted my pocket to be closer to my waist area, so you may wish to cut some length off of the neck strap if you are like me.

This is what my neck area looks like after I cut it to size and sewed it back together.
Your project is complete! I would love to see your finished work! If you want to tag me on IG, I’m @dayscrochetnc. You could also use the hashtag #crochetcraftfairapron to follow what others are making. I can’t wait to see your projects! If you would like to see other versions that I will be making after this publication, be sure to check me out on IG!

Please note that you do not have my permission to sell, share, copy, or duplicate this pattern or use my photos in any way. Please do not use this pattern for a video, blog, or class tutorial. Thank you so much for following these simple rules!
Come join my Facebook group, Crochet for Days! We have a lot of fun and I often offer discounts and coupon codes to my members that I don’t offer anywhere else! Request to join and answer the questions by following this link.
What did you think of this project?
Let me know in the comments!
Happy hooking!
~Dana