
Crochet Boho Wall Hanging

Pin it here!
This wall hanging is all that is lacy and dainty and boho! The open lace work of the crocheted pouch is simple to make yet stunning in appearance.
This post contains affiliate links that help me to continue to post free content. To skip the ads and have a printable pdf, you can find a copy of this pattern in my Etsy and Ravelry shops for a relatively low cost.
The motif itself takes very little time to make and is adjustable in size to fit different sized rings. The piece easily attaches to the wooden ring or embroidery hoop with almost zero sewing!
I decided to put fresh flowers in mine, but you could also put some dried eucalyptus to add a nice smell to your home and add a touch of greenery. Or you could simply put dried flowers inside to add a bit of color.
Several of my testers admitted they didn’t plan to put anything in it at all, so you could certainly leave it empty if you wanted to. You could also change up the look by making the pocket one color and the fringe another. A few of my testers did this and it was stunning!

My tester Yanna Michaelides created this gorgeous version of the Aurora Wall Hanging. I love the 2 tones!
I’d like to think it could also function as a pocket to hold some mail or a sweet card (if you plan to gift it). And of course you could also put faux flowers inside to add a nice appeal without the maintenance of dried flowers.
These would sell very well at vendor markets for around $30-$50 (depending on your area), especially in the warmer months. I could also see this as nice nursery décor, or décor for a wedding.
Enough of my rambling! Let’s make it!
Supplies Needed:
-Approx. 190-200 yds. of any ww cotton size 4
-A size H 5.0 mm hook
-12” (30 cm) wooden hoop/ring (I purchased mine on Amazon here)
-Scissors, tape measure
Terms Used and Abbreviations:
Pattern is written in US terminology.
Chain(s) - ch(s)
Cluster V-Stitch(es) – Cl V-st
Double Crochet - dc
Fasten Off – FO
Front Loop Only – FLO
Half Double Crochet - hdc
Increase - inc
Single Crochet – sc
Skip - sk
Slip Stitch - sl st
Space(s) - sp(s)
Stitch(es) - st(s)
V-Stitch(es) – V-st
Yarn Over – YO
Special Stitches:
V-Stitch: {1 dc, ch 1, 1 dc} in the same st or sp.
Cluster V-Stitch: {3 dc, ch 3, 3 dc} in the same st or sp.
Gauge:
15 dc and 6 rows = 4” (10 cm)
Finished Measurements:
Motif (before adding joining round) measures 11.5” x 6.5” (28 x 17 cm). Length of fringe will depend upon your preference.
Instructions:
Motif (make 2)
Motif is worked in the row from the bottom point upward.
Row 1: Ch 4 (beg ch counts as a dc), {2 dc, ch 3, 3 dc} in 4th ch from hook (Cl V-st made). [1 Cl v-st]
Row 2: Turn, ch 4 (beg ch counts as a dc + ch 1), dc in same st (V-st made), ch 6, sk next 5 dc and ch-3 sp, V-st in last st of row. [2 V-sts, 1 ch-6 sp] For help with this row, see my video here.

Row 3: Turn, ch 3 (beg ch counts as a dc), {2 dc, ch 3, 3 dc} in ch-1 sp (Cl V-st made), hdc down into ch-3 sp 2 rows below and going around ch-6 below, Cl V-st in next ch-1 sp. [2 Cl V-sts, 1 hdc] For help with this row, see my video here.

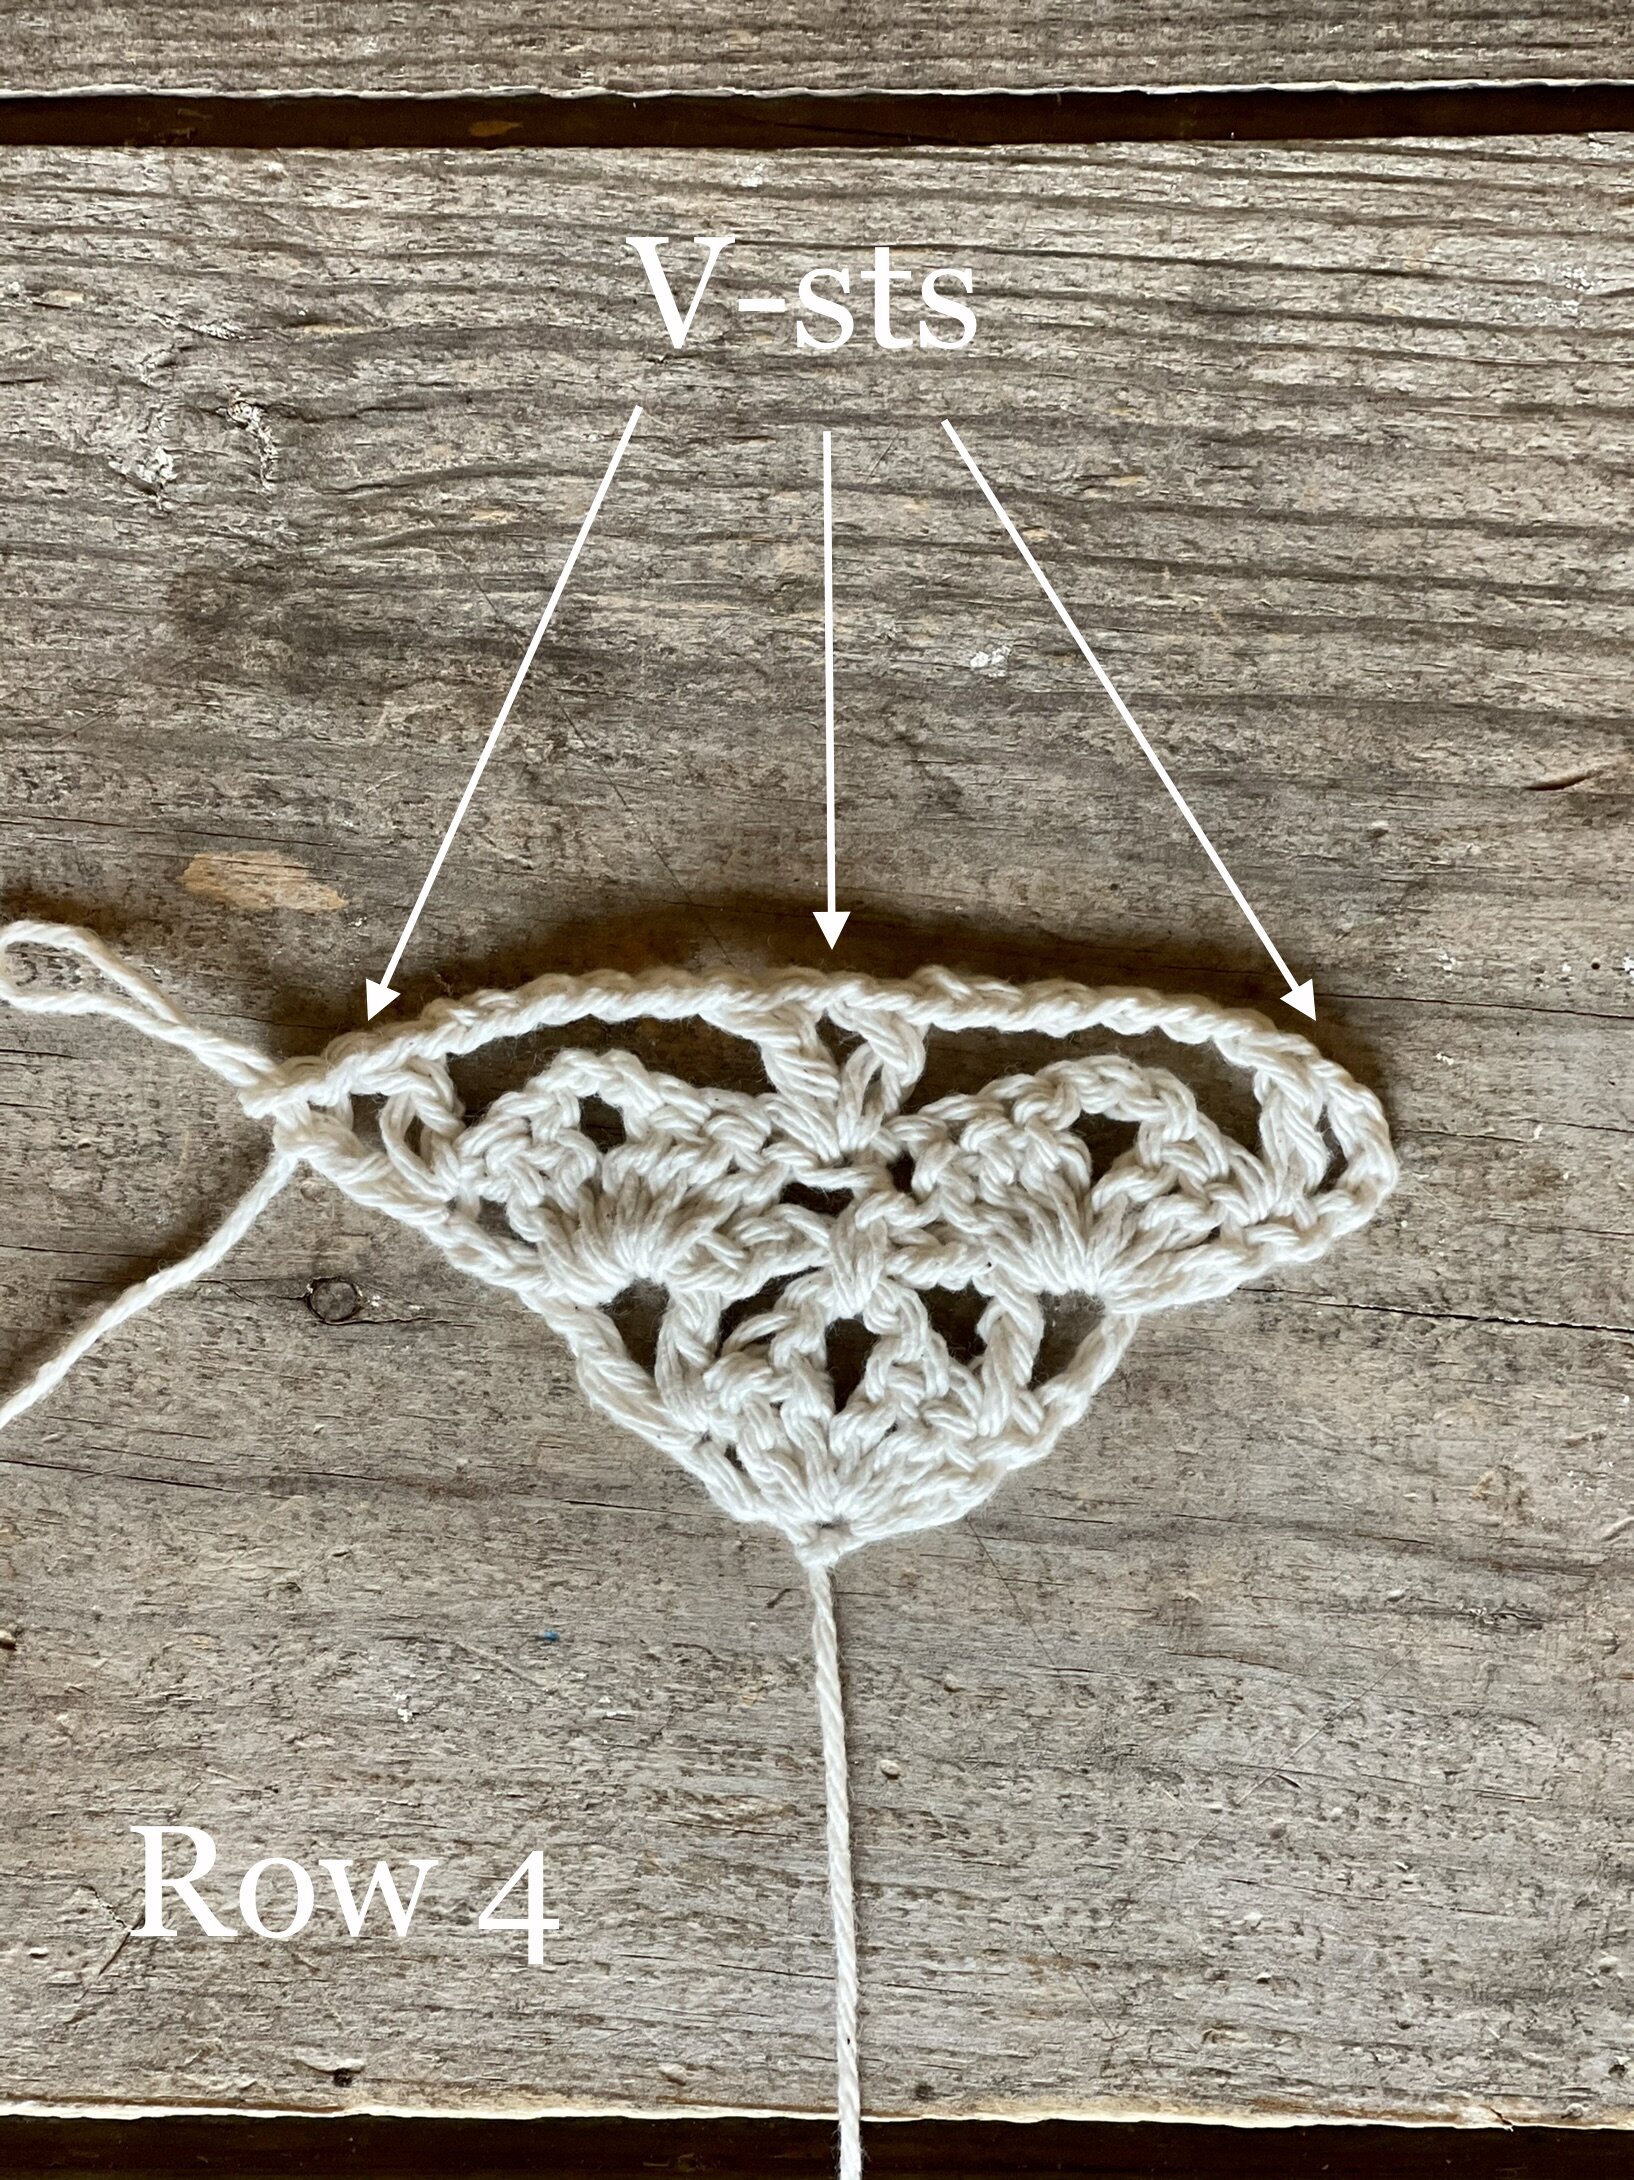
Row 4: Turn, ch 4 (beg ch counts as a dc + ch 1), dc in same st (V-st made), ch 6, sk next 5 dc and ch-3 sp, V-st in next hdc, ch 6, sk next 5 dc and ch-3 sp, V-st in last st of row. [3 V-sts, 2 ch-6 sps] For help with this row, see my video here.
Row 5: Turn, ch 3 (beg ch counts as a dc), {2 dc, ch 3, 3 dc} in ch-1 sp (Cl V-st made), * hdc down into ch-3 sp 2 rows below and going around ch-6 below, Cl V-st in next ch-1 sp; rep from * to end. [3 Cl V-sts, 2 hdc] For help with this row, see my video here.
Gauge Check: Your piece should measure approx. 5” x 3” (13 x 7.5 cm) after finishing row 5.
Row 6: Turn, ch 4 (beg ch counts as a dc + ch 1), dc in same st (V-st made), * ch 6, sk next 5 dc and ch-3 sp, V-st in next hdc; rep from * once more, ch 6, sk next 5 dc and ch-3 sp, V-st in last st of row. [4 V-sts, 3 ch-6 sps] For help with this row, see my video here.
Row 7: Turn, ch 3 (beg ch counts as a dc), {2 dc, ch 3, 3 dc} in ch-1 sp (Cl V-st made), * hdc down into ch-3 sp 2 rows below and going around ch-6 below, Cl V-st in next ch-1 sp; rep from * to end. [4 Cl V-sts, 3 hdc]
Row 8: Turn, ch 4 (beg ch counts as a dc + ch 1), dc in same st (V-st made), * ch 6, sk next 5 dc and ch-3 sp, V-st in next hdc; rep from * twice more, ch 6, sk next 5 dc and ch-3 sp, V-st in last st of row. [5 V-sts, 4 ch-6 sps]
Row 9: Turn, ch 3 (beg ch counts as a dc), {2 dc, ch 3, 3 dc} in ch-1 sp (Cl V-st made), * hdc down into ch-3 sp 2 rows below and going around ch-6 below, Cl V-st in next ch-1 sp; rep from * to end. [5 Cl V-sts, 4 hdc]
Row 10: Turn, ch 4 (beg ch counts as a dc + ch 1), dc in same st (V-st made), ch 2, sc in next ch-3 sp, * ch 2, V-st in next hdc, ch 2, sc in next ch-3 sp; rep from * to end, ch 2, V-st in last st. [6 V-sts, 5 sc] For help with this row, see my video here.
Row 11: Turn, ch 1, make 1 sc for every st and every ch st across. [43 sc]
Row 12: Turn, ch 1, hdc in same st, * ch 1, sk next st, hdc next st; rep from * across. [22 hdc, 21 ch-1 sps]
Row 13: Turn, ch 1, {sc, ch 3, sc} in every ch-1 sp across, sl st in last st. FO first motif, but do not FO second motif. [42 sc and ch-3 sps]

I’ve included a YouTube video tutorial to help with the most difficult portions of this project.
Joining Round
With wrong sides facing together, ch 1 and turn so that you are working down the side of the motif. Going through both motifs at the same time, sc in first 3 rows, then place 3 sc around every dc post down until you reach the beg point. {Sc, ch 2, sc} in beg point at the bottom of the motif. Turn to work up other side of motif, making 3 sc around every dc post and sc in each of last 3 rows. FO and weave in tails. For help with this row, see my video here.
Add Fringe
If you plan to gather your fringe into a knot at the bottom, I wrapped a piece of cardboard 25” wide, 1 piece for every st (and ch sp of point) in the joining round. If you plan to let your fringe hang loose, I recommend doing 2 strands per st of the joining round.
Connect Motif to Ring
To visualize this entire process, see my YouTube video here.
Cut double strands of yarn, approx. 50” long. Using your yarn needle and starting at the front center of the ch-1 sps of Row 12, weave your yarn towards the right corner of the top of the motif. When you reach the side, set your wooden hoop on top of your piece and wrap the yarn around the hoop and towards the back, weaving the yarn into the ch-1 sps of Row 12 in the back motif. Continue weaving in and out of the ch-1 sps until you reach the opposite side, then wrap the yarn around the hoop to the front, finishing your weaving when you reach where you began. Gently tie the ends in a knot several times. You can embellish the tails with beads if you’d like. I added 14 mm and 16 mm beads to the tails and knotted off the bottom to keep them from falling off. This is completely optional.
To further secure your piece to the hoop, cut double strands of yarn approx. 6” in length and whip st the motif (just below Row 12) to the hoop several times. Knot off and weave in the tails to hide. Rep to other side. To visualize this, see my video here.
Add Hanging Loop
You can do this however you please, but I tripled strands of yarn approx. 20” long and attached them as 1 strand to the top of the hoop using the Larks knot. I added a 18 mm bead to the strands to put flush against the hoop, then I separated the 6 strands evenly and braided them for approx. 2” up. Then I knotted the strands off to secure. Going up the tails about 2-3”, I knotted them off again, cutting the tails evenly to look more professional.
Gather Your Fringe
I recommend hanging your piece and combing out the tails prior to gathering your fringe. You do not want to do this with your piece lying flat. I also recommend using a clear rubber band (I got some in the hair section at Walmart) to put around the tails to hold them together so you aren’t constantly worried with keeping the tails straight while you add your gathering knot. I gathered the fringe and added the rubber band just below the wooden hoop.
Once you are satisfied with the placement of your rubber band, gently lay your piece flat and add a gathering knot around the rubber band area to clean it up and hide the rubber band. To visualize the gathering knot, see my YouTube video here.
Make a Smaller Wall Hanging
If you decide to make some smaller, you can simply follow the motif concept and use a smaller hoop. You could even go down a hook size and use a thinner yarn (like size 3 lightweight cotton) so that the motif will be small enough to fit on the hoop. For my smaller one pictured below, I used a 7” wooden hoop and the same materials otherwise. I made the motif rows 1-5, then skipped to rows 10-13 to finish it. Since I left the fringe loose, I added 2 pieces of fringe per st of the joining round. I cut my fringe using a 13” wide piece of cardboard.

Your Aurora Wall Hanging is complete! I would love to see your finished work! If you want to tag me on IG, I’m @dayscrochetnc. You could also follow the hashtag #aurorawallhanging to follow what others are making. I can’t wait to see your projects! If you would like to see other versions that I will be making after this publication, be sure to check me out on IG!
Please note that you do not have my permission to sell, share, copy, translate, or duplicate this pattern or my photos in any way. Please do not use this pattern for a video, blog, or class tutorial. Thank you so much for following these simple rules! Please message me on Facebook or send me an email at dayscrochetnc@gmail.com with any questions.
What will you put in your Aurora Wall Hanging? Let me know in the comments!
Happy Hooking!
~Dana