
The Diamondback Graph
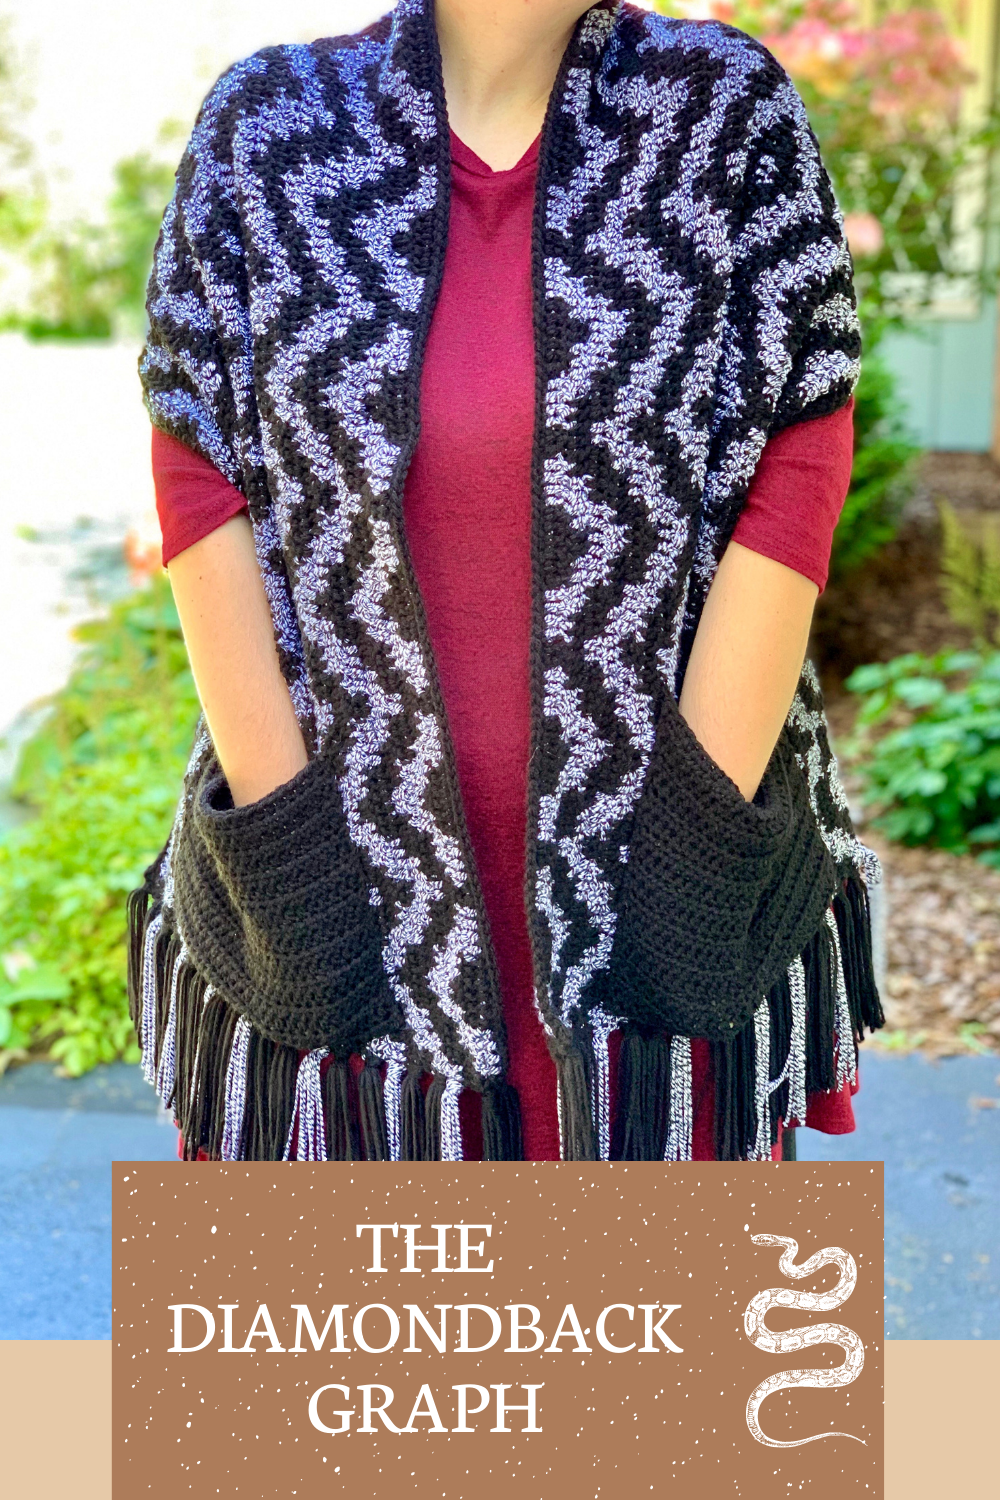
This lovely design came about after I gained inspiration from a folding chair I purchased from Target. It has such a cool geometric design on it. I have stared at it many times trying to figure out how I could translate the gorgeous design into my crochet work. Then it hit me one day-Tapestry Crochet!

I am not one for patience, however, so the use of all single crochet stitches did not appeal to me. I mean, it would be great for a purse or something, but I wanted this to be BIG. Like IN-YO-FACE-BIG. So I decided to go with all double crochet stitches.
I recollected that the Plaid Stitch was all the rage over the last few years, and it hit me. I could use the same concept for this project! And BONUS—instead of carrying 3 strands of yarn throughout, you only have to carry 2 with this project (unless you want to add more colors). Whoop whoop!!
It truly is an easy concept, just a bit slow-going. One thing I will mention is that you really need to keep your tension even in this project, or you will wind up with some odd-looking areas. I have created a YouTube video tutorial to accompany this project to help you grasp the concept.
If you would like to print an Ad-free version of this pattern and the graphs I have created, you can find it for a low cost in my Etsy and Ravelry shops. You can find them here.
Another cool thing about this design is, you can literally use any size yarn and hook you want! You can create the design using the graph indefinitely. So whether you want to make a pocket shawl, a blanket, a table runner, a place mat, a pillow, a purse, a pencil skirt—WHATEVER you want, you totally can with this graph! Since versatility is my FAVORITE thing to achieve with my patterns, I made this one with the-sky-is-the-limit feature! If you can dream it, you can achieve it!
Subscribe to my YouTube Channel!
Supplies Needed
-Yardage will vary based on your project, but for my pocket shawl I used approximately 500 yards of each color (I only used 2 colors). For a blanket, I would triple that amount.
-Hook in size of choice (I used the recommended hook size on the yarn label)
- Yarn needle, scissors, tape measure
Terms Used and Abbreviation
Pattern is written in US terminology.
Back Loop Only - BLO
Begin - beg
Chain(s) - ch(s)
Contrasting Color - CC
Double Crochet - dc
Fasten Off - FO
Front Loop Only - FLO
Main Color - MC
Repeat - Rep
Single Crochet - sc
Slip Stitch - sl st
Stitch(es) - st(s)
Yarn Over – YO
Gauge
Gauge is not really necessary with the use of st multiples, but I’m including my gauge swatch in case your desire is the pocket shawl so you do not have one that is too small or too big. Gauge: 12 dc and 6 rows = 4”
Pattern Notes
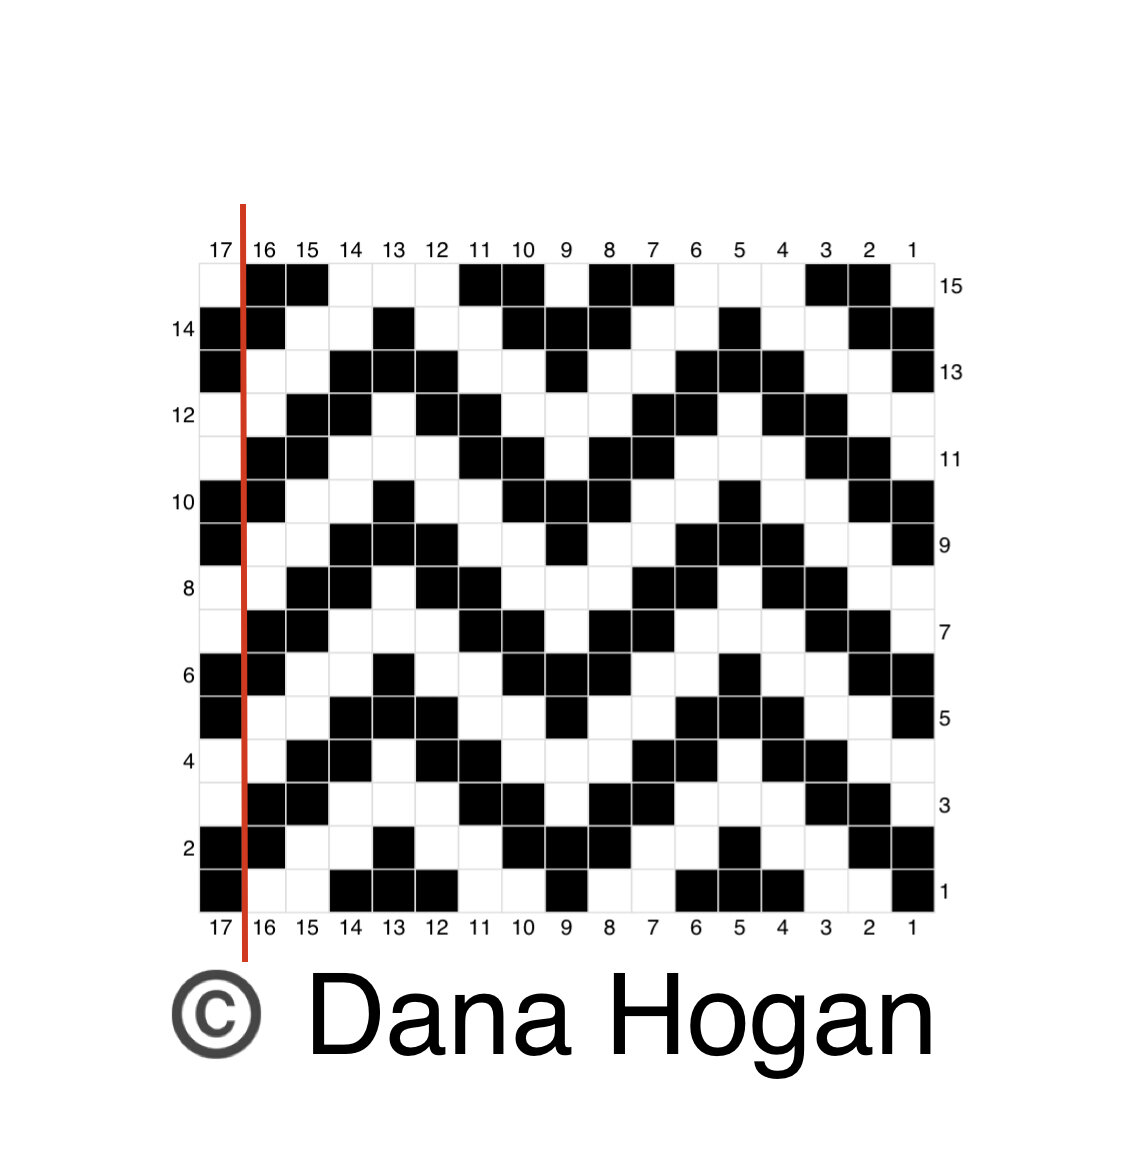
-The piece is worked horizontally from side to side.
-Each horizontal block = 2 dc.
-Each vertical block = 1 row.
-The pattern repeats indefinitely in the horizontal axis, depending on your desired length. You will need to make your foundation row in multiples of 16 +3.
-The pattern repeats every 15 rows in the vertical axis, if you desire a wider piece (i.e. for a blanket).
-The pattern is easiest when working with only 2 colors. You will be carrying your unused color underneath your sts until you need it again. It is a form of tapestry crochet, the same technique used to create the plaid st. I highly recommend watching my YouTube video showing how to change colors and end/begin rows.
-If you desire to use more than 2 colors, you will have to simultaneously carry the colors each row. I recommend printing the grid and filling in the blocks with the desired colors to help you keep track.
-I have found the st pattern looks more neat and distinct when working the sts into the FLO/BLO of the sts. Which loop depends on the right side of your work; you simply place all ribbed sts so that they face the same side. (See photo below)

This photo shows all stitches made in the FLO and BLO to give the right side a ribbed appearance.
-For the Pocket Shawl I recommend making your foundation ch the length of the wearer’s arm span. This will vary greatly from person to person. If your gauge swatch measures mine, your piece should measure approximately 19.5-20” wide.
-For a table runner, I recommend doing one less zig-zag to make it less wide, so repeat rows 5-15 twice instead of 1-15 twice. The average table runner is approximately 72” x 13”.
-The written pattern will be written out assuming all black blocks will be your MC and all white blocks will be your CC.
Instructions
Using your MC, begin by making a ch in multiples of 16+3 until you reach the desired length of your project (for a pocket shawl, you’ll need the wearer’s arm span. For a throw blanket, you’ll want it to be around 60”. For the table runner, 72”—you get the idea.)
Foundation Row: Sc in the 2nd ch from hook and in each ch across.
Row 1: (begin graph pattern) Ch 2 (beg ch 2 will not count as a st from here on out), *dc 2 MC, dc 4 CC, dc 6 MC, dc 4 CC; rep from * to last 2 sts. Dc 2 MC.
Row 2: Ch 2, turn. Working in the BLO, dc 4 MC, *dc 4 CC, dc 2 MC, dc 4 CC, dc 6 MC; rep from * to last 4 sts. Dc 4 MC.
Row 3: Ch 2, turn. Working in the FLO, *dc 2 CC, dc 4 MC, dc 6 CC, dc 4 MC; rep from * to last 2 sts. Dc 2 CC.
Row 4: Ch 2, turn. Working in the BLO, dc 4 CC, *dc 4 MC, dc 2 CC, dc 4 MC, dc 6 CC; rep from * to last 4 sts. Dc 4 CC.
Row 5: Ch 2, turn. Working in the FLO, *dc 2 MC, dc 4 CC, dc 6 MC, dc 4 CC; rep from * to last 2 sts. Dc 2 MC.
Row 6: Ch 2, turn. Working in the BLO, dc 4 MC, *dc 4 CC, dc 2 MC, dc 4 CC, dc 6 MC; rep from * to last 4 sts. Dc 4 MC.
Row 7: Ch 2, turn. Working in the FLO, *dc 2 CC, dc 4 MC, dc 6 CC, dc 4 MC; rep from * to last 2 sts. Dc 2 CC.
Row 8: Ch 2, turn. Working in the BLO, dc 4 CC, *dc 4 MC, dc 2 CC, dc 4 MC, dc 6 CC; rep from * to last 4 sts. Dc 4 CC.
Row 9: Ch 2, turn. Working in the FLO, .*dc 2 MC, dc 4 CC, dc 6 MC, dc 4 CC; rep from * to last 2 sts. Dc 2 MC.
Row 10: Ch 2, turn. Working in the BLO, dc 4 MC, *dc 4 CC, dc 2 MC, dc 4 CC, dc 6 MC; rep from * to last 4 sts. Dc 4 MC.
Row 11: Ch 2, turn. Working in the FLO, *dc 2 CC, dc 4 MC, dc 6 CC, dc 4 MC; rep from * to last 2 sts. Dc 2 CC.
Row 12: Ch 2, turn. Working in the BLO, dc 4 CC, *dc 4 MC, dc 2 CC, dc 4 MC, dc 6 CC; rep from * to last 4 sts. Dc 4 CC.
Row 13: Ch 2, turn. Working in the FLO, *dc 2 MC, dc 4 CC, dc 6 MC, dc 4 CC; rep from * to last 2 sts. Dc 2 MC.
Row 14: Ch 2, turn. Working in the BLO, dc 4 MC, *dc 4 CC, dc 2 MC, dc 4 CC, dc 6 MC; rep from * to last 4 sts. Dc 4 MC.
Row 15: Ch 2, turn. Working in the FLO, *dc 2 CC, dc 4 MC, dc 6 CC, dc 4 MC; rep from * to last 2 sts. Dc 2 CC.
Repeat rows 1-15 until desired width has been reached. For my Pocket Shawl, I completed rows 1-15 twice.
Finishing Row: Ch 1, turn. Using your MC, sc in each st across. FO, weave in tails.
For the pockets to my pocket shawl, I simply made a ch until it measured 9.5” in length. Then I made rows of hdc until it measured 8” wide. I sewed them onto the pocket shawl using the whip stitch.

This photo represents the graph design repeated 4 times horizontally and 2 times vertically. I am including this to help you visualize the pattern repeats.


As you can see here, I repeated the graph 13 times horizontally and 2 times vertically for my pocket shawl. I will note that I am 5’10” and this is a little long for me, so you definitely want to measure your arm span if you desire to make a pocket shawl.

I made this blanket using Bernat Blanket Yarn. It was more challenging because I chose to add a third color in some areas. I repeated the graph 8 times horizontally and 2 times vertically, although I did ADD a zig zag to each side to make it slightly wider. (See photo below)

I hope that you have as much fun with this graph pattern as I did! I hope to eventually make a pencil skirt for myself if I ever get done with all these orders!
I would love to see your finished work! If you want to tag me on IG, I’m @dayscrochetnc. You could also use the tag #diamondbackgraph on IG. I can’t wait to see your projects! If you would like to see other versions that I will be making after this publication, be sure to check me out on IG!