
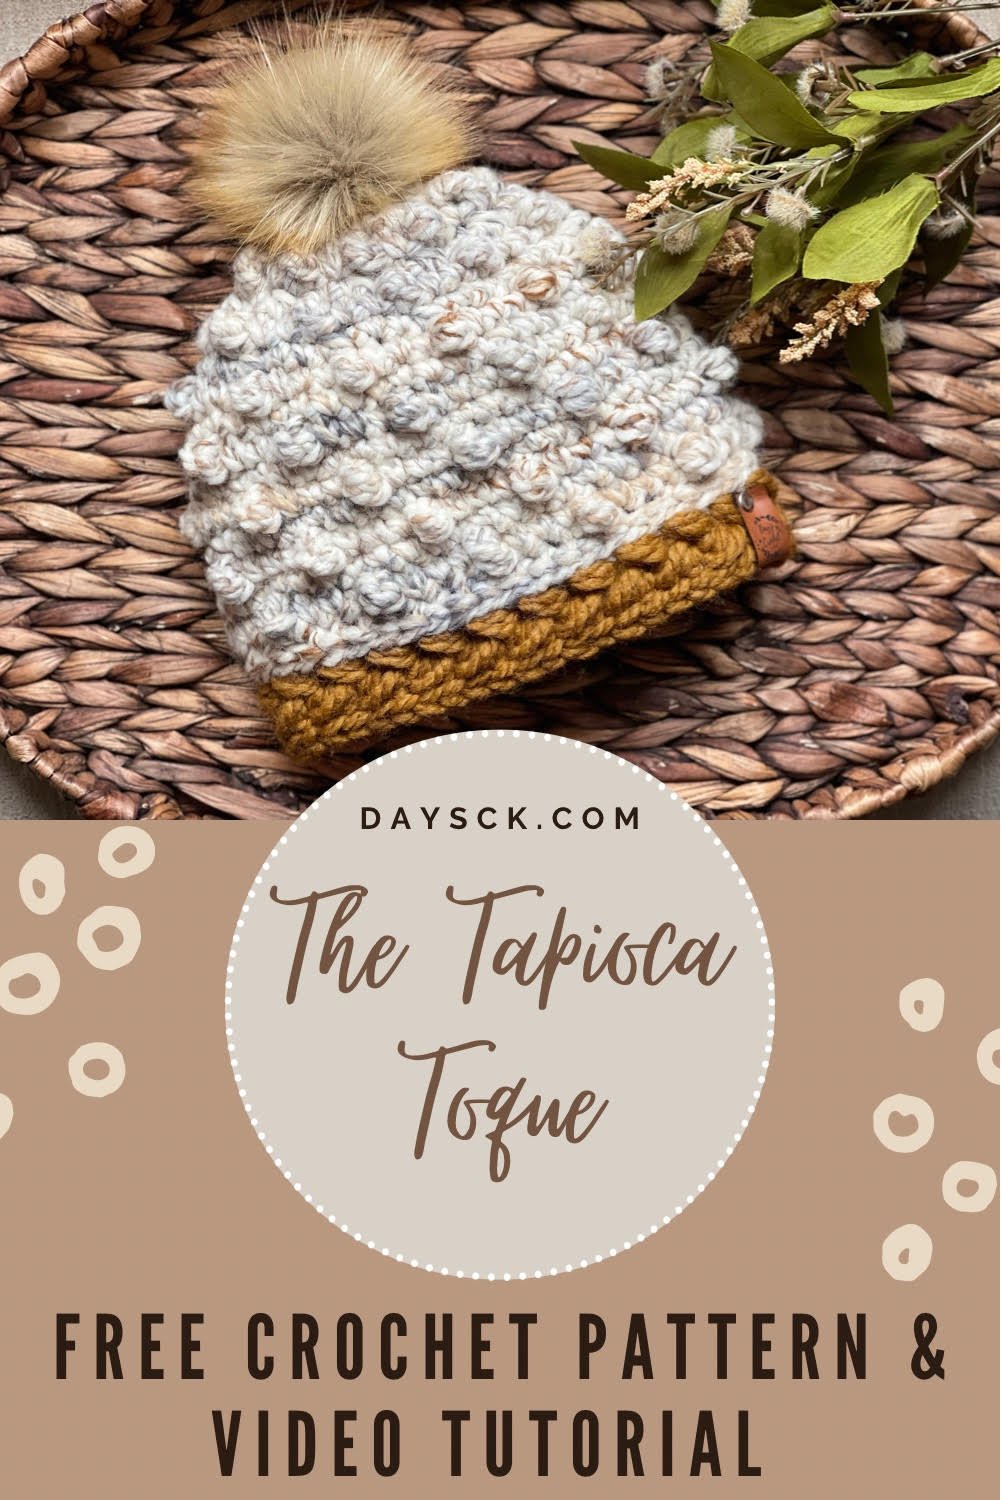
The Tapioca Toque
PIN it here!
Who’s ready for another super chunky, squishy hat?!
If you have ever tried to make texture with super bulky weight yarn, you know it is quite a challenge. I wanted to create a design that delivered on all my favorite vendor market prep criteria, but without being overly bulky. I wanted it to look similar to the bobble stitch, but I knew a bobble stitch was impossible with super bulky weight yarn.
This post may contain affiliate links that help me to continue to post free content. To skip the ads and have a printable pdf of this pattern, you can find it for relatively little cost in my Etsy and Ravelry shops.
This hat uses relatively little yarn and works up very quickly, which are absolute MUSTS if I am intending to make it for my vendor markets this year (yes, I am already prepping for that!). Since I knew I wanted texture without all the bulk, I decided to try to mimic bobble stitches by using single crochet and treble crochet stitches. It gave me just the texture I was looking for!
I staggered the treble stitches so that it wouldn’t be overwhelming, and then I added the slanted puff stitches to the bottom to give it a nice finish. This hat looks pretty as a flat lay, but it is truly SUPER cute when worn. If you decide to take it to your markets, I definitely recommend placing it on a head form (or even on yourself!) so that people can visualize just how cute it is when worn.

Here I am wearing the Fossil/Flax combo
I also recommend using 2 complementing colors for this hat. You could totally make it all one color and it would look great, but having a different band color really makes this design “pop”. My favorite so far has been to use Lion Brand Woolease Thick and Quick in the color Fossil for the hat body and Flax for the hat band.

Pictured is the Fossil and Flax combo
Another favorite combo is Urban Camo for the hat body and Peanut for the hat band. Just look at this gorgeous set I made for a customer!

Pictured is the Urban Camo and Peanut set. I made the cowl using the same pattern concept.
You could also realistically make this hat using a size 5 bulky weight yarn, so if you only have that on hand, be sure to give it a try!
Enough of my rambling! Let’s make it!
Supplies Needed:
-Approx. 106-115 yds of any super bulky weight yarn
-A size L 8.0 mm hook, or size needed to obtain gauge
-Scissors, tape measure, tapestry needle
Terms Used and Abbreviations:
Pattern is written in US terminology.
Back Loop Only - BLO
Beginning - beg
Chain(s) - ch(s)
Fasten Off – FO
Foundation Single Crochet - FSC
Front Loop Only - FLO
Place Marker - PM
Puff Stitch - PS
Repeat - Rep
Single Crochet - sc
Skip(ped) - sk
Slip Stitch - sl st
Space(s) - sp(s)
Stitch(es) - st(s)
Treble Crochet - Tr
Yarn Over - YO
Special Stitches and Terminology:
Foundation Single Crochet:
1. Beg with a slip knot on your crochet hook, then ch 2.
2. Insert your hook into 2nd ch from hook.
3. YO and pull up one loop.
4. YO and pull the yarn through the first loop on your hook. (The yarn you just pulled through is actually a ch st.)
5. YO and pull through both of the loops on your hook to make a sc.
6. Insert your crochet hook into the chain (that you made in step 4).
7. YO and pull up a loop. YO and pull the yarn through the first loop on your hook. (You’ve just made your next ch st.)
8. To finish the second FSC, yarn over and pull through both loops on the hook.
9. Rep steps 6 through 8 until you have the number of sts you need.
To visualize this process, see my video.
Invisible sl st: Remove hook from working loop. Take working yarn tail to back of work. Insert hook from back to front in first st of round and hook working loop onto your hook. Draw working loop to back of work and continue as usual. To visualize this process, see my video.
Invisible Join: Complete your last st of the round as usual. Leaving a longer tail, cut your working yarn. Pull that tail all the way through your last st (without doing the usual ch 1). Thread tail onto a yarn needle. Going under both loops of the first st of the round, take the yarn needle from front to back. Insert your needle from top to bottom of the BLO of your last st of the round. Weave in this tail extremely well since you are not making a knot of any kind to secure. To visualize this, see my video.
Puff Stitch: Insert hook into indicated st, YO and pull up a loop, YO and insert hook into same st, YO and pull up a loop (4 loops on hook), YO, draw through all loops on hook. DO NOT ch 1 like you normally would. To visualize this st, see my video.
Gauge:
9 sc and 9 rows = 4" (10 cm)
Finished Measurements:
Designed to fit an adult head, sized 21-23 (53-58 cm) circumference and 8-8.5" (20-22 cm) in length.
Pattern Notes:
-The first st of every round is the same st as joining.
-You will join with an Invisible sl st throughout this entire pattern (except the last 2 rounds of the hat band).
-Be sure the post of each Tr is poking outwards to the right side of your work.
Instructions:
Hat is worked in the round from the bottom up, adding the band last.
Round 1: Fsc 44. Join with an Invisible sl st. (See pattern notes for joining throughout the rest of this pattern) [44 FSC]
Round 2: Ch 1, sc in first 2 sts, Tr in next st, * sc in next 3 sts, Tr in next st; rep from * to last st, sc in last st. [44 sts]
Round 3: Ch 1, sc in each st around. [44 sc]
Round 4: Ch 1, Tr in first st, sc in next 3 sts, * Tr in next st, sc in next 3 sts; rep to end, join in first Tr. [44 sts]
Round 5: Rep round 3. [44 sts]
Rounds 6-9: Rep rounds 2-5 once more.
Round 10: Rep round 2.
Round 11: Ch 1, sc in first 2 sts, sc2tog, * sc in next 2 sts, sc2tog; rep from * to end. [33 sc]
Round 12: Ch 1, Tr in first st, sc in next 2 sts, * Tr in next st, sc in next 2 sts; rep from * to end, join in first Tr. [33 sts]
Round 13: Ch 1, * sc, sc2tog; rep from * to end. [22 sc]
Round 14: Ch 1, * sc, Tr in next st; rep from * to end. [22 sts] NOTE: Stop here for a messy bun hat.
Round 15: Ch 1, * sc, sc2tog; rep from * to last st, sc in last st. [15 sc]
Round 16: Ch 1, * sc2tog; rep from * to last st, sc in last st. [8 sc]
FO leaving a long tail for cinching hat shut. Using long tail, whip st in the FLO of each st around, bring tail inside hat and weaving in.
Add your band
With same or contrasting color, join in the back most loop of any FSC in round 1. To visualize the specific loop, see my video.
Round 1: Working in the back most loops of each FSC around, ch 2, sc in same st, PM, moving to the right of the sc st PS in next st, moving left again sk next open st, * sc in next st, moving right PS in st you just sk, moving left sk next open st; rep from * to end. Join with an Invisible sl st in first sc. [22 PS, 22 sc] To visualize this round, see my video.
Round 2: Working through both loops in each st around, ch 2, TURN, sc in same st as join, PM, moving to the right of the st PS in next st, moving left again sk next open st, * sc in next st, moving right PS in st you just sk, moving left sk next open st; rep from * to end. Join with an Invisible sl st in first sc. [22 PS, 22 sc] To visualize this round, see my video.
Round 3: Switch to a hook 1-2 sizes larger and very loosely sl st in each st around. Join with an Invisible Join and weave in tails. [44 sl sts] NOTE: If you do not make your sl sts loose, your band will be way too tight. You may want to try it on before you FO.
Your Tapioca Toque is complete! I would love to see your finished work! If you want to tag me on IG, I’m @dayscrochetnc. You could also use the hashtag #Tapiocatoque to follow what others are making. I can’t wait to see your projects! If you would like to see other versions that I will be making after this publication, be sure to check me out on IG!
Please note that you do not have my permission to sell, share, copy, or duplicate this pattern or my photos in any way. Please do not use this pattern for a video, blog, or class tutorial. Thank you so much for following these simple rules! Please message me on Facebook or send me an email at dayscrochetnc@gmail.com with any questions.
Come join my Facebook group, Crochet for Days! We have a lot of fun and I often offer discounts and coupon codes to my members that I don’t offer anywhere else! Request to join and answer the questions by following this link.
Did you enjoy making this project? Let me know in the comments!
Happy Hooking!
~Dana